Do-it-yourself submersible pump repair kid. Repair vibration pumps yourself: detailed instructions
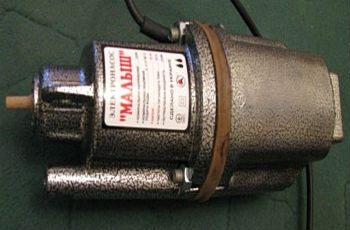
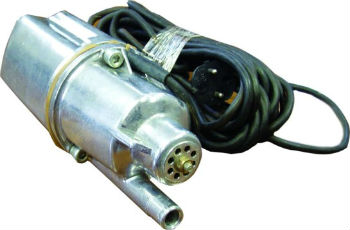
Among the variety on the market vibrating pumps it is the "Kid" that enjoys the greatest popularity. This pump, which has an optimal ratio of price and quality, is built quite reliably, but still a variety of problems with it happen quite often.
In this article, we will consider typical breakdowns that may occur during operation of the “Baby” submersible vibration pump, and repair, which is necessary for their own elimination.
1 The main weaknesses of the pumps "Kid"
The products of this sample have their own design and device features, which naturally affects their weaknesses. They need to be highlighted first.
- Overheat.
"Baby", and any other type of vibration pump, is very problematic transfers work "to dry." This is due to its structural features, namely the presence of a stator, which is extremely prone to overheating. Even short idle work, lasting several minutes, can cause damage to the mechanism.
In addition, there is a cumulative effect - the operation of a water pump in air causes a gradual accumulation of damage in the stator, which greatly reduces its service life.
Over time, the stator wear will reach a critical level, and a short circuit of the turns occurs, as a result of which the pump will be unsuitable for further operation. In order to repair such a breakdown, it is necessary to rewind the coils of the vibration pump with your own hands.
- Fragility of the design.
Another problem of vibration pumps "Kid" is the loss of strength of the joints of the housing during operation. This is the weakness of the technology, which is the basis of their work: constant internal vibration provokes the weakening of threaded joints, which can completely unwind if repairs are not completed in a timely manner.
The biggest problem is loosening the threads on the retainers of the non-return valve and piston of the submersible pump, which cannot be tracked by inspecting the body of the product. So be prepared from time to time to perform preventive tightening of joints submersible pump.
You can also immediately sort through the pump with your own hands immediately after purchase, and replace all the standard nuts on the threaded connections with self-locking nuts, or screw the locknuts on top of the standard ones.
1.1 susceptibility to contamination of the working part
Since the “Malysh” submersible pump belongs to the class of budget devices, in order to reduce the total cost, manufacturers use rubber gaskets to seal the case, which do not have sufficient efficiency.
As a result, accelerated wear of the check valve and piston is observed, which allow water to pass through with a large amount of mechanical impurities. To reduce the negative impact on the submersible pump, a mechanical filter is recommended.
There are two ways to do this: artisanal - put on a nylon stocking on the intake opening, or purchase a store filter. Most often, filters for vibration pumps are offered either as a cylinder made of a porous material, or as a nozzle made of a metal mesh with very small cells.
In principle, both devices provide effective cleaning of large insoluble particles (silt and sand).
Another scourge of budgetary vibration pumps is the capricious non-return valve, on which the pressure level of the water supply depends. Very often, even in a new device coming from the factory, the device has an inaccurate “reverse”. So it makes sense immediately after the purchase to adjust it with your own hands.
To do this, lower the pump into a large container of water (a barrel is suitable) and experiment with tightening the nut on the valve. As soon as you achieve maximum pressure, lock it with a lock nut.
2 Nuances and stages of repair of the pump "BABY"
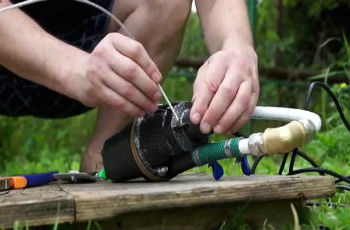
To begin, consider the features of disassembling and assembling the “Baby” submersible pump with your own hands, so they are the beginning and completion of any repair.
To disassemble the device, remove all the screws that connect the body parts in sequence. It is recommended that you do not immediately unscrew one screw, but gradually loosen all the connections a few turns. A vise can be used to secure the pump.
If the pump has already been in operation for a long time, then it is possible that under the influence of water the bolts tightly soured, and no special greases help.
There are two ways out: either use a power screwdriver with a large lever, or carefully saw off the screw caps with a grinder. For the future, it will not hurt to replace regular screws with screws with crosswise slots, which will facilitate further work with threaded joints.
When the repair is completed, and you need to assemble the device, carefully make sure that the holes on the top of the case and the central rubber gasket coincide. Since they are located symmetrically to the edges of the housing, you can easily get confused in the correct position of the gasket.
After assembly, be sure to check if the device is operable in a bucket of water so that you do not have to lower and remove it from the well once again.
2.1 Possible malfunctions of the vibration pump "Kid" and their causes
- The pump does not pump water, but it is buzzing.
There are three possible reasons for this problem: the threaded rod connections are loosened; worn out or valve torn; the stock broke (in this case, do-it-yourself repairs are only possible if you have a spare “Kid” that can be put into parts).
- After connecting the pump from the network, the plugs are knocked out, or the cable is charred.
Reasons: the winding of the armature burned out - rewinding of the coils is necessary; the cable is damaged - cable replacement is necessary.
- "Baby" weakly pumps water.
Reason: unregulated check valve.
- Excessive vibration and overheating of the device.
Reason: damage to the compound (layer of epoxy lining for damping vibration) - it needs to be replaced.
Now we turn to a specific technology of work, which will help us deal with troubles.
2.2 Compound replacement steps
- We disassemble the device.
- We determine the place in which the compound exfoliated from the submersible pump housing. This can be done by lightly tapping with a small hammer on the body. In normal areas, the sound will be deaf, in damaged areas - voiced.
- We remove the assembly with the compound from the housing of the vibration pump.
- With a grinder, we carefully apply a mesh of notches, up to 2 millimeters deep, to the inside of the case. We make the same mesh on the site with the epoxy compound.
- We cover both areas with notches with glue for glass surfaces (any sealant can be used)
- We return the node with the compound to its original position - we fix it and wait until the sealant hardens.
- Putting the case back.
2.3 Stages of rewinding
To rewind the vibrating pump coils, you will need the following materials:
- Copper wire with a diameter of 0.65 m (PETV brand);
- Epoxy resin, plasticizer, hardener.
Instruments:
- Winding machine;
- Soldering iron
- Electric stove;
- Hammer;
- Screwdriver;
- Protective gloves.
It is recommended that the vibration pump be repaired on the street or in a well-ventilated room, since epoxy resin will have to be melted to rewind the coils, and it releases toxic substances, inhalation of which is harmful to the body.

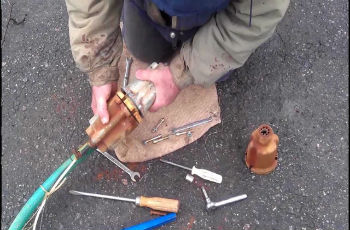
First, we disassemble the submersible pump. We remove the flooded electromagnet from the device. To accomplish this, you will have to melt the epoxy compound.
For this, an electric stove is best suited, on which it is necessary to put the unit body. Wait for the epoxy to warm up to a temperature of 160-170 degrees (this is indicated by a characteristic smoke coming from it - this smoke is toxic, try not to inhale it).
Next, we need a wooden log, about which it will be possible to knock an electromagnet from the case. After the compound has warmed up, put on protective gloves and hit the case against the deck (the electromagnet should look down) until the electromagnet changes its position so that it can be pried off and removed.
While the case is hot, clean it from the remnants of epoxy with a metal brush or a flat screwdriver.
Now you need to hammer the electromagnet out of the coil with a hammer. To do this, use a small wooden block, as a wedge. It is recommended that you do this with an assistant who will hold the coils, and you will knock out. If you fix the coil in a vice, then, most likely, the repair will end on the deformation of its frame.
As soon as the core of the electromagnet is knocked out, unwind the coil and clean its frame of residual epoxy. Place the coil frame on the winder and complete the coil winding (approximately 8 layers). This can be done without a special machine, but it will require much more time.
Connect the beginning and end of the wire to the main part using a soldering iron. We put the electromagnetic core back into the coil frame. We pass the cable to the mains through the seal into the case. We separate the cable and strip its ends by 2-3 cm.
Solder the cable to the beginning of the coil winding. Carefully lower the coils into the housing. To ensure that the coils fit snugly in place, attach a small wooden block to the electromagnetic core, and gently tap them to the desired position.
Now you need to make an epoxy compound. Lock the unit body in a vise. In a metal bowl, mix epoxy, plasticizer and hardener.
Pour the coils to the top edge of the electromagnet with the resulting mixture. Wait 10-15 minutes for the compound to fill all the cracks. If after the epoxy dropped into the voids, its level decreased, then add an additional amount of the mixture.
In order for the compound to completely harden, you need to wait at least 24 hours. After that, assemble the device case. After the repair is completed, try the pump in a bucket of water, you may need to adjust the gap between the armature and the electromagnet.
2.4 Example of repair of the pump "Kid" (video)
Owners of private houses and summer residents are in great demand submersible pumps, which are based on the vibration principle of operation. One of the most common is the "Kid" pump. Such popularity is due to the low price and, at the same time, excellent characteristics and pumping water over fairly large distances. In this article, you will learn a lot about how to fix your own vibrating “Baby” submersible vibration device. The article describes in detail the analysis of a submersible pumping device step by step, as well as the assembly. Description of some requirements and consideration of the most frequent breakdowns pumping equipment "Kid". We will also list the models of this device suitable for different conditions of use. Schemes, photos and videos will help you understand the repair of submersible vibrating pumping devices "Kid" in more detail.
But, like any sophisticated equipment, these pumps require periodic maintenance. Owners of the pumps "Kid" may well carry out repairs with their own hands. With minimal technical ability, most repairs can be done at home.
How does the “Malysh” household submersible pump work?
Submersible vibration pumps typically operate on an inertial basis. That is, the nodes of the device give the mass of fluid oscillatory movements that are transmitted over significant distances. 
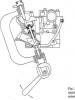
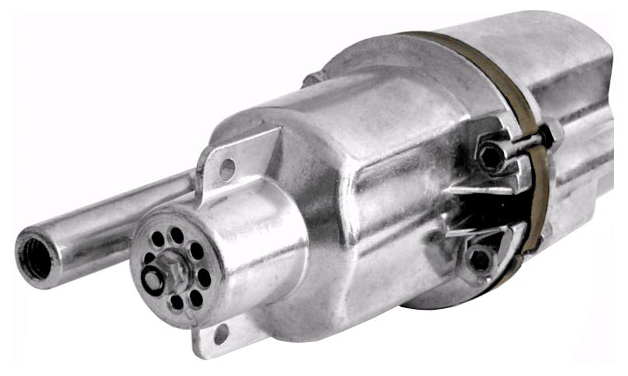
To give this oscillatory movement of fluid, the pump has a vibrator that runs on electromagnetic equipment. All pump components are located in the housing.
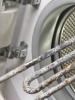
The electromagnetic equipment of "Baby" is a core in the form of the letter "P" and coils with copper winding. Two coils and a core are located in the housing, where they are fixed with a plastic resin (compound). This resin, in addition to fixing the device, isolates the coils and removes excess heat from them. The composition of the compound, in addition to resin, also includes sand with a quartz composition, which provides good thermal conductivity.
The vibrator is a shape of an anchor and is moved by the action of electromagnetic forces with a rod attached to it. In order for the vibrator to return to its original position, a spring of vulcanized rubber is attached to it. 
All the main components of the submersible vibrating pumping device "Kid" are placed in a metal case. At the top of the pump is a valve made of rubber casting. It is the rubber valve that is the pump assembly that most often fails.
How the pump works
To understand how to independently repair and maintain submersible vibration pumping devices, you need to understand the principle of their work.
When connecting the equipment to the electric network, the armature, under the influence of an electromagnetic field, approaches the magnet. After some time, the electromagnetic force of attraction disappears and the shock absorber spring, made of very elastic rubber, returns the anchor to its place. Such fluctuations occur 50 times per second. A piston placed together with an anchor changes its position with the same frequency.
Between the extreme positions of the piston element, a "hydraulic chamber" is formed, into which the two-component mixture (water and air dissolved in it) enters. This mixture, in contrast to a pure liquid, has greater elasticity. New portions of the mixture enter through the inlet valve and are pushed out through the outlet pipe, creating pressure inside the pipe or hose, thereby causing the movement of water. 
Submersible pumps "Kid"
These devices are available in several models.
- "Kid" and "Kid-K" - characterized by suction tubes at the bottom. Model "K" has an additional thermal relay. Due to the fact that the tubes are located at the bottom of the pump, the device is sensitive to contaminated water, and a “dry run” can damage it. Therefore, an additional thermal relay will help to avoid trouble.
- "Kid-M" - is equipped with suction tubes in the upper part. If the pond is shallow, it can be placed in a horizontal position.
- "Kid-Z" - has a compact cross-section, which allows you to put this device in pipes with a diameter of 8 centimeters.

To accommodate vibration pumping devices in wells and boreholes, they are equipped with a nylon cable. Synthetic cable avoids electric shock to the user in case of violation of the tightness of the metal shell of the pumping device.
When connecting the pump, the minimum internal cross-section of the hose or pipe must not be less than 19 millimeters. If these requirements are not observed, the Vibration Pumping Device may overheat and fail. 
- How to disassemble and assemble the pump.
- Before disassembling, it is worth making notches on the body, noting the relative position of the pump parts.
- The screws connecting the parts of the pump housing are removed in series. The screws take turns loosened several turns. To facilitate dismantling, the ledges for the fixing screws on the housing part can be temporarily squeezed with a vice. To simplify subsequent maintenance work with the pump, you can change the screws to similar ones (with an internal Allen key) or bolts with slots on the heads.
- Install the piston disc strictly parallel to its seat, observing the alignment of these nodes. Parallelism is controlled by constant measurement of the caliper distance from the piston edge to the gasket. Lack of parallelism causes a grover on the nut. To adjust the correct position of the grover, a piece of thin foil can be wound under it. Violations of parallelism can be caused by the inclination of the rod, this can be corrected by turning the gasket.
- When assembling the Kid pump, pay attention to whether the holes on the rubber gasket, which are located in the center and in the upper part of the device’s body, coincide. Their relative position can be easily confused, since these nodes of the device are symmetrical.
- Checks the correct operation of the pump by lowering it into a bucket of water. In the absence of a hose, a stream up to 30 cm in height is supplied from the exhaust pipe.
- Fill a new compound.
Detachment of epoxy plastic resin from the device’s body is one of the most frequent breakdowns of the “Kid” model vibration pumping device. This is due to the uneven expansion of the aluminum body and the plastic compound (plastic resin) when heated.

- Checking the correct position of the pump components.
- Make sure the clearance between the piston and the electromagnetic coils is 5 millimeters.
- Check valve condition. It must be flushed freely in both directions and must not have visible damage. For reliability of fixing it is possible to fix its nut additional.
- Make sure that there is no mechanical damage on the piston assembly. Despite its firm hold, the piston should retain some flexibility. To ensure a firm fit on the hub assembly, rivet the nut at the end. For reliability, the nut can be secured additional.
- You can disassemble the sleeve block. Remove the piston assembly, remove the washer, which adjusts the distance between the sleeve and the membrane (there may be several washers). Then remove the stop ring and on the piston unit side, remove the membrane from the durable rubber. You will see an aluminum cylinder. Press the sleeve assembly against the spring and disassemble the cylinder. When reassembling, you can adjust the clearance and make it equal to 5 millimeters. The clearance is changed by adding or removing washers on both sides.
- Disconnect the hose from the device and hang it in a bucket filled with water. We turn on the power and check the voltage in the network - it should be in the range from 220 to 240 volts.
- Turn off the device and drain the water from it.
- Check the patency of the valve (blow it through the mouth). Air should flow into the valve freely, but when the pressure rises, the hole should lock, and you should feel that the piston assembly has moved. When blowing in the opposite direction, the air flow must pass without visible obstacles.
- The setup diagram of the pumping device "Kid".

If the pump is not blown in the forward direction, then this defect can be corrected by lowering the operating voltage of the equipment to 170-200 volts. You can lower the voltage using a transformer.
- "Baby" works, but does not pump water.
- Loosen the locknut in the adjusting screw located at the water intake. Turn the screw, changing the pump efficiency.
- Damage to the rubber swing cuff. You can only see this malfunction after disassembling the device. Outwardly, the knot looks like a pair of saucers located with their bottoms towards each other. Diameter is about 4 centimeters. There are penny cuffs that can be bought at any specialized store.
- Damage to the swinging rod. This is a pretty serious malfunction. It is pressed into a neighboring unit, and it is extremely difficult to change it without special equipment. It is possible to repair this damage if there is a second malfunctioning pump - the donor.
To learn more about the procedure for disassembling, repairing and adjusting the “Baby” submersible vibration devices, you can watch the training video tutorial.
Video Features of using a vibration pump
Video Finalization of the vibration pump "Kid"
Video How to increase the pressure of a vibrating pump
Conclusion
Following all of the above, it will be easier to repair a submersible vibrating pumping device "Kid" and all its modifications, except when you need a pumping device - a donor. But if you follow all the requirements and requirements specified in the data sheet and device instructions, then the number of breakdowns of your submersible vibration pumping equipment will be reduced to zero. Do not forget about regular maintenance of the pumping device, it is necessary to avoid serious damage to the submersible pump. Do not use the pump without immersion in water, this will lead to quick overheating and damage to the pump that cannot be repaired. Try to avoid hitting the pump casing against the walls of the well, this will cause it to break, and you will have to disassemble the device and identify problems, in the worst case, you will have to look for a donor device.
Harvest and Chestnut, Bosna and Dzherelce, Strumok and Aquarius are popular among the inhabitants of the countryside. Comparatively (with foreign manufacturers) the low cost of pressure equipment of domestic production and a high degree of reliability (according to reviews) are attractive for owners of wells.
No less than reliability in terms of performance and price, summer residents are impressed by the possibility of self-repair and maintenance pressure equipment. Indeed, the ability to quickly solve the problem of water in the area due to a pump breakdown without the involvement of third-party specialists is always a plus. And the man and the saved nerves, means and time of his household.
1 Briefly about the device
By and large, the design of all pumping equipment for private use is the same. The pump consists of:
- housing in which there is a hole for water intake;
- electromagnet (dynamo);
- vibrator (electric motor).
For deep wells, pumps with an upper opening for water intake are used, for shallow wells - with a lower or side water intake. However, the lower water intake sins with periodic seizures of bottom impurities in the water from the well.
1.1 Principle of operation
Since all vibration pumps operate on the basis of the principle of inertia, all work is reduced to creating oscillations in the liquid, which is driven by the diaphragm membrane and creates the difference between internal and external pressure. Pressure difference is responsible for pumping water. .
Curving the diaphragm creates vibration. The more oscillating movements the diaphragm creates, the more intensive the cooling of the motor by water should be. Therefore, it is forbidden to use pressure equipment without water entering inside.
Dynamo (as the people call the electromagnet) is:
- steel core;
- two coils of enameled copper wire.
To install the magnet you need to fix the dynamics and coils inside the case. To do this, fill everything with an epoxy compound, which works simultaneously as insulation and removes excess heat from the coils to the housing for speedy cooling.
The composition of the compound must contain an epoxy, plus a hardener and a plasticizer (with the addition of quartz sand). In this case, quartz is simply an additional heat conductor.
The electric motor consists of an anchor with a rod, on which a spring for depreciation and a piston (rubber) are installed. The better the quality of the rubber from which the spring and piston are made, the more reliable and economical the pump.
The direction of the stem is provided by the rubber diaphragm. It divides the two working parts of the apparatus - (electrics and hydraulics) and is attached to the rod by a remote coupling. The most vulnerable point in the design of any pump is a rubber valve that closes the water intake openings.
Vibration of the diaphragm occurs due to the fact that when current enters the motor, the armature begins to be attracted to the magnet and is thrown back by the shock absorber at the moment of polarity reversal (magnetization reversal ).
The higher the frequency of the current, the more oscillations per second make the diaphragm. Moreover, the piston also emits a vibration of the same frequency.
The hydraulic chamber of the pump is the space occupied by the valve and piston. The piston oscillates, the water spring due to the air dissolved and not dissolved in the water, then compressing, then unclenching, and its excess is squeezed out of the hydraulic chamber into the discharge pipe, and then into the hose. Constantly the maximum amount of working fluid in the pressure apparatus is provided by a valve that lets it in and prevents water from pouring back.
The design with a top water intake and a bottom electric drive is a classic line-up of vibration pumps. In them, the engine cools better, and with open suction openings it can work up to seven hours without stopping. Sometimes an overheat sensor (thermal relay) is included.
By the way, pay attention to the material from which the mounting cable is made. It is better that he was from kapron. This cable, unlike a steel cable, does not wipe the eyes of the housing and provides additional protection in case of damage to the current cable.
2 Vibration pump repair
The ability to independently conduct diagnostics and repairs is always useful. Therefore, whatever the cause of the pressure equipment malfunction (draft break, short circuit or valve break), the pump will have to be disassembled first to inspect internal problems.
Unscrew the bolts that hold the case together, inspect the corrosion, tightly stuck bolts can be cut off with a grinder. Beat the compound. Inspect the coil winding and clean all moving parts. If you need to replace the power coil, you can simply knock it out of the case. Check the power cable with a tester, if everything is normal, you can reassemble it.
Ensure that the water flow holes are clearly aligned with the rubber gasket. Tighten the mounting bolts so that the pump operates in the familiar noise and vibration range.
2.1 Causes of malfunctions and their solutions
If it was not possible to limit ourselves to routine inspection and prevention and the reason is carbonization of the cable or overheating of the housing, lack of pressure or increased vibration, then you can repair your vibration pump in ways that are universal for any model of units.
As practice shows, a replaced hose or cable can easily reduce pressure or the level of overheating. Replacing or repairing the magnet will help reduce vibration. Now more about each of the possible problems.
2.2 Humming and low pressure (or lack thereof)
There may be three possible causes of pump humming with low pressure or lack of water:
- the nuts of the rod attached to the shock absorber are loose;
- the worn valve burst;
- the stock broke.

Here, only the problem cannot be solved if the stock is broken or deformed. There is nothing to replace it with. If the problem is in the nuts, tighten them all the way and fix the upper one well. It is with this nut that all the loosening goes. If you had to cut the bolts, replace them with the hexagonal clamping screws. About the "replace valve", I hope they themselves understood - just change it.
2.3 Carbonization of the cable
Carbonized cable or knocking plugs. There are two options: either the anchor winding is burned out, or the tester will show a malfunction of the cable itself. We change what is needed and must earn.
If the cable cannot be changed, because the drive is flooded with a compound, then the wire will have to be twisted by twisting.
2.4 Increased vibration and / or overheating
Enhanced vibration or overheating occurs due to detachment of the magnetic part of the unit. The source of the problem is that the pump was running without water. How to reduce vibration?
You need to get a magnet, grind the grinder with a grid of grooves 2 mm deep and make the same grooves inside the case. We put the magnet on glue and sealant, let it dry and only after that we begin assembly.
2.5 Weak head
If the pump is operating normally, but the pressure could be clearly greater, then the reason is low pressure. To increase the pressure (if the reason is in the vibrator - the gap is too small), you can use washers mounted on it (up to 11 pieces, depending on the model of the device).
2.6 Overview and repair of the vibration pump (video)
We will consider in more detail how to repair the vibration pump with your own hands, and which parts of the structure are most often susceptible to breakage. In total, there can be two reasons for the breakdown of vibration pumps, this is damage to the mechanical and electrical parts.
The main parts of the design
Repair of the mechanical part of the unit will not be difficult, the problem can be done with your own hands. But with the electrical part there are some difficulties and some knowledge will be needed.
Consider the details of a vibration pump, it consists of:
- Aluminum housing.
- Anchors.
- Electromagnet.
- Shock absorber.
- Aperture
- Valve.
- Stock.
- Piston.
The principle of operation of the vibration structure:
- The operation of the vibration unit is carried out due to the oscillations of the piston and the armature. Oscillations are made under the influence of an alternating magnetic field.
- In this case, the piston performs axial movement with an approximate frequency of 50 Hz.
- When the anchor is attracted to the electric magnet, the piston during movement creates a discharge that is enough to open the check valve. As a result of these actions, the working part of the pump is filled with water.
Note. When the anchor is repelled by an electric magnet, the piston begins to move, while the check valve closes. Thus, water is pushed into the pump pipe.
Key Work Elements

Consider the main elements that need to be monitored during the operational period.
Electrical part of the unit:
- This part is a powerful U-shaped electric magnet.
- The magnetic wire is assembled from thin plates. An electric magnet coil is dressed on the wire.
- The coil is wound with a copper wire, with a diameter of 0.6-0.7 mm.
- The core with coils is placed in the aluminum case. Then it is filled with epoxy resin.
Note. The resin without hardener performs two functions at once: it reliably fixes an electric magnet with coils in the case and removes heat from the coils to the structure body during operation.
The mechanical part:
- The vibration part is equipped with a shock absorber, an anchor and a rod.
- A steel rod is pressed into the anchor.
- A shock absorber is put on the rod and fastened with nuts (2 pcs.) M12.
- This is followed by an aluminum sleeve onto which an elastic rubber diaphragm is worn.
- It serves as a separator between the electrical part and the plane under fluid pressure.
- Further, the piston is attached to the rod with an M8 nut.
Note. To prevent damage to the piston, a steel spacer is installed in the inner bore. Special washers are installed on both sides of the piston.
There, where the vibrator is located (the upper part of the body), a check valve is installed, which during operation of the structure closes the opening of the suction part when the water pressure rises.
What are the problems with vibration pumps?

Before you produce a vibration pump, you need to study what kind of malfunctions are most often encountered by users.
Consider the malfunction of structures like:
- Bosna.
- Strumok.
- Dzherelce.
- Neptune.
- Brook.
What is the incorrect operation of the mechanical part of the pump:
| № | Malfunction | Causes | Decision |
| 1. | The pump is pumping very badly or is buzzing, but it is not pumping. | One of the reasons may be the spontaneous unscrewing of the nut on the piston. Such a breakdown, as a result of vibration of the structure. | The solution to the problem will be sticking the end of the rod. In this case, the nut is not so easy to unscrew. |
| 2. | The pump overheats and buzzes violently. | Such a malfunction may be caused by the operation of the pump without pumping fluid. | From overheating, an electromagnet falls out. The gap between the armature and the electric magnet disappears. It is necessary to monitor the liquid level, otherwise a major overhaul. |
| 3. | Low water pressure, pump weakly pumps. | The reason may be a low voltage in the network (less than 200W). | If the voltage is normal, the pump must be disassembled and adjusted. |
| 4. | The pump turns on and the machines break out and plugs burn out. | Most likely, the winding of the electromagnet burned out. | Overhaul. |
How is a vibration pump repaired

A vibration pump, repairing it yourself, is not a simple matter, especially when it comes to its most difficult part - an electric magnet. Therefore, if there is no certainty, it is best to seek specialized help.
So:
- Imagine that at some point you turned on the pump, and the protection in the shield worked.
- Reason: apparent short circuit in the pump itself or in the power cable.
- Here it is necessary to check the pump for the resistance of the winding of the electric magnet.
Note. A normal running pump should have at least 4 ohms.
- You will need a multimeter, they measure the resistance of the winding. If the meter reads 0.5 ohms, then this is a clear short circuit.
- In order to check the cable, it is necessary to bite off the cable from the pump, leaving a piece of about 15 cm. The device is connected, and the cable is checked for a short between the conductors.
- When a short-circuit is detected, another cable is taken, connected to the pump and insulated with electrical tape.
- Superimposed at least 3 layers. Before connecting the cable, check the resistance of the electric magnet.
If the cable is in good condition, and the resistance is small, then the cause is a burned-out winding.
Electromagnet Repair

Repairing an electromagnet is rewinding coils.
To rewind, you will need the following tools:
- Enameled winding wire with a diameter of 0, 65 mm.
- PVC tube with a diameter of 4 mm.
- Soldering iron.
- Epoxy resin
- Hammer.
- Screwdriver.
- Gauntlets.
- Mask.
- Conventional winding machine.
- Electric stove for 1.5 kW.
- Wood chock.
Repair work:
- First you need to remove the magnet from the pump housing.
- To do this, an electric stove is turned on, on which the pump casing is placed and heated.
- You need to heat to a temperature of 150 degrees, you should feel a little smoke from the epoxy.
Tip. The smell is very toxic, so you need to work in a mask or gas mask.
- After that, in thick gauntlets, take the heated pump casing and tap on a wooden deck so that the electric magnet looks down.
- If he did not budge, then you still need to leave him to bask for a few minutes.
- Then try again: if the magnet has moved, it must be pulled out of the housing.
- Next, it is necessary to clean the inside of the case of epoxy with a flat screwdriver.
- Then, with the help of a hammer, the iron of the electromagnet is knocked out of the coils.
- In order to better knock out iron, it must be heated on the tile to the desired temperature.
- Next, the burned windings are unwound and the frame is thoroughly cleaned of residual resin.
- The frame is fixed on the winding machine and the coil is wound. Next, a turn is made into the plug until the entire frame is filled.
- A total of 8 layers is obtained, the last layer should be wound halfway and secured with electrical tape.
- A second coil is wound in the same way. Then, the coil frames are put on the core, and the ends of the windings are stripped from the outside.
- The excess bites off, and a PVC tube is put on the remaining soldered terminal.
- The cable is threaded through a rubber seal into the housing where the electric magnet was flooded.
- The end of the cable is cut, and ends up to 50 mm are stripped.
- The ends of the cable are twisted with the beginning of the windings and soldered. The ends are worn in PVC tubes.
- Then, carefully, the core with the coils are lowered into the housing, while simultaneously pulling the excess cable out.
Tip. So that the electromagnet reliably sits in place, you need to hit it with a hammer on the core through a wooden block.
- Then the pump housing is clamped in a vise and leveled off.
- In an old can, an epoxy resin with a hardener and a plasticizer is mixed.
- Everything is stirred and poured into the coils of an electromagnet. After 15 minutes, all voids are filled with epoxy.
Epoxy hardens within 24 hours. Then we remove the remains and collect the pump. For full information, we recommend watching the training video.