Improving the maintenance and repair of machines in the SEC "homeland" Novozybkovsky district of the Bryansk region
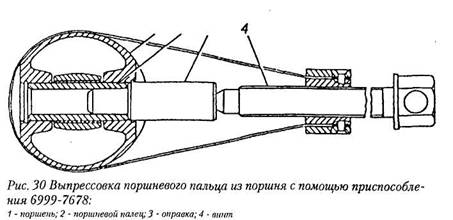
The engine must be thoroughly cleaned of dirt before disassembling. Disassembly of the engine, as well as assembly, is recommended to be carried out on a stand that allows the engine to be installed in positions that provide easy access to all parts during disassembly and assembly. Disassembly and assembly of the engine must be done with a tool of the appropriate size (wrenches, pullers, accessories), working surface which must be in good condition. With an individual method of repair, parts suitable for further work should be installed in their original places. To do this, such parts as pistons, piston pins, piston rings, connecting rods, liners, valves, hydraulic pushers, etc., when removing them from the engine, must be marked in any way that does not cause damage to the parts (punching, labeling, attaching tags, etc.) , or lay them on racks with numbered compartments in the order corresponding to their location on the engine. For an impersonal method of engine repair, remember that the rods of the connecting rods with the rods, the covers of the main bearings with the cylinder block, the covers of the distributor shafts with a cylinder head are processed in the assembly and therefore they must be understaffed. The crankshaft, flywheel and clutch are balanced separately at the factory, therefore they are interchangeable. The clutch housing is processed separately from the cylinder block and is also interchangeable. In hydraulic tensioners, dismantling the housing with the plunger is not allowed. Before proceeding with disassembling the main engine mechanisms, it is necessary to: remove the clutch release fork; remove the gearbox from the engine; remove attachments: starter, drive belt, generator, sensors; remove the clutch housing. Install the engine on a stand. Further disassembly of the engine is recommended in the following sequence: disconnect the hoses under heating of the throttle branch pipe; disconnect the crankcase ventilation hoses; disconnect the idle speed hoses: remove the idle speed regulator; disconnect the high voltage wires with ferrules from the spark plugs; unscrew the spark plugs; remove the oil filter (if it is replaced); remove the oil level gauge; remove the intake pipe assembly with the receiver and the fuel line of the engine; remove the exhaust manifold; remove the valve cover with ignition coils; remove the front cover of the cylinder head; remove the upper and middle chain dampers; remove the cover of the upper chain tensioner and hydraulic tensioner; remove the bolt fasten the intake camshaft sprockets while holding the camshaft with a key to prevent turning, remove the sprocket; remove the camshaft covers, for which, unscrew the bolts securing all covers to 2-3 orota, then repeat this operation until the load on the cams from the valve springs is removed. This will prevent damage to the bearing surfaces and breakage of the covers. Check the labels on the covers; remove the chain from the exhaust camshaft sprocket and take out the camshafts; loosen the thermostat housing hose clamps; pick up the heater; remove the thermostat housing assembly; remove the cylinder head. If there is no need to disassemble and repair the thermostat housing, the intake and exhaust gas pipelines and the cylinder head, the cylinder head can be removed together with these units; using a suction cup or a magnet, remove the hydraulic pushers from the head and put them in order; using the tool ЗМ7814-5119 ( Fig. 28) to dismantle the valve springs. In order for the valve spring plate to come off the crackers, after compressing the springs, lightly hit the handle of the clamp bracket with the hammer handle; remove the valves; mark the valves according to their location; remove the clutch housing booster; remove the oil sump, oil pump and take out the hexagonal roller of the oil pump drive; remove the connecting rod caps along with the bushings; remove the pistons together with the connecting rods and bushings. Before disassembling the connecting rod-piston group, it is necessary to once again check the correctness of the marks on the connecting rods and their covers, as well as their compliance with the serial numbers of the cylinders; 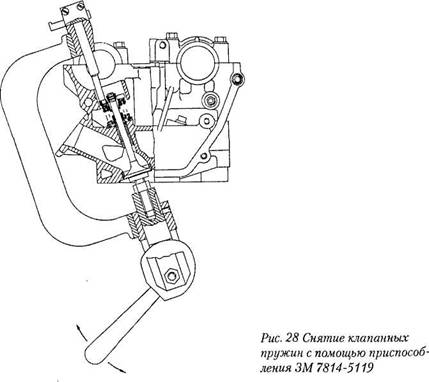 Unscrew the coupling bolt (or ratchet) from the front end of the crankshaft and remove it with the toothed washer; use the 6999-7697 tool to remove the crankshaft pulley; remove the lower chain tensioner cover and hydraulic tensioner; remove the water pump; remove the tensioner roller; remove the chain cover . If there is no need to disassemble and repair the water pump and tension roller, the chain cover can be removed with these nodes; unscrew the bolts securing the sprocket for the intermediate shaft, remove the sprocket and chain; unscrew the bolts of the intermediate shaft flange and remove the flange: remove the oil pump drive cover; unscrew remove the nut and remove the drive gear of the oil pump drive from the intermediate shaft; remove the intermediate shaft; remove the oil pump drive roller with driven gear; remove the clutch and flywheel; remove the back cover from the rubber sleeve ; unscrew bolts of fastening of covers of radical bearings of a crankshaft; with a stripper 6999-7683 remove covers of radical bearings of a crankshaft together with loose leaves and persistent half washers, having checked up correctness of labels on covers (1, 2, 4, 5); take out a crankshaft assembled with bushing and sprocket; remove the bushing and sprocket from the crankshaft; disassemble the cylinder-piston group; remove using the tool 6999-7675 (fig. 29) the piston rings from the pistons; remove the retaining rings from the pistons; press out using the tool 6999-7678 and the mandrel with sub 6999-7927 pendulum piston pins of the pistons (Fig. thirty).
 After disassembling the engine, all its parts must be washed, cleaned of carbon deposits and tarry deposits. The bonding surfaces of the cylinder block, cylinder heads and caps should be cleaned of gaskets and sealant that have been stuck and torn during disassembly. Do not wash parts made of aluminum alloys in alkaline solutions (cylinder heads, pistons, caps, etc.), since these solutions corrode aluminum.
To save even more, we can look for an engine from a broken car or, for example, from the so-called English, or cars coming from the British Isles. If the engines in both markets are the same and their fixing positions are consistent, but the attachment points for accessories such as the intake manifold or air filter housing may vary. Parts such as starter, alternator and cooler will fit if their mounting brackets are placed in the same places.
When buying an engine, it is worth checking the condition of your equipment, because when you buy more parts, you can agree on the price of the equipment. If, for example, the recipient’s cooler is in much worse condition, you should consider buying it complete with the engine.
The developed process is designed to disassemble the KamAZ-740 engine using the stand under development.
Before disassembling the engine, it must be cleaned of dirt and oil, washed with kerosene or a degreasing solution for drying, and blown with compressed air.
Parts and assemblies removed from the engine should be placed in specially prepared containers in which they must again return to assembly after washing, checking and eliminating malfunctions.
When replacing an engine, it is also worth investing in new parts and replacement and working fluids such as engine oil, gear oil and coolant. You should not consider buying an entire car for parts, although this may be the cheapest option out of the above. If such a vehicle does not have the right to register, a fine for storing a car, which according to the law is a waste of 10,000 zlotys, and the customs may also require an excise tax if this vehicle was presented.
Before installing the engine on a stand, the gearbox must be removed from the engine. To do this, unscrew the gearbox mounting bolts with a ring wrench, disconnect the gearbox from the clutch housing with a mounting blade and, swinging, remove it with a hoist.
Install the engine on the intermediate support.It is necessary to prepare the engine for installation on a stand: it is necessary to remove the oil filters and exhaust manifolds.
Does your engine burn a lot of oil, lose power, and maybe it makes strange noises? In this case, the best solution may be to replace it with an effective model. This is a very popular practice among owners of old cars. Of course, new real estate costs, but buying a used one can be a really good deal. When to change, where to buy and how much?
In many cases, this is simply the only reasonable solution, even if repairs are cheaper. This is mainly due to the fact that only one insulated element is rarely damaged or worn in the engine. Usually one mistake causes an avalanche of others. In addition, it often happens that buying is cheaper than replacing several parts.
Cylinder Head Covers.Remove the two bolts and gently tap the lid to move it.
Remove fan impeller.Unscrew the nut from the fluid coupling shaft, remove the fan.
Outlet pipelines. Unscrew nuts securing exhaust pipe and remove it with gasket. If the gasket is burnt to the plane of the cylinder head, it must be carefully separated with a screwdriver. Repeat the operation with the second pipeline.
The problem also lies in the search for high-quality spare parts, which usually do not correspond to each other, in relation to hundredths of a millimeter, as is the case with common whole engines. This means that the equipment after repair can work loudly and at the same time will be consumed at high speed.
The first thing that should attract our attention is, of course, too much oil burning. Our special care must be additionally caused by dense smoke that escapes from the exhaust pipe. It is really hard not to notice. In the case of diesel engines, we may have a problem with the ignition on cold days. Very often, the cause of this is the poor condition of the pistons and pins. We can also hear tapping from the depths of the engine.
Oil filters. Unscrew the oil pressure gauge sensor from the filter housing. Separate the drain chute. Remove the bolts securing the filter housing and remove from the engine together with the gasket.
Power steering pump. Unscrew nuts securing tension bracket to cylinder head, remove pump assembly with bracket.
A common malfunction is a break in the synchronization drive. This is a malfunction that should not be repaired, since it also causes the valves to bend the pistons, capturing the crankshaft bolts and many other consequences. Such a set of adverse events makes the only way, of course, be to replace the engine. We often lead to such consequences with too rare exchanges.
Before we make the right purchase of an engine, we need to check what exactly our drive has. If in doubt, you should seek help from a mechanic or another specialist who specializes in car repair. Few people understand that if you choose an engine, you have two choices. The first is a complete engine containing all the elements. This is certainly a more expensive solution, but thanks to this we will have spare parts that may be useful in the future. This is especially important for diesel engines.
Generator. Unscrew the nut securing the exhaust bar. Unscrew the nuts securing the generator to the bracket and, having released the generator pulley from the drive belt, remove the generator and the generator drive belt.
Remove the generator brackets from the engine by unscrewing their mounting bolts.
High pressure fuel lines.Unscrew the nuts securing the fuel lines to the high pressure fuel pump and injectors.
However, the bare engine does not contain anything that can be easily removed from its inside. No parts such as power supplies or power steering pumps. If many of these elements are in good working condition, then this is an option for us, because we will even pay half the price for the full engine for the “bare” version. Which of these versions we should choose about, let's decide with the mechanic.
Of course, engine prices vary, depending on which model and power we are looking for. An average full engine can be bought for 3-4 thousand zlotys. They may not be too low, but it is worth noting that buying a new car or buying such a car will many times exceed these prices. The quality of driving after replacing the drive unit must be significantly improved, as well as the state of our safety.
Mounting brackets and nozzles.Unscrew nuts securing brackets and remove nozzles.
Compressor.Unscrew the union nuts for the pipelines supplying coolant to the compressor of the inlet pipe and draining the liquid from the compressor to the water pump, remove the pipelines.
Unscrew the union nuts for the pipelines - supplying oil to the compressor from the oil line of the cylinder block and diverting oil from the compressor to the engine crankcase - remove the pipelines. Unscrew bolts securing compressor to bracket; remove compressor. To remove the bracket from the engine, unscrew the nuts that secure the bracket to the cylinder head.
Turbocharger.Remove four bolts, remove turbocharger.
Fine fuel filter. To disconnect a tube from the fuel pump, to turn off nuts of fastening of an arm and to remove the filter assembled with an arm and tubes.
Intake manifold. Unscrew the nuts securing the pipeline to the cylinder heads with a socket wrench and, gently tapping with a hammer, remove the pipeline manually. Remove the two gaskets and two rubber seals, carefully separating them from the contact planes. Unscrew the coolant temperature gauge sensor from the socket.
Install the engine on a stand.Having hooked the hoist for the eyebolts of the engine, bring the engine to the stand and, having combined the tidal holes and the fixtures of the stand, install the engine on the stand.
Removing the engine oil pan, oil trap and oil pump receiver. Turn the engine on the stand 90 °. Unscrew the pan securing bolts with a socket wrench and remove it manually from the engine. Remove the pan gasket, carefully separating it with a screwdriver from the plane of the cylinder block. Remove the oil catcher retaining bolts and remove it.
Oil pump assembly.Remove the oil pump assembly with suction and discharge pipes and unscrew the drain valve of the lubrication system from the cylinder block.
Timing gear cover.Having bent the lock washer off the side of the ratchet, unscrew the ratchet with a socket wrench, locking the crankshaft using a wooden mandrel, placed under the shaft crank.
After removing the pulley, remove the key from the groove of the crankshaft.
To remove the cover of the timing gears, use the socket wrench to unscrew the cover fastening bolts and remove it by lightly tapping with a wooden hammer, remove the cover gasket, carefully separating it from the plane of the cylinder block.
Assembled Pistons. Unscrew the nuts of the connecting rod bolts, unscrew the connecting rod nuts with a socket wrench, check the marking of the covers and connecting rods, apply it with a core if necessary, then remove the covers from the connecting rods, tapping the covers slightly with a hammer, remove the connecting rod bolts.
Turn the engine 90 ° on the stand, take out the pistons from the cylinders one by one, install the connecting rod caps in their places and fix them with bolts and nuts, screwing them by hand.
Crankshaft. Unscrew the bolts securing the covers of the main bearings with a socket wrench and remove them, check the marking of the covers and, if necessary, apply it with a core, then remove the covers together with the inserts, and the back cover together with the rubber and wooden seals. Remove the oil deflector from the shaft. Remove the crankshaft with flywheel and clutch assembly using the hoist. Remove the main bearing shells, arrange them in numerical order. Remove the rear main bearing oil seal. Replace the main bearing caps.
Camshaft. To remove the camshaft from the engine block, it is necessary to remove the axles of the rocker arm with rocker arms assembly, remove the rods and pushers, unscrew the two bolts securing the flange through the holes in the gear, and remove the camshaft. When removing the shaft, special care must be taken not to hit the camshaft bearings with the tops of the cams and not damage their surfaces. The shaft is taken out complete with a cam gear and a flange.
Axis rocker arm, rods and pushers. Unscrew the four bolts of the yokes of the rocker arms on each cylinder head with a socket wrench, remove the axle assembly with the rocker arms and struts, remove the pusher rods, and remove the valve pushers from the cylinder block socket with a metal rod, the end of which is bent at right angles. To remove the rocker arms and racks, it is necessary to unclip one end of the axis and remove from it: the first flat washer, spacer spring washer, the second flat washer, the first rocker arm, the rocker arm, the second rocker arm, the spring, then remove all other rockers, racks and springs.
Remove cylinder liners.Using a puller, press out the sleeves and remove the o-rings.