Draw a winter evening with a pencil. Winter drawing with children, a selection. Russian winter, ideas for drawing
This winter there was a lot of snow quite often and I managed to take some interesting pictures in the park, where the spruce trees were simply covered with snow. The feeling that you were in a fairy tale. I was filming then on a cell phone, but the quality of the photo does not prevent us from conveying the beauty of the snow-covered trees. Today we will have in the lesson painting winter landscape with a simple pencil. best done on white paper to accentuate the whiteness of the snow. The main thing to remember here. In our photo-reference, the basic laws are clearly visible:
If there are no special problems with linear perspective, because we see that the trees have different sizes in the photo due to their distance from the observer, then to convey an aerial perspective, I recommend taking several simple pencils, of varying degrees of rigidity. I chose the following pencils - 4H, H, HB, 4B.
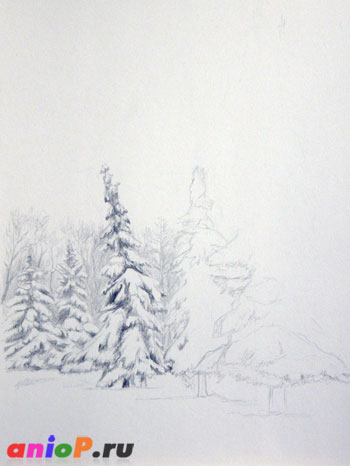
To construct the sketch, I took the hardest 4H pencil and sketched the main lines, relative to which I will build landscape composition... The photo had to be darkened for you to see these lines. But in fact, keep in mind that these are very thin, barely visible lines:


The drawing principle is the same for all trees - look at the photo and determine the light contours of the snow. In approximately the same form, transfer these contours on paper, and paint over all the dark places with a pencil. Do not aim for excessive detail, otherwise you can get bogged down in the smallest details. Those. It is not at all necessary to render snowballs exactly as in the photo, you can show them a little differently by looking at the nature of the arrangement of snow and branches from under the snow. Actually, I will immediately tell you the plan for drawing a winter landscape - with the toughest pencil we draw the farthest and lightest objects, and with the softest - the nearest objects, where you can see many dark areas. Let's take a closer look at this next.
The next step is to draw the third spruce on the left with a 4H pencil and work through the darkest areas on all the trees drawn with a hardness H pencil. This will highlight the dark areas in the trees, which will nevertheless still be lighter than the shadow areas in the foreground trees. On the third spruce on the left, we re-pass the shadows with an HB pencil.

Do not forget about the background, where you can see the branches of deciduous trees. They are drawn mainly with pencils 4H, N. Next, we sketch out the light outlines of the remaining trees:
And by analogy, we draw the fourth tree:

After that, a lot of work lies ahead - the largest and fluffiest spruce. Here it is most convenient to first determine the approximate contours of the snow clods, and then work out the shadow areas. At the same time, I tried to make the strokes thicker than on other trees, because in the foreground, individual spruce branches are already visible here and there. We also pay special attention to the nature of the growth of branches. The upper branches look up, and the lower ones are lowered down under the weight of the snow. We go through the first layer with the HB pencil, while in some places we slightly shade the contours of the snow clods to show their volume.

Go through the second layer with a 4B pencil and select all the dark areas and the trunk of the tree. The final step is to slightly show the shadows under each tree, softening them as we remove them. Here is our winter landscape and ready.
All children and even adults love winter. This time of year envelops everyone with its own fabulous atmosphere. The winter landscape is mesmerizing: trees silvered with snow and frost, soft snow falling. What could be more beautiful? How to draw winter and transfer this fabulous mood to paper without too many problems? This can be done by both an experienced and a novice artist.
Thinking through every step
How to draw winter in stages, namely a winter landscape with paints and a pencil, we will consider in our article. Let's start with the one painted in gouache.
Before drawing winter with paints, we do on a sheet of paper. Arrange the house, trees and courtyard buildings so as to fill in the drawing.
Draw the background. It will be more convenient if we start from the background, gradually moving to the foreground. Compliance with such a rule is not at all a prerequisite. Some artists, on the contrary, find it more convenient to paint from the foreground, gradually moving to distant objects and the background. Our future landscape will be flooded with sunlight, so to add brightness and fabulousness to the picture, we draw the background in warm tones.

Elements of the picture
On the left side, we sketch out a thick one.To do this, mix three paint colors on the palette: yellow, blue and a little black.
The main element in the picture will be a wooden house. To achieve the most natural color for drawing logs, you also need to mix three colors on the palette: yellow, brown and ocher. We use a bristle brush, with which we make strokes along the entire length of the logs, painting them unevenly for a more natural look of the tree.
After applying the main color, you do not need to wait for the paint to dry, but you should immediately start applying the shadow on the underside of the logs. In order for the transitions not to be striking and not too sharp, it is advisable to mix black paint with ocher.
How to draw a distant forest
In the paint that we used to draw the background, add more white and yellow to make the forest appear a little lighter than the background itself.
So gradually we got to. To achieve greater naturalness and color similarity, we draw tree trunks by mixing brown, green and black paints. Apply the strokes in several layers, without waiting for the previous layer to dry.
Draw the trunks of all trees using the same principle. After the paint dries, be sure to lighten some areas on the bark, making white highlights from the bright sun. And paint over the shadow side (the back wall of the house) with red-brown color.

Thin strokes
Until the paint is completely dry, you can use a thin brush to outline the texture of the logs and paint over the window frames with yellow paint. Although the drawing is sunny, bright, but the time on it is already afternoon, when the sun gradually sets. It seems that the street is still light, but the light has already been turned on in the house. The glare in the window can be painted with white gouache, and closer to the frame we darken the glass a little.
Moving on to details
We take a bristle brush and use point movements to make out the dark bushes around the wooden house. By the same principle, we add white bushes covered with snow.
From a white hillock in a gray-blue color we outline a ski track. Lighten the lower part of each strip with white paint, and darken the upper edge.
The next step is to draw thin branches on the trees. To do this, take the thinnest brush and paint the snow-covered branches with white paint.
We will decorate the foreground of the picture with a small fir tree. The picture shows that the sun is shining in our direction, so the spruce is facing us with its shadow side. We mix blue, black, green, white and a little yellow paint and paint over the dense branches of the spruce. Do not forget to show the shadow under the tree. We mark places in the snow with black and green paint, from where fir branches peep out.
In order to outline light highlights on the tree, draw them with blue and white gouache.
And the last step
The last step in the step-by-step course "How to draw a winter landscape" will be to create an imitation of snowfall. For this we need a hard, large brush and white paint. We spray the drawing with paint with a brush, the main thing is not to overdo it, so as not to create a blizzard instead of a light snowfall.

Street in the village in pencil
Now let's look at how to draw winter with pencils. This tutorial is not intended for beginners, but artists with little experience will be able to master it. Let's try to draw a snow-covered street in a village in winter. The lesson will explain how to draw winter in stages with a pencil.
Execution stages
First of all, we outline the location of the house, trees. This is done with light movements.
Moving on to shading the sky. Better to do this with a hard pencil.
Gradually move on to drawing the house, the fence around it and the trees. We draw up the trees in the foreground in more detail, draw the bark and branches.
Places where there are drifts with snow, do not shade with a pencil, but leave them empty.
In the picture, the light falls from the right, so do not forget to add shadows and correctly decorate the walls of the house. It is lighter where the sun is falling, and darker on the shadow side (side wall). To increase the brightness of the drawing, use softer pencils. In place of the branches covered with snow, while we leave clean places.
Details
We turn to a more detailed drawing and add small branches. We draw a pole with power lines near the house, paint it well and do not forget about the shadow. On the right side we depict another pillar and behind it in the background additional buildings, as in any rural courtyard.
Draw the tree in the foreground more clearly and place snow caps on it. With a hard pencil, paint over additional buildings in the background. Don't forget to place piles of snow on the trees. You can practice and learn a little in winter.

Finishing touches
After all, the picture has already become quite clear. Now all that remains is to add the final touches. We break the snow caps on the trees with thin branches. Lightly paint over the snow lying on the road, leaving only small illuminated segments, highlights.
The lesson "How to draw winter with a pencil" has come to an end. In the cold season, most often adults and children spend their leisure time at home. There is a lot of free time to do drawing with your children. You can try to make some winter-themed drawings.
Volumetric snow paint
For this technique, mix PVA glue and shaving foam in equal amounts. With this paint, you can paint airy snow, a volumetric snowman, a beautiful winter landscape. To begin with, we outline the contours of the future drawing with a pencil, and after that we apply paint. This painting can be decorated with sparkles before it hardens. The drawing is ready.

Falling snow
If the house is littered with the remnants of bubble wrap, which is wrapped in stores when selling equipment, it can be used for children's drawings. We apply white and blue paints to the bubbles and apply it to the finished landscape. The resulting dots are very much like falling snow.
Fancy paint
How to paint winter using a normal winter landscape salt will add a fabulous beauty. It is sprinkled with the not yet dried drawing, and when it dries up, they simply shake off the remnants of the salt. The drawing is ready. You can admire the sparkling snowflakes formed from the salt particles.
Winter is a "magical" time, which children and adults associate with a fabulous time, gifts, holidays and fun. Drawing winter is not only easy but also fun. Each time, depicting a new storyline (a snow-covered house in the forest, a squirrel on a Christmas tree or falling snowflakes), you plunge into the world of your drawing and partially dissolve in it.
You can draw a winter landscape with anything: pencils, crayons, paints. The simplest tool is, of course, a pencil. Choose crayons or pencils, as well as heavy landscape or craft paper.
IMPORTANT: Drawing a winter landscape on colored craft paper is much more pleasant and interesting, since this material already has a certain color shade, on which white falls easily and in contrast.
Before drawing, plan in advance what exactly you will portray: a hut, a city covered with snow, a snowy forest or a playground. First, sketch out your landscape (mountains, houses, figures) and only then start detailing, depicting lumps of snow on each surface.
You can draw snow in waves (imagine that there is a small cloud on each twig or roof), or pointwise. To do this, you should use a white pencil, with which you will make many point prints in the selected place.
IMPORTANT: In your work, always use a good quality eraser, which will help to remove unnecessary lines and sketches, to make the drawing neat and "clean".
How to draw a winter landscape and the beauty of Russian winter with a pencil, paints, gouache?
"The beauty of Russian winter" is snow-covered fields and forests, warm, cozy huts with "snow caps" on the roofs, children playing with snowballs in the yard, kind forest animals and only happy faces. Drawings depicting Russian winter should radiate warmth and only positive emotions.
When portraying the "Russian winter", remember everything that you associate with the "good old winter fairy tale": sledges, grandmother's rolls, fluffy Christmas tree, Santa Claus, red-cheeked children, ice skates and much more. You should draw the entire sketch with a pencil and only then paint it with bright colors, sparing no colors.
Russian winter, drawing ideas:
Russian winter: simple template  Russian winter: a template for drawing
  Russian winter and winter fun: a template for drawing
  Russian winter, hut: a template for drawing
  Russian snowy winter: a template for drawing
  Hut in the forest, Russian winter: a template for drawing
"Russian winter", ready-made drawings:
Russian winter, children's fun: drawing Russian winter in the village: drawing
  Russian winter, Santa Claus: drawing
  Russian winter, Christmastide: drawing
  Russian winter, morning: drawing Russian winter, huts: drawing
 How to draw the beginning of winter with a pencil?
The beginning of winter is not snowdrifts and snowmen, but the roofs of houses and tree branches slightly covered with a white shroud. There is a special magic in the first days of the “fairytale time” and therefore you can try to capture it in pictures and drawings.
You can choose any subject for drawing: nature, city, village. The main thing is to try to convey the cold of frosty air and mood. The sky deserves special attention. To depict it, use heavy blue paints so that the ground looks contrasting, and the first snow especially stands out.
IMPORTANT: It will not be superfluous to also depict the wind and the first snowflakes descending to the ground. They can be large or small, detailed or just white dots.
The beginning of winter, how to draw:
 The figure clearly shows the gold of recent autumn and the first snowfall.
  You can depict "bare" trees and yellow fields, only covered with the first snow The first snow is often associated with the joy of children
  It is possible to depict the beginning of winter not necessarily by means of a landscape, but also as a view from a window.
  The beginning of winter is often associated with bare trees, wet puddles and fallen leaves.
  A simple child's drawing of the first snow is very simple, but conveys all the energy of a real winter.
  You can depict a winter landscape, both rural and urban
  First snow: drawing in gouache
 How to draw a winter forest with a pencil, gouache?
The winter forest becomes charming and beautiful in a special way when the first snow comes. You can depict any trees, complement them with fir trees, bushes and glades. The main thing is to cover all branches and crowns in the forest with a white veil and snow "caps".
Depending on what exactly you want to depict, you can complement the drawing with snow-capped mountains, forest animals, a village with burning windows in the distance, a bright moon, stars or a month. If you draw with a pencil, choose dark paper, the white pencil can look more contrast on it.
IMPORTANT: It is much easier to paint a winter landscape with gouache. To do this, apply paint layer by layer: first the background, then the forest, and only when everything dries up - white snow.
Drawing a winter forest with gouache:
Winter forest in gouache on white paper Winter forest in gouache on blue paper
  Winter forest in gouache, multilayer drawing
  Winter forest with a simple pencil, winter
  Winter forest with colored pencils: children's drawing
  Winter forest, hut: paints, pencil
 How to draw a winter village with a pencil, gouache?
Truly fascinating are the images of a winter Russian village, powdered with snow, where light and comfort glimmer in every house. It is best to draw such images on dark paper or with a dark background, so that the snow looks especially contrasting.
IMPORTANT: The drawing where you depict the evening or early morning will turn out to be bright and effective. In the evening or at night it is good to draw the stars and the moon, in the morning - a bright red sunrise and sparkling snow.
Ideas for drawings:
 Night, winter village: colors
  Winter in the village: colors Winter morning in the village: colors
  Early morning in the village in winter: colors
  Winter in the country: a simple pencil
  Country winter: pencil
  Winter village: pencil
 Ideas of drawings on the theme of winter for sketching
If you do not have special skills in drawing, templates for sketching will always help you. With the help of templates, you can depict any landscape and picture presented in your head. You can sketch by observing each detail of the image, or by attaching the drawing to the glass (now everything is much easier in the era of computers and a sheet of paper can simply be superimposed on a computer monitor in order to draw a contour with a pencil).
 Template for sketching No. 1
  Template for sketching No. 2
  Template for sketching No. 3
  Template for sketching No. 4
  Template for sketching No. 5
 The article will tell you the features of the image of winter landscapes with paints and pencils, present ideas and ready-made drawings.
Winter is a "magical" time, which children and adults associate with a fabulous time, gifts, holidays and fun. Drawing winter is not only easy but also fun. Each time, depicting a new storyline (a snow-covered house in the forest, a squirrel on a Christmas tree or falling snowflakes), you plunge into the world of your drawing and partially dissolve in it.
You can draw a winter landscape with anything: pencils, crayons, paints. The simplest tool is, of course, a pencil. Choose crayons or pencils, as well as heavy landscape or craft paper.
IMPORTANT: Drawing a winter landscape on colored craft paper is much more pleasant and interesting, since this material already has a certain color shade, on which white falls easily and in contrast.
Before drawing, plan in advance what exactly you will portray: a hut, a city covered with snow, a snowy forest or a playground. First, sketch out your landscape (mountains, houses, figures) and only then start detailing, depicting lumps of snow on each surface.
You can draw snow in waves (imagine that there is a small cloud on each twig or roof), or pointwise. To do this, you should use a white pencil, with which you will make many point prints in the selected place.
IMPORTANT: In your work, always use a good quality eraser, which will help to remove unnecessary lines and sketches, to make the drawing neat and "clean".
Video: "How to draw a WINTER LANDSCAPE with a pencil and a nag?"
How to draw a winter landscape and the beauty of Russian winter with a pencil, paints, gouache?
"The beauty of Russian winter" is snow-covered fields and forests, warm, cozy huts with "snow caps" on the roofs, children playing with snowballs in the yard, kind forest animals and only happy faces. Drawings depicting Russian winter should radiate warmth and only positive emotions.
When portraying the "Russian winter", remember everything that you associate with the "good old winter fairy tale": sledges, grandmother's rolls, fluffy Christmas tree, Santa Claus, red-cheeked children, ice skates and much more. You should draw the entire sketch with a pencil and only then paint it with bright colors, sparing no colors.
Russian winter, drawing ideas:
Russian winter: simple template 
 Russian winter: a template for drawing
 Russian winter and winter fun: a template for drawing
 Russian winter, hut: a template for drawing
  Russian snowy winter: a template for drawing
 Hut in the forest, Russian winter: a template for drawing
"Russian winter", ready-made drawings:
Russian winter, children's fun: drawing
 Russian winter in the village: drawing
  Russian winter, Santa Claus: drawing
 Russian winter, Christmastide: drawing
 Russian winter, morning: drawing Russian winter, huts: drawing
 How to draw the beginning of winter with a pencil?
The beginning of winter is not snowdrifts and snowmen, but the roofs of houses and tree branches slightly covered with a white shroud. There is a special magic in the first days of the “fairytale time” and therefore you can try to capture it in pictures and drawings.
You can choose any subject for drawing: nature, city, village. The main thing is to try to convey the cold of frosty air and mood. The sky deserves special attention. To depict it, use heavy blue paints so that the ground looks contrasting, and the first snow especially stands out.
IMPORTANT: It will not be superfluous to also depict the wind and the first snowflakes descending to the ground. They can be large or small, detailed or just white dots.
The beginning of winter, how to draw:

 The figure clearly shows the gold of recent autumn and the first snowfall.
 You can depict "bare" trees and yellow fields, only covered with the first snow The first snow is often associated with the joy of children
  It is possible to depict the beginning of winter not necessarily by means of a landscape, but also as a view from a window.
 The beginning of winter is often associated with bare trees, wet puddles and fallen leaves.
 A simple child's drawing of the first snow is very simple, but conveys all the energy of a real winter.
  You can depict a winter landscape, both rural and urban
 First snow: drawing in gouache
 How to draw a winter forest with a pencil, gouache?
The winter forest becomes charming and beautiful in a special way when the first snow comes. You can depict any trees, complement them with fir trees, bushes and glades. The main thing is to cover all branches and crowns in the forest with a white veil and snow "caps".
Depending on what exactly you want to depict, you can complement the drawing with snow-capped mountains, forest animals, a village with burning windows in the distance, a bright moon, stars or a month. If you draw with a pencil, choose dark paper, the white pencil can look more contrast on it.
IMPORTANT: It is much easier to paint a winter landscape with gouache. To do this, apply paint layer by layer: first the background, then the forest, and only when everything dries up - white snow.
Drawing a winter forest with gouache:
Winter forest in gouache on white paper Winter forest in gouache on blue paper
 Winter forest in gouache, multilayer drawing
 Winter forest with a simple pencil, winter
 Winter forest with colored pencils: children's drawing
  Winter forest, hut: paints, pencil
 How to draw a winter village with a pencil, gouache?
Truly fascinating are the images of a winter Russian village, powdered with snow, where light and comfort glimmer in every house. It is best to draw such images on dark paper or with a dark background, so that the snow looks especially contrasting.
IMPORTANT: The drawing where you depict the evening or early morning will turn out to be bright and effective. In the evening or at night it is good to draw the stars and the moon, in the morning - a bright red sunrise and sparkling snow.
Ideas for drawings:
 Night, winter village: colors
 Winter in the village: colors Winter morning in the village: colors
  Early morning in the village in winter: colors
 Winter in the country: a simple pencil
  Country winter: pencil
 Winter village: pencil
 Ideas of drawings on the theme of winter for sketching
If you do not have special skills in drawing, templates for sketching will always help you. With the help of templates, you can depict any landscape and picture presented in your head. You can sketch by observing each detail of the image, or by attaching the drawing to the glass (now everything is much easier in the era of computers and a sheet of paper can simply be superimposed on a computer monitor in order to draw a contour with a pencil). Template for sketching No. 5
Video: “Drawing lessons. How to draw winter with gouache? "
Winter is one of the most inspiring seasons of the year.
Does your child love to draw but unfortunately ran out of ideas? No problem.
We offer all kinds of winter drawings for children, we will share the best techniques for translating them into reality.
This creative process captures not only children, but also adults and will forever remain a pleasant memory in your memory!

Winter theme is a field for a flight of imagination. You can draw a house in the snow, various fantasies about this (snowman, snow queen, Santa Claus), children's fun, snowdrifts, animals associated with this season, landscapes (day and night), a river or lake with ice on the surface.
There are many materials for this business: pencils, paints, felt-tip pens, helium pens, cotton wool, glue, glitter.
House in the snow
We present variations of children's drawings on the theme "Winter" with colored pencils and paints. One of them:

First, draw three large snowdrifts, one after the other. Draw Christmas trees on them. To do this, draw one stick with a brown pencil. Twigs will depart from it. Draw needles on them in green. Draw snow with a white pencil. The house will be hidden behind the snowdrifts. Draw a square and a triangle on top of it. This is a wall with a roof. Place a small square on the wall and a rectangle next to it: a window with a door. Powder the roof with snow in white or blue. Ready.
It is better to draw a drawing with hatching, and not paint over all empty spaces.
We draw winter with paints:

Here is the first snow and a house in winter. But painting with paints is a tricky business. First, make the markup with a simple pencil (take the work plan from the first option). Then just paint with gouache. Color the snow flakes in blue.
Winter landscape
Winter-winter:

Divide a piece of paper in half. On the top line, place two Christmas trees, followed by light green birches. Spread as many trees on the sides as you like. There should be drifts in the center. To do this, leave a couple of lines of purple-pink color, blend blue somewhere.
Winter tree:

We'll have to divide the horizon again. Only now on one third and two thirds of a sheet. Draw the sun in the upper right corner. There are Christmas trees on the horizon. We will make them blurry, do not draw the outline and details. Draw two semicircles on the bottom with a thin brush. These are drifts. On them, with the same thin brush, draw two birch trees without foliage.
A welcome fairy tale
When we hear the phrase "winter's tale", Most think about the snowman, the snow maiden, talking animals.
Therefore, we offer in the background, and in the front, a smiling snowman and his girlfriend-mouse:

To do this, draw three circles. The bottom one is the largest, the middle one is the smallest, and the head is the smallest. She is wearing a red cap and a multi-colored scarf around her neck. On the side there are two twig handles with warm mittens on them. A New Year's gift in hand.
Fairy winter house:

Nothing new. We combine elements from early works: here is a house, and Christmas trees, and a snowman. This option is also suitable for children in grades 2 and 3.
Fun
The kids' favorite pastime is, of course, skates. Pictures on the theme "Winter fun":

We draw the upper part of the man the way you always used to do it. Spread your legs a little wider than usual. In the second boy, you can depict how he pushes off the ice. Ice is supposed to be pale blue, otherwise paint as desired.
Naughty guys love hockey:

We divide the horizon into two parts. The upper one is for the sky, trees and gates, the lower one is for fun action. How to make a gate: in a gray square, the strokes go obliquely first from the lower left edge to the upper right, then from the lower right to the upper left. Put one child on the slide, let the other watch a beautiful picture. Give two children hockey sticks in their hand, throw a black oval washer between them.
We remind you that it is difficult for children to work with paints, because they blur on the sheet. The base must be made with a pencil, and blurred spots must be attached to it, symbolizing hair, clothes, inventory.
Fantasies
Children fantasize and dream most often about gifts, New Year and Santa Claus. We suggest you draw winter fantasies like this using sketches:

To begin with, draw an oval, in its center there is a smaller oval. We divide the large figure into two parts. Draw a semi-oval on top (and a semicircle on top of it), below a semicircle. We got a hat without a pompom. Hurry up and finish painting it. In the very first oval there will be eyes, furry eyebrows, nose and mouth. From the mouth, draw another half circle. Starting from the hat, erase the borders, detailing the beard. We paint over.
Another option:

Draw a circle with a smile in its center. This is the nose of Santa Claus. A luxurious mustache should extend from the nose. Then, in waves, depict ruffles on the cap and a lush beard. Draw the cap and torso, eyes, eyebrows, gifts behind the back. It remains only to use the paint. Forward! A student of grade 4 can easily cope with this.
We depict nature from earth to sky
You can draw winter nature in different ways.
Animals
Who, if not a bunny, is awake all winter. What is not a symbol of this time of year:

The stages are extremely simple: we draw an oval, not far from it, a slightly elongated circle. Add the outlines of the tail and legs. We connect the head with the body, attach long ears to the head. Add strokes to create a furry effect.
Drawing animals with paints is not as difficult as it seems. Penguins live in ice all year round. They are worthy to be on your winter drawing:

How to draw animals: in the upper half of the paint we paint an excellent beautiful northern lights. Most of the leaf is occupied by snowdrifts and ice floes. Three little penguins are cheerfully walking on them. We make a black oval, tapering a little at the very beginning. Next to him on the sides are fins. Dip the brush in orange paint, gently apply it downwards. These are webbed feet. We make the eyes and abdomens in white.
Forest
Forest - trees and animals gathered in one place. As in the picture you can depict a winter forest:

How to draw a winter picture with a mountain ash: draw a trunk of medium thickness, short branches extend from it. At their ends we place small red circles in two rows. The first row is longer. Draw a red semicircle next to the mountain ash, two sticks extend from it. There are three more sticks from these sticks: two obliquely, one in the center. Add a black head, beak, wings. We place in the picture a couple of Christmas trees and other animals of your choice. Do not forget to create a snow effect with white and blue pencils.
Another variant:

First you need to draw the fir trees. Dip the brush in green paint, then print evenly on both sides of the sheet. It turns out symmetrical needles. We mark the base of the trunk with brown paint. The rest of it was closed by branches. After that, paint over the bottom and top with white, leaving room for the moon. We are waiting for the white paint to dry, then apply pink next to the yellow circle and blue around the edges.
Night
Fairy Night Forest:

Even if you work in a minimalist style, there is a chance to achieve the necessary recognition. Print the tree in green as above. On top of this layer, apply almost the same, but white, leaving room for the previous one. It turns out a tree, which is covered with snow. Add blue paint to the sky, draw stars and snowflakes on it with a thin brush.
Small river
Hand-drawn picture with a river:

This drawing is also done using hatching. Christmas trees are made with blue strokes obliquely with a slope to the right. The sky is in violet-blue tones. Let's add some yellow-purple clouds. The river is blue-yellow with a horizontal stroke.
Making crafts: pleasant get-togethers
Winter illustration:

For such a simple craft, we need a sheet of cardboard, glue, colored and plain paper, gouache. Cut a branch out of brown paper. Draw snow on it with white gouache. Dip your palm in red paint and print horizontally to the sheet. It remains to add eyes, beak and legs. Cut out small snowflakes, glue them.
Another simple hack:

Materials at hand: cardboard, colored, cotton wool, cotton pads. We glue the disks on top of each other to make a snowman. We cut out all the necessary details for its decor from paper. We glue brown tree trunks and a broom on the sheet. Further we deal only with cotton wool. Tear off small pieces, fluff them up. These will be drifts. Then roll into large balls - this is the crown of the trees. Smaller balls - herringbone. The smallest lumps are falling snow.
Works worthy of the competition
We have selected examples of drawings about winter, with which your child may well be able to win the competition. The execution techniques have been presented above.


For those over ten
Ten-year-olds are old enough to practice the more complex winter painting techniques. They are already able to work out small details, handle paints so as not to run over the edges.
How to draw pictures on the theme "Winter" for children 10 years and older:


Beauty - you can't take your eyes off
Finally, we would like to show you beautiful painted, talented children's portraits of winter:


We wish you success in all your creative endeavors! Let the winter be remembered for its wonderful drawing.