Print paper crafts. DIY paper toys. Schemes, templates for children. Spinner making technique
It is very exciting to watch how an ordinary sheet of paper turns into a dragon, an owl or a funny hedgehog. What about Maleficent?
The art of paper crafting is native to Japan and a bit like origami, but requires cutting and gluing parts. Everything you need for making toys in papercraft style, is a color printer, thick paper, scissors and glue stick. Print out the blank, cut out the parts and glue in the right places - the figure is ready!
A paper toy can be taken outside or on a visit. And it's not at all scary if she suddenly gets lost. Making a new one will be even more interesting! And if you try: paint the craft with pencils, add details or make a cozy house for it - feel free to take the item to an exhibition in a kindergarten or school.
Papercraft paper animals
Colorful paper animals will decorate any interior and will be a great gift for a friend. Choose the layouts that you like and arrange a small zoo in your room. Pustunchik has prepared for you templates for making a tiger, kangaroo, owl, ladybug and others. It will take no more than 15 minutes to make each toy. Forward!
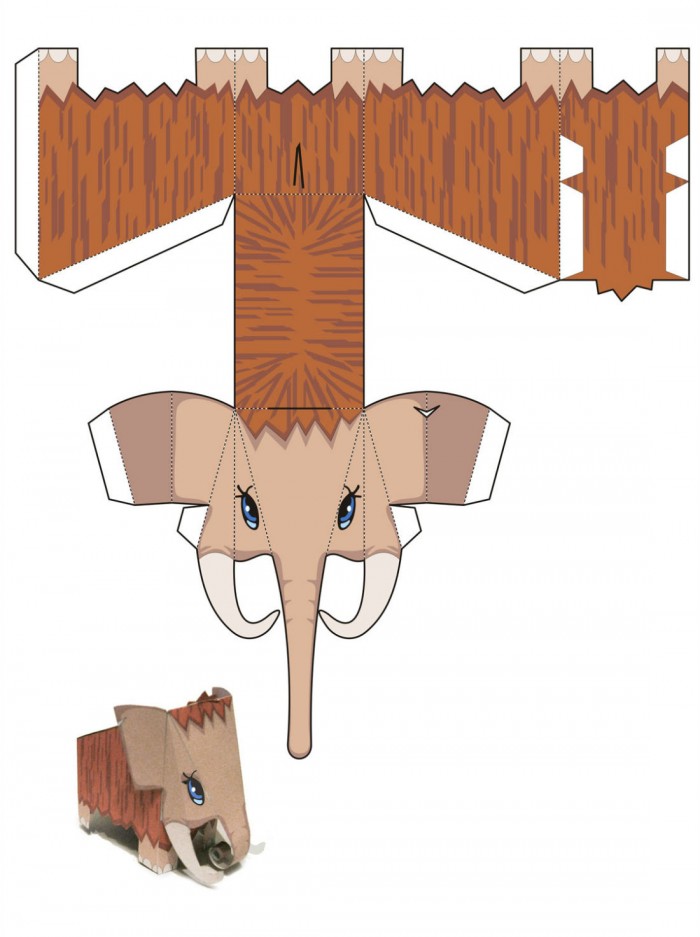


Remember! To make the toy neat, carefully cut out the details so as not to make unnecessary cuts. Be sure to use a ruler when folding the paper along the dotted lines.
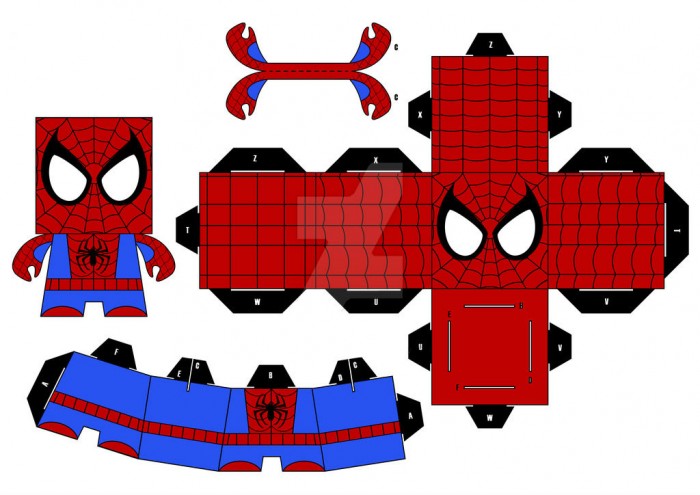
Characters of cartoons and fairy tales using papercraft technique
Imagine: a superhero from your favorite cartoon is staying at your house ... It is easy to make a dream come true. Make a character using papercraft technique- it's so much fun to play with! Boys will love the figures of Spider-Man and Batman, and the girls will love to play with a miniature copy of Hello Kitty or Maleficent.


Simple papercraft style car
Refill your car fleet with wonderful paper cars and invite your friends to play with new toys from your collection. The art of papercraft is simple and accessible, which is why it is so easy to create new characters for the game even every day!
All children love to decorate the Christmas tree, but they will also definitely like making voluminous Christmas tree decorations out of paper with their own hands. After all, how interesting it is to decorate a Christmas tree with your creation, to admire it every day, to demonstrate to everyone around you.
For crafts you will need:
- Colored cardboard of various colors (not very dense);
- Threads, braid, twine (optional);
- Double-sided or regular tape;
- Glue stick, scissors, pencil.

Volumetric Christmas tree decorations made of paper step by step
1. Bell

Using this template or any other template from the internet, circle and cut out 6 flat bells.


Fold each in half, being careful to fit the edges carefully.

Glue together one half-side of one piece with the half-side of the other.

Glue all 6 parts together, then put the thread in the center and secure it with tape. In principle, glue will also cope with this task, but with scotch tape it is faster and more reliable.

Glue the last two sides together to form a complete, voluminous Christmas tree bell.

2. A complex toy for a Christmas tree with your own hands

Redraw or print the template.

Cut out 6 shapes.

Fold them in half.

Take one part and apply glue to its half, glue the second part to it with one side, adjusting the ornament.

Repeat until all 6 pieces are glued together.

Before gluing the remaining edges, do not forget to place a string or thread in the middle of the toy, making a loop out of it.
3. A toy for a Christmas tree in the form of a multi-colored whirligig

Now we complicate the work a little, although it still remains as easy as the previous ones.
Cut 6 pieces according to the template, but in different colors. Alternatively, some may repeat in color.


Glue the sides, first placing a loop-thread inside.

4. Paper bear

Children will especially enjoy making this Christmas tree decoration and then contemplating on the tree. Cut 6 bears according to the template.


Fold them in half.

Glue one side of the bear blank to the other side of the second blank.

Before gluing the last sides, glue the thread on the tape in the middle, making a loop out of it.

Finally, on all parts, you can draw the eyes of the bear, the muzzle. You can and completely colorize. Draw a smile, claws, circle the ears.

5. Volumetric Christmas tree toy made of paper in the shape of a star

The craft is being crafted in the same way as the previous ones, but you can also add an insert of a different color to it in the middle.
Cut 6 stars out of paper of the same color according to the template. And 6 stars, slightly smaller, made of paper of a different color.


Glue the small stars in the middle of the larger ones.

Fold in half.

Glue the halves of the sides, place the string inside and glue the remaining two halves of the sides. The asterisk is ready.

These are the Christmas tree decorations made of paper for the Christmas tree. They can be very different, because it all depends on the template used, of which there are thousands on the Internet. You can even completely decorate the Christmas tree with your own hand-made paper animals, birds, ornaments of various shapes, which are mastered in the same way as the step-by-step photo instruction on creating volumetric objects presented above.
Fast navigation through the article
Making paper crafts with your own hands is a simple, inexpensive and very interesting activity for both children and parents. All you need is paper, scissors, glue, and some cool ideas. In this material you will find 7 step-by-step master classes on needlework from different types of paper and 50 photo ideas for your inspiration.
Idea 1. Volumetric crafts
We offer the smallest needleworkers to make a simple volumetric paper craft in the form of such a cat.

Materials:
- A4 sheet of paper;
- Scissors;
- Glue.
Instructions:
- Download and print the template (see the cat template below) on white or colored paper;
- Cut out the template with scissors, and then make 4 cuts in it along the outlined solid lines;
- Bend your neck along the markings with an accordion and twist the ponytail;
- Bend the dashed fold lines on the legs and glue them to the cardboard.
For older children, there is a more difficult task, namely a master class on making a volumetric paper craft in the form of a bird.

Instructions:
Step 1. Download and print the layout diagram (see below). Note that the file contains a colorless template so you can print it on colored paper.
Step 2. Cut all the pieces exactly along the solid lines using a breadboard knife.
Step 3. Fold all the fold lines according to the principle: bold dotted line = fold inward, thin dotted line = fold outward.
Step 4. Glue the parts together by glueing their corners (with the words Glue). Stick to the following order:
- First glue the beak to one side of the bird, then to the other.

- Glue the back of the bird starting from the beak, as shown in the photo.

- Glue the wings.

- Now take the part, which is the poultry breast, and at one end, fold and glue the triangle as shown in the photo.


- Assemble the legs, make sure the knees are at a 90 degree angle, then glue the legs to them.

- Well, that's all, it remains only to glue the legs to the body and your volumetric paper craft is ready. If you wish, you can make a whole flock of such birds in different colors with your own hands.


Idea 2. Wall panels, paintings and applications
It is known that you can draw not only with paints on paper, but also ... with paper on paper. Such classes are no less exciting and useful for the development of hand-eye coordination, fine motor skills, perseverance, the ability to plan their work, to combine colors, shapes and materials.
The next selection of photos presents ideas for paintings, panels and paper applications for children of different difficulty levels.


By the way, an applique can be made of parts of the same shape, but different sizes and colors. These can be circles or hearts. The next slider shows examples of such paper crafts and schemes for their manufacture.


And here are some more examples of interesting paper crafts of different types.

Now we offer you to get acquainted with a master class on making an original, but very light paper craft. We have no doubt that such cute figures will help instill an interest in reading books in your child.


Materials:
- 1 sheet of colored A4 paper;
- 1 sheet of A4 white paper;
- Scissors;
- Glue stick;
- Markers, pencils and paints.
Instructions:
Step 1. Bend one half of a white A4 sheet in half and let the child draw on it the cover of his favorite book on his own, also signing the title and the name of the author.
Step 2. Cut three long strips from a colored sheet about 2.5 cm wide. You will have 4 parts: 2 stripes for the legs, 1 stripe for two arms and one rectangle to create the body of the figurine.

Step 3. Take two strips (for the legs), fold them like an accordion, and then glue them to the body-rectangle.
Step 4. Divide the remaining long strip into two equal parts, draw fingers at the ends and glue to the body.
Step 5. Bend the top of the figurine to the front side and make bangs with it using scissors as shown in the photo.

Step 6. Cut out circles from the remaining half of the white sheet and glue them on the figure as if they were glasses.
Step 7. Draw the details of the eyes, mouth, nose and temples of the glasses with black marker.
Step 8. Now glue the book to the hands of the figurine and finally place it on the table or hang it on the wall, for example, near a bookshelf.

Idea 3. Hats
All children love transformation games and for this they use everything that comes to hand. To provide your child with props, you can make fancy hats with him. By the way, such colored paper crafts can be made for one or several children for a performance, masquerade, themed birthday or any fancy-dress party. In the next selection of photos, you can see examples of a wide variety of paper "hats" - from pirate cocked hats to wigs.


Today we invite you and your baby to make a hat in the shape of a dinosaur head. This master class is so simple that a child from the age of 3 will need very little help from you.

Materials:
- 3 sheets of colored paper;
- Glue stick or PVA;
- Scotch;
- Scissors.
Instructions:
Step 1. Cut 4 strips about 3 cm wide along the long side of the sheet of paper. Two of these strips will turn into a headband, and the other two - into “cap” crossbars, on which the dinosaur spikes will stick.

Step 2. Take two other sheets of paper and cut them into strips about 5 cm wide along the short side of the paper. You can measure and cut stripes by eye, but in the end you should get 5 strips from each sheet. We need these blanks to make thorns.

Step 3. Fold each blank for the thorns in half and, stepping back about 1.5 cm from the fold, draw a marking in the form of a triangle up to the very edge (see photo). Next, just cut out the future spikes.

Step 4. Glue two strips-crossbars, and then glue spikes on them in a row as shown in the photo below.

Step 5. While the glue is drying, adjust the two pieces of the headband to fit the circumference of the child's head, and then use tape to join them in a circle.
Step 6. Now let's go back to the spikes. Turn the crossbar over so that the spikes are on the table and bend each of them well (see photo). Form the first spike: cover one side with glue and connect it to the other. Use paper clips to hold the spike in place until the glue dries. Repeat these steps for the rest of the pins.

Step 7. After the glue is dry, remove the staples from the cleats and simply glue the crossbar to the headband at the front and back.

Idea 4. Toy figurines from toilet paper rolls
Toilet paper rolls are great kid's craft blanks that only need a little embellishment. For example, you can make such wonderful toys from them.


Colored paper is an excellent craft material. It can be used to make appliqués, various figures and many other creative things. In this article we will look at: how to make crafts from colored paper for children of elementary grades with their own hands.
You will need: thick colored paper, glue gun, ruler, scissors, scotch tape, stationery, pencil, pen spring.
Master Class
- Take a sheet of paper and a pencil, twist the tube diagonally from the corner, then fix it with tape and pull out the pencil.

- Roll the second sheet of paper around the first tube, then pull them apart. The second paper tube should be slightly larger in diameter than the first so that you can shoot from it in the future.
- Secure the second tube with tape, then cut off the edges.
- Twist 2 more paper tubes in the same way.
- Cut the tubes into pieces of the following length: trunk - 2 tubes 15 cm long; handle - 7 tubes 5 cm long; trigger - 1 tube 8 cm long.
- Glue the 5 cm tubing obliquely to form a handle.

- Glue an 8cm tube on top of the handle so that the remaining 3cm protrudes to the right. This is the trigger.
- Glue the two 15cm tubes together and glue them to the top of the gun as a barrel.
- Roll two thin tubes of yellow paper.
- Bend the thin tube into the letter "U" and insert one end into the trigger and the other into the upper tube of the handle. Cut off the excess. This will be the trigger.
- Make a trigger guard from a second thin tube. To do this, place one end of the tube in the handle (in the second tube from the top) and glue the rest of the tube to the bottom of the barrel.

- Roll up the pink paper tube, flatten it and glue the handle as shown in the image. It is worth noting that the rear trigger hole must be open.
- Pull the trigger out of the upper handle tube and insert the spring. It is worth noting that the spring must rest against the tube covering the back of the handle. Reinsert the trigger.
- Roll up a thin, thick tube of yellow paper, secure with tape and cut off the edges so that they are straight.

- Fold over the edge, put on the elastic and secure with glue.
- Insert the rubber tube into the lower tube of the gun barrel and pull the rubber band forward, hooking it between the two tubes.
- Roll paper bullets, load your gun and fire.
You will need: colored cardboard, scissors, glue stick, cotton wool, stapler.
Master Class

The rainbow in the clouds is ready!
Binoculars
You will need: yellow cellophane, scissors, scotch tape, black paint, paintbrush, green and black paper, glue, stationery, wine stopper, string or elastic.
Master Class
- Cut out 2 circles of yellow cellophane and tape on the circumference of the sleeves as binoculars.
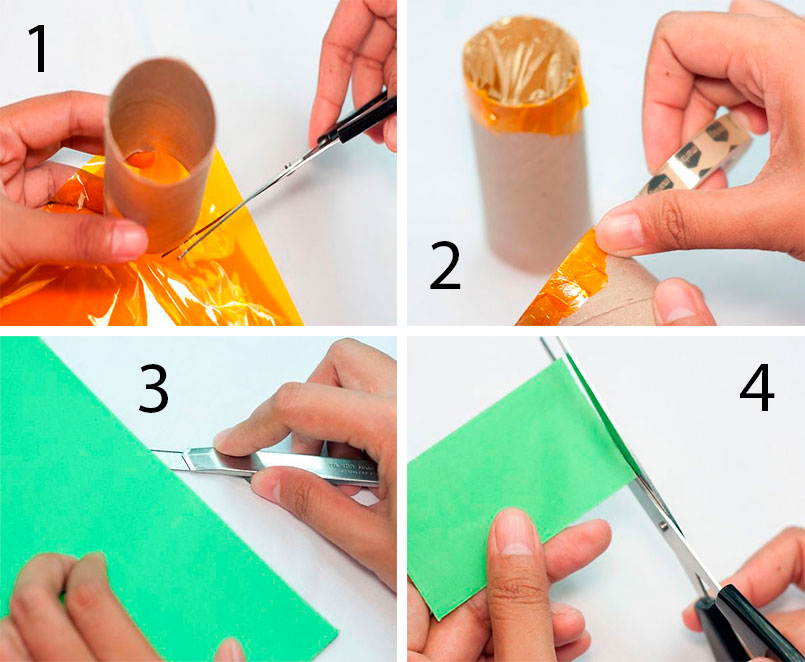
- Paint the circumference of the wine cork with black paint and glue it over with green paper.
- Cover the sleeves with green paper and glue the black stripes as shown in the image.

- Glue the bushings together and fix by putting on a rubber band. Remove the rubber band after a while.

- Glue the pasted plug between the grommets.
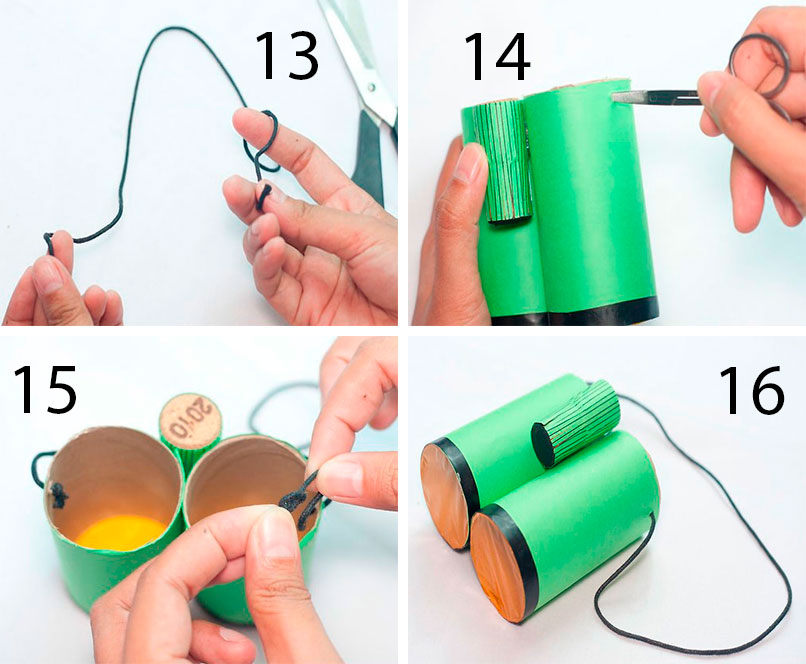
- Prepare an elastic band or rope of the desired length, punch a hole in the side of the sleeves and secure the elastic.
The binoculars are ready!
Origami rose
You will need: double-sided colored paper, scissors, a simple pencil.
Master Class
- Fold a sheet of colored paper diagonally as shown in the photo and cut off the extra strip to make a square.
- Bend the square to form the second diagonal.

- Fold the square in half to form snowflake-like lines.
- Move the sides of the workpiece in this way: the top - from the right side to the left, and the bottom - from the left to the right, to make a triangle.
- Fold over all 4 vertices to the middle and slide your fingers along the folds.
- Expand the workpiece to a double triangle and bend the top corner back.

- Spread the bud and bend the folded corner inward.
- Gather the double corner back and slide your fingers along the folds.
- Lift the 4 side corners to the top.

- Fold over, then fold each side to center in the middle. You should get a blank with a hole at the bottom.
- Blow vigorously into the hole from the bottom to expand the bud.
- Curl the petals using a simple pencil.

- Take the strip of paper you cut off at the beginning.
- Fold the stem and insert it into the bud.
The origami rose is ready!
Move 3Dfish
You will need: colored paper, scissors, glue, pencil, black felt-tip pen.
Master Class
- Take a sheet of blue paper and make a square.
- Fold the sides to the fold, then unfold the paper.

- Fold the paper in half to form a triangle as shown in the image.
- Make cuts along the fold, then open the paper and overlap the uncut portions.
- Flatten the fish's face by cutting off the corner.

- Cut out the fins and tail from the pink, then draw stripes with a felt-tip pen.
- Cut out the eyes out of white paper and draw the pupils with a black felt-tip pen.

- Glue the fins, tail and eyes, and don't forget to draw the eyelashes.

- Cut out the elongated semi-oval and glue as the lower jaw.
You will need: sheet of colored paper, felt-tip pen and scissors.
Master Class
- Fold a piece of colored paper in half.
- Place your palm on the leaf so that your thumb and forefinger touch the edge of the leaf, thereby forming a half heart.
- Circle your palm.
- Cut out the palm and unfold the craft.
The heart in the hands of colored paper is ready!
You will need: white and yellow colored paper, a pencil, a ruler, glue, a coin or a compass.
Master Class
- Cut 9 strips of paper to the same size.
- Make 2 circles on yellow paper.
- Cut them out.
- Glue the ends of the stripes together to form petals.
- Glue the petals to the yellow circle, then glue the second circle on top.
You will need: red colored paper, a simple pencil, scissors, a round object.
Master Class
- Trace a round object on colored paper.
- Draw a spiral in the circle.
- Cut out the circle.
- Cut the spiral in such a way that you get a "spring"
- Twist the rose, in the same way make the required number of roses.
Original roses made of colored paper are ready! I recommend watching the video master class!
You will need: double-sided colored paper, glue gun, stick or skewer as a stem, button.
Master Class

A creative flower made of colored paper is ready!
You will need: 4 sheets of colored paper, double-sided tape.
Master Class
- Fold each leaf into an accordion fold.
- Fold each accordion in half to form a fan.
- Glue 4 sheets together in such a way that you get a circle.
A fan flower made of colored paper is ready!
You will need: colored paper, stapler, cut out butterfly (from a magazine, notebook, pictures), felt-tip pen.
Master Class

A case for surprises made of colored paper is ready!
You will need: colored paper of black and yellow color, a simple pencil, scissors, a ruler, glue, compasses, sequins.
Master Class

The colored paper owl is ready!
You can also make a cute bunny out of colored paper, but how - see this video!
Sisters from colored paper
You will need: paper of two colors, 2 wooden sticks, buttons for eyes, elastic bands or strings for hands, pencil, glue.
Do you want to take a break from the Internet or TV programs, spend time with the benefit of yourself and your child? Then take a lot of paper, scissors, glue and try to make bulky paper toys.
Paper craft templates.
The most interesting paper crafts are movable toys. For example, here's the Nyan Cat toy, based on the hugely popular YouTube video.
(function (w, d, n, s, t) (w [n] = w [n] ||; w [n] .push (function () (Ya.Context.AdvManager.render ((blockId: "RA -468763-13 ", renderTo:" yandex_rtb_R-A-468763-13 ", async: true));)); t = d.getElementsByTagName (" script "); s = d.createElement (" script "); s .type = "text / javascript"; s.src = "//an.yandex.ru/system/context.js"; s.async = true; t.parentNode.insertBefore (s, t);)) (this , this.document, "yandexContextAsyncCallbacks");
A plot from the popular game Tiny Wings.
And this is the famous singer PSY made of paper and his famous dance move from the video for Gangnam Style.
Paper dancing man.
In this paper figure, all the details are movable and when shaken, the man seems to be dancing. Watch him dance the Harlem Shake in this video.
3D paper projection of a road and a moving car. In the instructions you will find the QR code of the link to the animation for the smartphone.
Video - How to make a paper projection of a road.
Bulky SpongeBob SquarePants made of paper.
SpongeBob's Paper Friends: Gary the Snail, Ptarik the Starfish, Skidward, and the Sandy Cheeks.
This model is a real Macintosh computer with a paper keyboard.
And here is the very Nyan Cat video (the very first toy template) with almost 153 million views.
(function (w, d, n, s, t) (w [n] = w [n] ||; w [n] .push (function () (Ya.Context.AdvManager.render ((blockId: "RA -468763-11 ", renderTo:" yandex_rtb_R-A-468763-11 ", async: true));)); t = d.getElementsByTagName (" script "); s = d.createElement (" script "); s .type = "text / javascript"; s.src = "//an.yandex.ru/system/context.js"; s.async = true; t.parentNode.insertBefore (s, t);)) (this , this.document, "yandexContextAsyncCallbacks");
Paper modeling is a rather fun process in which all family members can be involved - it will be interesting for everyone. After all, one has only to start and it is already difficult to break away from this activity. Now there are many different templates for paper crafts, you just need a printer to print them. It should be noted that cutting and gluing three-dimensional pieces of paper develops spatial thinking and fine motor skills of the hands, like any other handicraft.