Stencils for windows for the New Year. We make our own sleigh for Santa Claus! Features of decorating windows using stencils
Good afternoon everyone, I'm posting today the largest collection of templates with Santa Claus. This is the most complete selection of New Year's templates with the face of Santa Claus and stencils where he stands at full height (in a fur coat and felt boots). You can use these templates with Santa Claus as ready-made templates for paper appliques, for drawing or coloring, and also as patterns for New Year's crafts made of felt (Christmas tree decorations, souvenirs, frames, calendars). Along with the templates I will also show photo with finished crafts according to similar patterns of other Santa Clauses. I have put all the ideas into groups... and therefore the article will have several separate paragraphs - to make it easier for you to navigate and quickly select a template for your New Year's craft idea.
Santa Claus TEMPLATE
in the form of a New Year's card.
Here is a postcard template in the form of Santa Claus - A4 format. We print and cut out along the contour - color with felt-tip pens or make elements from colored paper.

Here is another version of the template for a postcard with Santa Claus. As you can see, you can take any silhouette of Santa Claus’s head as a basis and make a FOLD LINE OF THE CARD in the HAT AREA.

Here are Santa Claus heads - templates that can also be designed as a folding card. Their size has been increased to A4 format. To make a postcard, you need to reduce the size by transferring the picture to a Word sheet and pulling the corners of the image.


You can simply make a card out of cardboard and make an applique out of colored paper on the front side. Santa Claus is made up of three circles - belly, face, bag circle. Next, curly applique details are applied on top of the circles. Templates can be re-shot by printing this picture on a printer.

And here is the finished color postcard - it has an A4 sheet format (click the mouse to see it). And if such a postcard is folded in half, then the face of Santa Claus remains on the front cover, and the trees in front of the sleigh go to the back cover.

Simple New Year's crafts
based on Santa Claus' HEAD PATTERN.
If Santa Claus long beard on a template, then you can make a NEW YEAR EXPECTATION CALENDAR. New Year's calendar It is made in the form of the numbers of the month of December pasted onto the beard of Santa Claus. Every day you need to close the number, so the child can see how long it will take to wait for the desired holiday.


If on the template Santa Claus has a small thick beard, then such neat silhouettes of Santa Claus’s head can be used when creating crafts-holders from cardboard.
For example, this decorative sign for cupcakes is a simple and beautiful way to decorate the New Year's table.

These are such beautiful crafts in the form of Santa Claus - who is held vertically thanks to a CROSSING FROM FELT FELT FEET. At the back, behind Santa Claus's back, the felt boots are extended... and crossed with each other crosswise, also threaded into vertical cuts (the same cuts as those made in Santa Claus's red coat). Due to this rear crossing of the legs, the Santa Claus figurine stands upright and does not fall. 
Here are the templates for Santa Claus's head with a small beard - just right for such beautiful crafts.


Crafts FROM FELT.
according to the template with Santa Claus.
Templates with the image of Santa Claus can be used as ready-made patterns for felt crafts for the New Year. Santa Claus can be an element of a large New Year's craft - a Christmas wreath made of felt and fleece, as in the photo below.

Or the template will be an independent craft toy for the New Year tree, which you can sew together with your children. Children will love making their first small patterns and sew the parts together with a needle and thread.


Here are templates suitable for small felt crafts. 

And even if you DON'T have FELT, you can still take the ideas from our patterns and implement them using regular fabric and hand stitches (horizontal stitches, or edge hems - both in the photo below).


But now felt is available in every craft store - it is sold in small sheets, the size of a napkin, and you can buy yourself sheets of felt in different colors.


And you yourself can make a larger felt craft - a full-length Santa Claus. There is a template below, enlarge the diagram to the size you need on a Word sheet and print it. Trace all the details through the window into separate patterns and sew Santa Claus with your own hands.


Applications made of HARD FELT
according to the template with Santa Claus.
The applique can be made from hard thick felt - as in the photo below. Solid wooden felt does not bend or break and keeps its clear shape forever. The craft is of high quality and durable. Therefore, you can make useful crafts from thick felt - for example, a do-it-yourself photo frame with Santa Claus.


Templates for this solid applique we see in the diagram below. All the parts turn out to be solid and durable, and we don’t have to glue or sew them on, but put them on rivets so that they rotate freely. And Santa Claus' arms and legs will bend.


You can cut something like this out of hard felt figurine of Santa Claus (diagram below). First, we cut out the entire silhouette from red felt - entirely from the legs to the head, and then on top of this overall solid silhouette onto the thermo-glue we put the elements of the face, beard, mustache, nose... cuffs, hat edge, pompom, fur coat trim.
We make two holes in the mittens, thread a string through them - we hang something on the string, lanterns, flags, birds, also made of felt. or a photograph on a clothespin. Then it also turns out to be a photo frame.

Templates for round Christmas tree decorations
with Santa Claus.
Based on the music disc, you can make a craft pendant for the New Year tree, also using one of our templates with the head of Santa Claus.

Here are circular templates that you can use for similar CD-based crafts.


Father Frost
templates for applications.
Beautiful bright New Year's applications are a charge of positivity and a useful activity for children. A great way to distract them from their tablet and phone. As a motivation - an offer to make a craft and post a selfie with it in your Class group - to show off. It works, the child breaks away from the gadget and goes looking for glue and colored paper.
Meanwhile, you select and print templates with Santa Claus for a craft you and your child will do together.
The applique can be made from colored paper or colored cardboard (photo below).

The applique can be smeared with PVA glue on top and sprinkled with small sparkles (glitter powder for manicure) - as in the photo below.


Here are large templates for applications, where Santa Claus is depicted in the company of various New Year's attributes - gifts, Christmas trees, deer.


Here are two templates of Santa Claus's friends - a penguin and a deer. You can also make appliqués from cardboard or hard felt based on them. 

Here are some interesting craft ideas and ready-made templates for them. Creating an image of Santa Claus from any material with our templates has become SIMPLE and FAST.
This is exactly my goal - to give you ready-made tools and make you fall in love with the idea.
Awakening DESIRE and adding OPPORTUNITY to it is the secret of PERFORMANCE.
Good luck with your results. May the Real Santa Claus, created by the spirit of Christmas and your magical hands, enter your home this New Year.
Read other articles on our website
Olga Klishevskaya, especially for the site ""
If you like our site, you can support the enthusiasm of those who work for you.
Happy New Year to the author of this article, Olga Klishevskaya.
When the New Year comes, the pre-New Year bustle comes: you need to buy gifts, make costumes for children's parties, decorate the house and much more. Before all these pre-holiday chores take up all your free time, let's think about creating various fakes. In this article we will show a couple of examples of creating Santa Claus' sleigh with our own hands, which will clearly not leave you indifferent. It is best to make such crafts on cool, winter evenings with the whole family. They will give your home a festive coziness, and also if the craft is made for a competition, then you will definitely take a prize.


Holiday craft
New Year is considered one of the most favorite holidays among children. Many kids are waiting for the cold guest with their beautiful animals and deer. The process of making a beautiful Santa Claus sleigh with reindeer from cardboard can be followed in a master class with step-by-step photos.
In order to make a craft, prepare all the necessary materials: cardboard, glue, scissors.

The first step is to cut out the side walls of the sled from cardboard. Then the back and seat are cut out of cardboard, the back part is made of cardboard and white thick paper. If you use cardboard paper from regular boxes, then your task is a little more difficult. The first step is to cover this cardboard with white paper napkins. Each place of cuts is covered with these napkins.

After this, you will need to paint Santa Claus's sleigh with white paint. And then we decorate the cut places with beautiful openwork inserts.

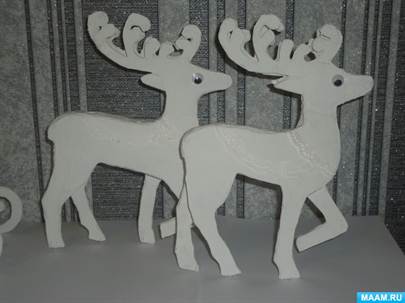
Now we move on to making the animals of our cold guest - overseas deer. Take the template and redraw it, you can also cut off the extra legs. From the following photos you can redraw the red deer template.

After that, take the foam and cut out the body itself from it. Glue the two deer templates and the foam together using hot glue. After this, glue the sections with paper napkins. Then we paint the deer with white paint.

Using acrylic paints or a marker, you will need to draw the eyes of the deer. You can buy ready-made blanks in a specialized store and glue them with PVA glue.

We collect reindeer and sleigh among ourselves. New Year's fake for kindergarten - ready.

Using quilling technique
To make a New Year's sleigh using the quilling technique, you will need to prepare materials such as white colored paper, PVA glue, toothpicks, scissors, pencils, files and rulers with circles.

The first step you need to make is a horse. To do this, find a template on the Internet, but you can use the image in our article.

After that, put this template into a file. This way the quilling will not stick to the paper.


Then we begin to twist these strips. To do this, insert the tip of a toothpick and begin to scroll the strip, thereby winding it. Do this carefully. The most important thing is that the turns are close to each other.

After you scroll the whole strip, then take a ruler and place the finished spiral in the circle of this ruler. This way, your roll can easily bloom to the required size. If you place each subsequent spiral in a ruler, then the quilling will be much neater.

We lay out the blanks along the contour and glue them together.

After this, take a piece of black paper and make four strips, the width should be up to ten mm. Make a spiral out of these strips. We make hooves from ready-made black spirals. And then we cut out strips of colored paper, which we twist, and then glue on the horse harness.


We cover the entire emptiness of the horse with white spirals, gluing these spirals together. After that, glue on the tail, mane, and snow. Let our fake dry and only then carefully remove it from the fabric.

Then we make three more knights. Using this technique, we make Santa Claus's sleigh.

Then we use white spirals to make a base on which the horses and sleigh will stand.
We make a Christmas tree, ordain Santa Claus, and in the end we have a beautiful craft for the competition.


Video on the topic of the article
We invite you to watch a selection of videos on how to create Santa Claus' New Year's sleigh with your own hands.
New Year's stencils for windows 2018, which you can print on our website, will help you beautifully decorate your window thematically for the New Year and Christmas holidays. To create entire fairy-tale scenes on windows, you don’t have to be an artist or designer. Regular stencils will help with this, as well as general knowledge of how to work with these stencils.
So, if you print New Year’s stencils for windows 2018 on time and correctly, you will be able to decorate your window quickly, beautifully and originally, according to your own theme. If previously only snowflakes were glued to windows, then, thanks to such stencils, the scope of decor has expanded significantly.
Interesting! Such stencils can be used not only for sticking on windows. If you cut them out of cardboard or then glue the cut out stencil onto a cardboard base, you can hang it on windows, on a Christmas tree, on the ceiling or chandelier.
To carefully and accurately cut out the template, you will need to print it out or carefully redraw it with all the details. To work, you need landscape paper, a pencil and ruler, an eraser and a special cutting mat. You also need a paper knife and thin nail scissors. Of course, the ideal option is to print the stencil on a printer. But this modern unit is not always at hand.
In the situation described above, you can simply redraw the stencil from the computer screen. To do this, it will be enough to simply enlarge the drawing, then attach a piece of white paper to the screen and trace the outline of the drawing with a simple pencil. Then, having already placed the paper on the table, try to make the outline of the template clearer. Do you know how to draw?
New Year's stencils for windows 2018 (can be printed) and pictures
Ded Moroz and Snegurochka
In our country, these holiday characters are still the most relevant today. Therefore, many people choose to print just such New Year’s stencils for windows in 2018. In principle, these figures themselves look quite elegant. However, if desired, they can complement the overall wonderful composition. These stencils can be used to decorate windows, walls, and a Christmas tree.
Funny snowmen
Another kind and beloved character who becomes relevant during the New Year and Christmas. Snowmen are not evil, which means that these sweet, good-natured people can take their rightful place in our holiday windows. A free-standing figure will look great, however, you can also safely make entire families, repeat the decoration in symmetry, or come up with your own original options for an excellent New Year’s composition.

Herringbone, natural scenes
Natural motifs or decorated Christmas trees will be a salvation for those who don’t have a lot of time to come up with their own New Year’s scenes on their windows. New Year's trees, even if they are simply cut out of plain white paper, look beautiful and elegant. As for holiday trees, they can be printed and cut out strictly according to the template, and if you glue several templates together, you will get a beautiful three-dimensional Christmas tree that can be placed on a windowsill, under a real tree, or on a festive table.


Christmas toys, balls
New Year's stencils for windows 2018, various Christmas decorations can be printed in large quantities. The most common toy of this type is, of course, a regular New Year's ball. But, depending on the chosen template, these could be pretzels, bells, or any other options. Decorations of this kind are good because they can complement not only the composition on the window, but also decorate the Christmas tree; on their basis, you can make a real holiday garland.


Houses in the snow
Nothing will look cozier and nicer than the snow-covered houses in the New Year's picture. Here, even within the framework of a seemingly single plot, there is a huge scope for imagination. It could be a small hut or an ice palace. You can make a village of small houses, each resident looking forward to the new year. This is also a great option for creating cardboard compositions.


Advice! An interesting effect of a glowing city can be achieved by cutting out houses from cardboard and placing them on a windowsill, on a table or directly on the floor. Then put a garland behind the houses, which you can turn on in the evening. It looks magical and fabulous, simply breathtaking.
New Year's bells
Bells are not only an attribute for decoration. They are associated with Santa Claus and his sleigh, as well as with Christmas. On a New Year's window, bells, no matter what pattern they are cut out from, look impressive and very beautiful.


Advice! Many designers advise that bells are best cut from tracing paper or translucent paper of this type. Such a bell can be used with spectacular lighting, which looks simply magical.
Sleigh, cart and reindeer
How does Santa Claus get to us? Of course, on their sleigh, which is harnessed to deer or other animals, according to certain tales and legends. So, on your window you can have your own Santa Claus sleigh, which will bring the holiday to your house. Deer and other attributes associated with the delivery of gifts to every home also look beautiful.


Animals and holiday attributes
If you carefully watch various New Year's cartoons or read fairy tales, you will often find a bunny, a mouse or a fox, a bear cub and other animals that help Santa Claus and the Snow Maiden. So, they have certainly earned their right to be in your New Year's window.


Christmas templates
Particular attention should be paid to templates that are dedicated to the Nativity of Christ. Many families pay as much attention to this holiday as they do to the New Year. So, on your Christmas-themed windows you can place stencils of angels and wise men, a manger with a baby, or other thematic scenes.

New Year's stencils for windows 2018, you can print them in all the given variations on our website. You can
Perhaps this is the first time many people are hearing this type of needlework, which is based on cutting out patterns or shapes from paper. New Year's vytynankas have been popular for a long time. New technology came to us from abroad. Soon it appeared in our country. Now the original ones are used for window decoration. Making them won't be difficult. The New Year's deer turns out very beautifully. To make the work easier, you are allowed to throw off ready-made deer stencils for the New Year for cutting.
Vytynanka - deer
The vytynankas, which depict deer, turn out to be unusually beautiful. Perhaps they are considered the main New Year's heroes. To create a product, you can take your own template or print it from the Internet. The picture can be supplemented with a sleigh. You can also make a lot of snowballs around.
This is a very interesting and exciting activity. A template is created from A4 paper. DIY jewelry is especially appreciated. To prevent the paper template from becoming wrinkled, it should be made of cardboard. And only then, put it on white paper and translate it. All that remains is to cut out and decorate the windows and walls with the image.

Vytynanki are an ideal handmade decoration. Toys and paintings made by parents together with their child bring real pleasure. A New Year's paper image will become your baby's favorite decoration of all the toys hanging on the Christmas tree.

Children are interested in everything, so handicrafts are not left out. Children love to help their parents with New Year's crafts. The whole family can gather at one table and create original crafts. Try making a beautiful deer out of paper. It is very important to prepare all the necessary tools in advance. You will also need a large sheet of cardboard on which the silhouette of a deer will be drawn.

Now you have to put the silhouette of the animal on the cardboard. If the image is small, you need to put it in front of you and redraw it only in larger sizes. When the picture is ready, the product must be carefully cut out. After which the craft should be handed over to the child, and he certainly knows where to place them.
Tatyana Perova
Santa Claus's sleigh- a wonderful idea for decorating a New Year's interior, for wrapping gifts or for fruits and sweets on a festive table.
It's not difficult to make them. You need to prepare thick cardboard, scissors, glue, decorative New Year's decorations, as well as a good mood and desire.
1. Draw a sleigh template (A4 format) and cut it out.
2. Transfer the template to cardboard and cut it out in duplicate.

3. Cut out a rectangle from cardboard according to the attached pattern.

4. Bend the cut out rectangle along the fold lines (dotted line).


6. Glue this blank onto one side of the sleigh.

7. Glue the second side of the sleigh in the same way. They turned out like this sled.

8. Let's prepare plastic decorations - snowflakes and stars.

![]()

Santa Claus's sleigh is ready. All that remains is to fill them with gifts and sweets or decorate the New Year's interior.
I wish you creative success and thank you for your attention!
When the New Year comes, the pre-New Year bustle comes: you need to buy gifts, make costumes for children's parties, decorate the house and much more. Before all these pre-holiday chores take up all your free time, let's think about creating various fakes. In this article we will show a couple of examples of creating Santa Claus' sleigh with our own hands, which will clearly not leave you indifferent. It is best to make such crafts on cool, winter evenings with the whole family. They will give your home a festive coziness, and also if the craft is made for a competition, then you will definitely take a prize.


Holiday craft
New Year is considered one of the most favorite holidays among children. Many kids are waiting for the cold guest with their beautiful animals and deer. The process of making a beautiful Santa Claus sleigh with reindeer from cardboard can be followed in a master class with step-by-step photos.
In order to make a craft, prepare all the necessary materials: cardboard, glue, scissors.

The first step is to cut out the side walls of the sled from cardboard. Then the back and seat are cut out of cardboard, the back part is made of cardboard and white thick paper. If you use cardboard paper from regular boxes, then your task is a little more difficult. The first step is to cover this cardboard with white paper napkins. Each place of cuts is covered with these napkins.

After this, you will need to paint Santa Claus's sleigh with white paint. And then we decorate the cut places with beautiful openwork inserts.

Now we move on to making the animals of our cold guest - overseas deer. Take the template and redraw it, you can also cut off the extra legs. From the following photos you can redraw the red deer template.

After that, take the foam and cut out the body itself from it. Glue the two deer templates and the foam together using hot glue. After this, glue the sections with paper napkins. Then we paint the deer with white paint.

Using acrylic paints or a marker, you will need to draw the eyes of the deer. You can buy ready-made blanks in a specialized store and glue them with PVA glue.
We collect reindeer and sleigh among ourselves. New Year's fake for kindergarten - ready.

Using quilling technique
To make a New Year's sleigh using the quilling technique, you will need to prepare materials such as white colored paper, PVA glue, toothpicks, scissors, pencils, files and rulers with circles.

The first step you need to make is a horse. To do this, find a template on the Internet, but you can use the image in our article.

After that, put this template into a file. This way the quilling will not stick to the paper.


Then we begin to twist these strips. To do this, insert the tip of a toothpick and begin to scroll the strip, thereby winding it. Do this carefully. The most important thing is that the turns are close to each other.

After you scroll the whole strip, then take a ruler and place the finished spiral in the circle of this ruler. This way, your roll can easily bloom to the required size. If you place each subsequent spiral in a ruler, then the quilling will be much neater.

We lay out the blanks along the contour and glue them together.

After this, take a piece of black paper and make four strips, the width should be up to ten mm. Make a spiral out of these strips. We make hooves from ready-made black spirals. And then we cut out strips of colored paper, which we twist, and then glue on the horse harness.


We cover the entire emptiness of the horse with white spirals, gluing these spirals together. After that, glue on the tail, mane, and snow. Let our fake dry and only then carefully remove it from the fabric.
Perhaps you should try to decorate your apartment in a completely new way by painting real frosty patterns on the windows. They will require protrusions.
The most popular options for vytynankas are sleighs, Santa Claus, Snow Maiden and bunnies. These are the traditional heroes of the holiday. New Year's deer stencils for cutting out are no less popular.
- How to make a deer stencil
What are vytynanki and what are they eaten with?
- one of the many types of needlework. It is based on working with paper, namely cutting out various figures and then transferring them to glass. The figures can be either simply glued or applied to the window with a “frosty pattern” based on an existing blank (vytynanka). Thanks to this technique, it is easy to decorate not only apartment windows, but also store windows, windows in a school auditorium or kindergarten, and even a mirror in the hallway.
Where did the world first learn about vytynanki? This needlework technique came into the homes of modern craftsmen from seventh century China. Paper fakes were also used here for decorative purposes. In Russia, this art first appeared in the twentieth century. In this century, vytynanki spread to Europe.

Gradually, the technique of creating stencils of various paper figures began to become popular not only on the eve of the New Year, but also at Christmas and Easter. In addition, in some localities in Russia, vytynankas are used to decorate the bride’s house several days before the wedding.
What materials are needed to make a vytynanka
To make a stencil, you will need the following materials:1. White paper (A4 size).
2. Thick cardboard.
3. Scissors (manicure).
4. Knife (stationery).
5. Soap solution.
White paper is usually needed to make window shapes. You will need cardboard for those cases when you want to make several beautiful hanging figures.
In “Everything for Creativity” stores you can find special kits for making vytynankas. Then they proceed as follows - either transfer the finished patterns onto paper, or give free rein to their imagination and draw figures as they see fit.

It is not necessary to cut out single figures. Armed with stencils, it’s easy to recreate a real full-fledged picture on the window. For example, this could be the house of Father Frost, near which there is a sleigh drawn by reindeer, his granddaughter Snegurochka is walking nearby, and snowflakes are in the air.

- this is the most common pattern for vytynankas. First you need to draw a snowflake by hand or print a ready-made template. Then glue it to the glass using a soap solution. To make a snowflake look like a real one, you will need toothpaste. It is diluted with water so that the consistency of liquid sour cream is obtained, then a toothbrush is dipped into it and hands are run over the pile so that splashes fly away from it. These splashes should fall on the glass, namely around the snowflake. The result should be a snowfall effect.

How to make a deer stencil
With a slight movement of the hand, a New Year's deer can appear on the window. For this you will need:1. White paper (A4 size).
2. Scissors (manicure).
3. Knife (stationery).
4. Pencil.
5. Grater.
First of all, you need to decide what kind of New Year’s deer will be - drawn with your own hands, or printed from the Internet. On the Internet you can find a huge number of ready-made templates, which you just have to print and cut out all the excess. To do this you will need a sharp utility knife. If you use ordinary scissors to cut out small parts, the stencil can easily be damaged - wrinkled, cut off excess or an uneven cut.

For those who have a knack for fine art, you can try drawing a deer by hand. For this you will also need plain white paper. Cardboard should be used only if the stencil is not intended for a window, but, for example, for a Christmas tree as a hand made toy.

The size of the stencil depends solely on how the master wants to see it. The finished vytynanka is glued to the window with soapy water and sprinkled with “snow” - toothpaste. As an alternative, you can use special decorative snow, which is sold in the form of cans at any “Everything for creativity” store. Unlike toothpaste, it does not need any special preparation for application. Just shake the can and spray.

Why making vytynankas is useful for children
Adults and their young children can make a template (stencil) for gluing various figures in the form of deer or any other animals onto windows. Firstly, the baby will definitely like this activity, if only because he will do it together with his parents.
Modern people have very little time left to spend with their children. Making for windows on the eve of the New Year is a real chance to spend time with your family doing a useful activity. The kids will be pleased to do something for everyone, becoming the most significant person for the family for a few hours.

In addition, creating a template (stencil) is also useful because this technique develops fine motor skills of the hands. This skill is very useful for preschool children. In the future, the baby will not have any problems with the need to cut something exactly out of paper. Plus, making a template for figures on windows is useful because this technique activates a person’s creative thinking. In the future, this may play into the hands of the child when choosing his profession. It is possible that just because of such activities, the grown-up child will want to connect his life with some kind of creative activity.