Non-standard finishing of the base using polystyrene foam. Proper insulation of the base using extruded polystyrene foam. Technology for insulating the base and basement with extruded polystyrene foam
When building a house, each owner tries to insulate the base of the building, which is its foot part, as best as possible. After all, it is this part of the foundation that comes into contact with both the soil and the floors, which contributes to the appearance of dampness in the room and a decrease in temperature. To protect the foundation and preserve heat in the house, extruded polystyrene foam is often used. Due to its performance characteristics, this material is best suited for insulating the base.
Analysis of material for foundation thermal insulation
Since the building's base is most susceptible to temperature changes and precipitation, the choice of material for its thermal insulation is quite narrow. They have to meet the following requirements:
- Have high compressive strength.
- Have minimal water absorption rates.
- Have high thermal conductivity.
 Extruded polystyrene foam and polystyrene meet all these requirements.
The popular mineral wool insulation has only one drawback. It has low resistance to moisture. In this regard, it can be used only for interior work on thermal insulation of the building.
Polyfoam prevents moisture absorption and has low thermal conductivity. In addition, it is inexpensive, so it is a good choice for insulating the base. Its disadvantages include the fact that the material is flammable and very attractive to rodents.
Extruded polystyrene foam has closed pores, which prevents moisture from penetrating into it. The same property ensures the frost resistance of the material. It is resistant to mechanical damage and is not flammable. That is why polystyrene foam is the most suitable option for thermal insulation of the foundation.
EPP (extruded polystyrene foam) made from polystyrene granules and a blowing agent, which are mixed at high temperature and pressure. The resulting mixture is extruded from an extruder, resulting in colored or transparent sheets. Due to the structure and homogeneity of the composition, EPP has excellent characteristics:

High quality material can last up to 50 years. It is easy to install and can be stored outside at any time of the year, since it is not afraid of temperature changes.
Base insulation with polystyrene foam
Construction markets offer extruded polystyrene foam with a thickness of 3 to 12 cm. When choosing insulation for the base of your building, you must take into account the following indicators:
- Climate in the region of work.
- Wall thickness.
- Basement wall material.
- Functional purpose of the basement floor and its arrangement.
For regions located in central Russia, EPP with a thickness of 5 cm is used. The corners of the building freeze the fastest, so material with a thickness of 6 to 10 cm is selected for them.
In addition to polystyrene foam boards, for thermal insulation of the base you will need the following materials:
- reinforcing mesh;
- reinforcing tape;
- waterproofing material;
- roofing felt;
- putty;
- bitumen mixture;
- glue for working with polystyrene foam;
- dowels
Before work it is necessary Prepare the following tools:

Basement insulation technology
Since thermal insulation must be carried out over the entire surface of the walls, first of all, to the entire depth of the basement need to dig a trench. It should be of such a width that it is convenient to work in it. Experienced builders recommend digging a trench one meter wide. After completing the insulation work on the basement, you will need the earth, so you don’t need to transport it far.
To avoid shifting of the thermal insulation, the bottom row of slabs must be mounted on a rigid base. If the base is insulated during the construction of the building, then a concrete ledge can be installed. As a last resort, the bottom of the trench is covered with a mixture of fine gravel and sand in a layer of 5 cm.
The first layer of waterproofing of the house will be bitumen mastic, which needs to cover the entire surface of the base. Roofing material is glued onto the mastic with an overlap of 10 cm. The mastic should be applied in stages so that it does not have time to harden and the roofing felt sticks well to it. Otherwise, it will have to be melted using a blowtorch.
Plates of extruded polystyrene foam are cut with a sharp wallpaper knife, coated with a special adhesive and installed on the surface of the base. After the glue has dried well, the polystyrene foam sheets in the four corners are additionally fixed using umbrella-shaped dowels. The gaps between the building and the slabs are sealed with polyurethane foam, and the joints between the installed EPP sheets are coated with bitumen mastic.
After covering the entire surface of the base, a primer layer is applied to the slabs, which will serve as the basis for the following layers. On top of polystyrene using adhesive reinforcing mesh is glued. It must first be cut to the size of the slabs. After the glue and primer layer have dried, the trench is covered with earth.
Tape base insulation technology
 Not only the base of the building’s foundation, but also the strip plinths are subject to serious heat losses. Therefore, it is also recommended to insulate them. As a rule, the tape base is no more than 20–30 cm high. To insulate it, EPP sheets will have to be adjusted to size by cutting them with a hacksaw.
Before starting installation work on insulating the strip base, the entire surface is cleaned of dirt and dust. It is recommended to use for this broom and brushes for metal. The remaining hardened cement solution is knocked down with a hammer and cleaned with a brush. Serious cracks and damage to the building are repaired with cement mortar, which must dry well.
To ensure a better connection between the wall surface and the adhesive composition, the entire base must be coated with a primer and, after it has dried, a reinforcing fiberglass mesh must be secured. It must be cut to such a size that it can be used to wrap a sheet of material.
In a specially prepared container, according to the instructions, glue for polystyrene foam is diluted, which is applied to the sheet using a spatula. The mesh is laid between the plinth and the slab, and the sheet is pressed tightly against the wall of the building.
When installing polystyrene foam boards, you must ensure that they are pressed tightly against each other. Once the glue has dried, you can begin additional mechanical fastening of the slabs. It is not recommended to do this before, since at the stage of driving in dowels or drilling, the sheet can move away from the wall.
Fastening with mushroom dowels is done as follows:
- A hole is drilled through the insulation along the length of the fastening element plus 3 mm.
- The dowel and screw or nail get clogged.
At the joints of the sheets and between the building and the installed insulation, all cracks are filled with polyurethane foam. After it has dried, any remaining foam that has protruded must be carefully removed using a sharp knife.
At the last stage, the excess mesh is cut off with scissors, first a primer is applied to the insulated surface, and then putty. Now you can carry out the final finishing work.
Features of insulation with extruded polystyrene foam
When using EPP for basement insulation, experienced builders recommend follow some rules of thermal insulation:

Most often used for final finishing facade paint, decorative plaster, brick or tile for exterior use. It is not recommended to use sand-lime bricks and decorative tiles, since at low temperatures chips will form on their edges.
When the basement is insulated with polystyrene foam, the floor temperature will not depend on the outside air temperature. Regardless of the time of year, the room will be protected from drafts, and the foundation from negative influences in the form of condensation, mold and fungi.
There is an opinion, especially among “nomadic builders,” that there is no difference between polystyrene foam and extruded polystyrene foam (EPS), except for the price - the cost of the latter is many times more expensive. And as the well-known advertisement says: “Why pay more?”
But why. Let's consider the characteristics of insulating materials suitable for insulating basement walls, including mineral wool slabs.
|
FOAM POLYSTYRENE |
MINERAL WOOL BOARDS |
||
|
THERMAL CONDUCTIVITY |
|||
|
WATER ABSORPTION (by volume) |
|||
|
WORKING TEMPERATURE |
|||
|
VAPTOR PERMEABILITY |
|||
|
DENSITY (kg/m3) |
|||
|
FLAMMABILITY CLASS |
From the table above it can be seen that extruded polystyrene foam is inferior to other insulation materials only in terms of fire safety.
The main indicator for insulating basement walls is the thermal conductivity of the material. In this case, the smaller it is, the better. An example is the fact that, according to preliminary calculations, 2.5 cm thick EPS can be used for insulation. To achieve the same indicators (all other things being equal) using polystyrene foam, you will have to attach a 5 cm thick sheet to the walls, the cost of which is more expensive than EPPS 25 mm.
The advantage here is that a 25 mm layer of insulation will not “inflate” the base as much as a material twice as thick.
To insulate the walls of the basement and the blind area of the foundation, it is best to use EPS with densities from 30 to 45 kg/m.
Nuances and stages of the process of insulating the base by extrusion
Before you start insulating basement walls with extruded polystyrene foam (and not only it), you need to contact qualified specialists who can calculate the thickness of the insulating layer, taking into account its heat loss characteristics in conjunction with the parameters of wall materials and decorative finishes.
IMPORTANT: the main goal of insulating any building structures is to remove the “dew point” outside, beyond the main walls.
Only specialists can make an accurate calculation after first measuring the thickness of the walls and familiarizing themselves with the material that composes them.
After receiving such an expert opinion, which will indicate the recommended type and required thickness of insulation, work on its fastening and further finishing can be carried out independently, observing the necessary regulations.
Particular attention should be paid to insulating the blind area around the basement walls. Without it, insulation of the base will be ineffective. This work should not be left “for later”. The best and most cost-effective solution is to simultaneously insulate the base and blind area - this contributes to better quality work. Moreover, it is necessary to obtain data from specialists on the materials and insulation conditions of not only the basement walls, but also the blind area:
- Waterproofing coating,
- Insulation data
- Bedding material,
- Top enclosing layer.
It is necessary to begin insulation work by preparing the surface of the walls. Most builders from “roving teams” deliberately ignore this operation, thinking that a layer of extruded polystyrene foam will hide all the errors in the walls. Yes it is. But over the years, moisture will accumulate in niches and cracks that remain unsealed, which can bring the walls to a critical state.
INFORMATION: repair of foundation and basement walls is the most expensive repair, which can cost up to 80% of the total cost of the house frame.
In order to perform the work efficiently, the surface of the walls must be smooth, with protruding elements removed and recesses and cracks plastered. If there are old and cracked pieces of plaster on the basement walls, they must be knocked off and a new layer put in their place.
IMPORTANT: if wall fragments are plastered with “wet” solutions, further work should be done only after they have completely dried.
Depending on the time of year, this may take from 24 to 32 hours. Do not seal cracks and crevices with mineral wool or scraps of the same extruded polystyrene foam.
Before you begin attaching polystyrene foam, it must be laid out along the walls, performing the so-called “rough” insulation. It is necessary to take into account the fact that XPS is afraid of exposure to ultraviolet radiation. For the same reason, you should not delay applying decorative plaster or tiles to the basement walls after they have been insulated.
If both sides of the extruded polystyrene foam boards have a smooth surface, then either side must be processed with a wood hacksaw - stretch the hacksaw with teeth recessed into the polystyrene along the entire surface several times and in different directions.
IMPORTANT: the side of the EPS on which the adhesive is applied must have a rough surface. This improves the adhesion of the material and, accordingly, the quality of the work performed.
It is very important to perform two necessary operations before installing sheets of extruded polystyrene foam:
- Treat the basement walls with a deep penetration antibacterial priming solution,
- Attach bitumen waterproofing to the wall with an overlap (with an overlap of at least 10 cm). This will prevent the occurrence and concentration of moisture in the basement.
The slabs are placed on the base from top to bottom and “staggered” if for insulation it is necessary to secure several rows in height. You should not cover foundation vents - openings intended for ventilation of the sub-foundation space - with polystyrene foam. If this requirement is neglected, radon gas, which is found in small quantities in the earth’s crust, will accumulate underground. There are no barriers for him to penetrate inside the room (at high concentrations). Odorless and colorless, this gas can cause significant damage to human health, especially in winter, when rooms are ventilated less frequently. Also, excess moisture will concentrate under the floor, which will also not lead to anything good.
To fix extruded polystyrene foam slabs on the walls of the plinth, it is necessary to use polymer cement mixtures intended for polystyrene. To speed up installation work, you can use polyurethane adhesive foam, which is applied along the entire perimeter of the slab at a distance of 2-3 cm from the edge and one strip along the middle.
After applying the glue, you should wait five to ten minutes and only then attach the slab to the wall.

IMPORTANT: all gaps between the plates are filled with adhesive (not mounting!) foam for polystyrene foam.
After 24 hours, the slabs are additionally fixed mechanically using facade dowels (umbrellas). To fasten slabs located inside a row, five dowels are enough, and for corner ones, the consumption can be from six to eight elements per slab.

IMPORTANT: extruded polystyrene foam cannot be processed and attached to compounds containing acetones, ethyl acetates, toluenes and white spirits.
These components, when interacting with EPS, are able to completely dissolve it.
The main requirement for daily drying of the glue is to protect the EPS boards from moisture getting between them and the walls of the base. To do this, work should be carried out with complete confidence that there will be no precipitation in the form of rain or fog in the next couple of days. If precipitation does occur, then the top of the slabs should be covered with plastic film.
After fixing the slabs, it is necessary to install a mesh base for applying the base plaster coating.
If the general layer of insulation and decorative finishing protrudes beyond the vertical boundaries of the wall, in order to prevent moisture from entering, a protective structure must be made on top of it. These can be ebbs made of galvanized metal or a protective canopy made of plastic. As a last resort, a layer of waterproof plaster can be applied on top of the protruding elements.
In any of these options, it is necessary to remember that moisture that gets into the joint between the wall and extruded polystyrene foam will provide fertile ground for the formation of mold and fungal formations, which will then be extremely difficult to remove.
Of course, any material has both positive and negative characteristics. XPS has more positive parameters, such as frost resistance cycles (about 1000), fluctuations in thermal resistance depending on the ambient temperature (does not exceed 5%) and others. And it’s much easier to work with than other materials. Plus there is an environmental component - extruded polystyrene foam is not eaten by mice and other rodents.
All this and more allows us to say one thing - extruded polystyrene foam is almost an ideal material for insulating basement and enclosing walls, both in private housing construction and in the construction of multi-storey structures.
The base is the foot part of the house; it is located on top of the foundation and protrudes slightly beyond its limits. It is absolutely obvious that for this reason it is forced to be exposed to negative atmospheric influences, unlike the foundation itself. Insulating the base with polystyrene foam makes it possible to save additional heat in a house made of timber, especially during the cold season.
Extruded polystyrene foam is justifiably used as insulation; this material has a low level of thermal conductivity, with a high degree of compressive strength. The quality of extruded polystyrene foam is determined by the structure of the homogeneity of closed pores, which do not allow moisture to penetrate into the material, and the low level of water absorption guarantees high resistance to frost. The service life of high-quality material, according to manufacturers, is at least 50 years.
Basic technological standards and video steps of installation work for independent insulation of the base will be discussed below.
- Today, expanded polystyrene slabs are produced with a thickness from 3cm to 12cm.

- wall thickness and material;
- geographical area where construction is taking place.
- If we take the middle zone of the CIS, then it is better to insulate the base with slabs of extruded polystyrene foam having a thickness of at least 5 cm. The corners that freeze first are laid with slabs 6cm to 10cm thick.
- If the work is still at the planning stage, then it is logical to build a sinking base, which allows you to hide the layers of hydro- and thermal insulation.
- Since part of the base will be underground, it will be exposed not only to aggressive environmental factors, but also to groundwater and frost, which can lead to the destruction of the base itself. A damaged structure ceases to properly perform the functions assigned to it. This is primarily reflected in drafts along the legs inside the house and on the cold floor.
- The main mistake of many owners is the intention to insulate only the walls of their home. The base remains unattended, and this fact leads to large losses of heat and energy. Expanded polystyrene as insulation is quite affordable and absolutely not harmful to human health.
Base insulation technology
- The basement is insulated on the outside of the wooden house. Expanded polystyrene boards must be glued to the walls of the base using non-aggressive glue that does not contain solvents that can destroy the material.
- The adhesion of thermal insulation materials to glue will be better if construction work is carried out at positive temperatures: at least + 5 C. Compliance with this recommendation will guarantee that when frosts appear on the surface of the wall, cracks will not form.
- Before covering the surface of the base with insulation, you must follow the installation technology: use a thin layer of plaster to eliminate all defects found on the surface: pits, irregularities, cracks. For this purpose, you should use cement-sand or lime mortar, or, in extreme cases, gypsum mortar. Video lesson: “Plinth design, insulation process.”
- After the plaster has set and dried, the surface must be sanded and cleaned of dirt and dust.
- Expanded polystyrene boards are attached to the surface of the foundation plinth using a specially prepared adhesive solution; it is intended for thermal insulation of the panels. The glue is applied with a roller or brush to the surface of the base along the back side of the insulating board.
- Thermal insulation slabs are installed on the upper part, overlapping 10-12 centimeters of the basement floor, which increases the thermal resistance of the floor inside the house and reduces heat loss.
- To avoid unevenness when installing polystyrene foam slabs, leveling them with a wooden construction lath or a special level will help.
- The thermal insulation boards are finally secured using a hammer drill with a metal mesh in such a way as to connect the mesh, the slab and the base of the basement into one whole.
- To protect polystyrene foam from external factors, it must be plastered over slabs on which a metal or fiberglass mesh is attached.
- On top of the mesh, according to the technology, facing work is carried out.
Do-it-yourself installation and insulation of the basement of a house
- The slabs are attached over the waterproofing with polyurethane glue or cold-hardening bitumen-polymer mastic. Glue is applied over the entire surface or pointwise.
- It is important that the adhesive does not contain solvents, since they will destroy the structure of the polystyrene foam itself, which is based on foam plastic. Of course, this will have a negative impact on the durability and thermal insulation qualities of the slabs.
- Since mechanical fastening can compromise the integrity of the waterproofing layer, causing leakage into the basement walls, experts do not recommend fastening the slabs using them.
- Almost all models of expanded polystyrene slabs have an L-shaped notch along their entire perimeter, which makes it possible to join them into a lock without creating cold bridges. When trimming the joints of adjacent slabs, it is necessary to additionally coat them with either glue or mastic.

- The bottom row of slabs is laid with emphasis on the base. This step is demonstrated in more detail in video lesson. The best option is the existing foundation protrusion, made at the stage of pouring it. However, quite often the insulation is laid over the gravel backfill where the foundation was installed.
- On top of the insulation, wild stone, tile, brick, decorative plaster or facade paint are most often used as decorative finishing. Sand-lime brick or decorative tiles would not be the best choice, since in winter, at low sub-zero temperatures, chips form on the edges of these materials.
Based on the above, we can conclude that one of the important areas for insulating a wooden house is insulating the base with polystyrene foam. These actions will help maintain a constant floor temperature in a wooden house, regardless of the time of year, protect your feet from drafts, and protect the foundation itself from all possible negative influences of the external atmospheric environment, from condensation, from fungi and mold.
The specifics of thermal insulation of the base with foam plastic, the advantages and disadvantages of this technology, surface preparation, algorithm for basic work, finishing.
The content of the article:
Insulating the base with polystyrene foam is one of the most important measures aimed at creating optimal operating conditions in the building. The service life of the object depends on how reliably it is protected. If the structure is not insulated, you can lose up to 10-15% of heat. Due to freezing of the base, costs associated with the need to improve heating and eliminate dampness and fungus will inevitably increase.
Features of using polystyrene foam when insulating the base

To reduce the impact of negative factors on the base, there are a number of construction and finishing measures, including insulating the base with polystyrene foam. The inherent qualities of the material allow it to store heat and perform a good protection function, unlike other insulation materials. In addition, it is convenient to use, it cuts well, and the price of this insulator is much lower than others. This is how you can keep the room warm when the temperature on the thermometer is minus, and block the flow of cold air into the house.
Another primary factor in insulating the base with polystyrene foam is the aesthetically finished appearance of the building from the outside. By using it, the surface becomes more convex and voluminous, which means that the architectural structure acquires its uniqueness and originality.
The technology of insulating the base with polystyrene foam can be used both inside the building and, if necessary, for external work. Any of these methods allows you to:
- Improve the temperature in the house;
- Protect the building from all possible sources of moisture;
- Protect the lower part of the building from condensation penetration, preserving the material and extending its durability.
Advantages and disadvantages of thermal insulation of the base with foam plastic

Like any other insulating material, polystyrene foam, when used for a base, has strengths and weaknesses.
The advantages of such a heat insulator include:
- Low thermal conductivity;
- Ease of installation and cutting;
- Immunity of the material to rodents, fungus, rot and mold;
- Low cost, making it accessible to consumers.
- Subject to moisture absorption. To avoid this, when laying a heat insulator, it is necessary to carry out waterproofing work using modern insulators. For these purposes, materials are used in rolls or on a bitumen-polymer basis.
- Low strength. In order to preserve the properties of the insulator for a long time, a brick wall is installed to perform protective functions against soil pressure, or special profiled polyethylene membranes are used.
- Subject to mechanical damage. Therefore, the installation of reinforced mesh is required.
Technology of base insulation with polystyrene foam
Following the technology of using polystyrene foam, all insulation work must be carried out only at above-zero temperatures. This is one of the conditions for ensuring high quality of work performed. When purchasing assembly adhesive, you need to make sure that it does not contain any solvents (gasoline, acetone), which lead to the destruction of the inner surface of the material and, accordingly, the loss of its thermal insulation properties. Following these recommendations, you can, even without a construction education, insulate the base with foam plastic with your own hands.
Preparatory work

First, mark the installation level of the foam plates. Typically, each house has a waterproofing layer (roofing felt), which is covered with thermal insulation slabs 2-3 cm above the roofing felt. The master applies markings on all sides of the house using a level, cord, or marker. He will lay the insulation along this line.
In addition to the indicated markings, a small groove is dug around the house close to the wall, to a depth of 6-7 cm. The lower side of the insulator will go into this recess.
The next stage of the process is preparing the base and cleaning it from various contaminants. These works are carried out using the simplest tools - an ordinary brush and a spatula.
Tools for installation of slabs: cord, level, marker, angle for arranging slopes, knife, hammer, spatulas, hammer drill, brushes, rollers, work bucket.
Materials used for insulating the base: polystyrene foam with a density of at least 25 kg/m3, putty, primer, assembly glue, reinforced mesh, facade paint, decorative bark beetle putty, brick, cement, sand, water.
Installation instructions for foam plastic

As soon as the surface is prepared, you can begin to carry out thermal insulation work. To do this, follow the instructions below:
- When the debris is removed, all cracks and potholes are filled with putty, in other words, the wall is leveled. In this case, special plaster for walls is used. The solution is prepared according to the instructions. The prepared mixture is applied with a spatula. Next, you need to find out the curvature of the surface to be insulated. Take a level that is installed against the wall and determine the discrepancy between the upper and lower contact points.
- It is not necessary to eliminate irregularities less than 1 cm; if large differences are detected, plaster is applied to the surface along the beacons. The following work can be done when the base is completely dry. If it is not completely leveled, the procedure must be repeated when the first layer has dried. In order to better connect the materials, a primer is applied to the surface using a brush.
- The next stage is attaching the reinforcing mesh to the base; it is fixed with staples using a construction stapler, or glue is applied to the surface of the mesh and it is embedded in it. To begin with, the mesh is cut into pieces to dimensions that must correspond to the height of the base. It must be placed in such a way that approximately 10-12 cm remains under the insulation. After installing the insulator, it is wrapped and attached to the slab. During the final finishing, this bend is attached to the main reinforcing mesh.
- Next, you need to make a mixture of glue; it is best to use a special mixer or drill with an appropriate attachment for these purposes, since it will not be possible to stir the solution evenly by hand. To apply the glue, two spatulas are used: regular and notched. Regular glue is applied to the surface of the insulation, and serrated glue is used to level it along the base. When the adhesive mixture is poured onto the slab, the central part and edges are covered with a large layer. If the surface was initially smooth and was not leveled, then glue can be used to level it to a certain extent by filling cracks and small potholes.
- Along with gluing the slabs, installation using disc-shaped dowels-nails is also used. This fastening method is used when installing large slabs on a plinth, for example, 125x60 cm or more. In this case, they take dowels with thermal heads, with rods in a plastic shell. Here the waterproofing layer may be damaged when holes are drilled for attaching dowels. It is important to minimize such risks.
- The slabs, cut to the required size, are attached to the base with mounting adhesive. To ensure a high-quality connection, a wooden block is used, which can be tapped with a wooden hammer. If the layer of insulation slabs exceeds one row in height, then installation and fastening work begins from the bottom row, and in addition, from any corner of the house. In this case, they are fixed so that T-shaped joints are formed.
- After gluing every 2-3 slabs, you need to seal the seams with the same glue. A similar operation should be performed on the ends. The bottom layer of slabs must be rested against a solid base, for example, the foundation of a building, or a sand and gravel backfill, which will allow the sheet not to move off the base before the glue sets securely.
- 1-2 days after the glue has dried, each glued batch of slabs is secured using disc-shaped dowels-nails. Each sheet must be secured with 5 dowels, in the central part and in the corners. It is recommended to make a hole in the foam sheets in advance; the dowels are buried into the material to a depth of 2 mm.
- Before reinforcing the wall, all potholes left after driving nails are repaired. It is also necessary to remove all the slightest irregularities on them, using a paint float for this. The fold of the mesh, approximately 10 cm in size, is attached to the foam with glue.
- After fixing the slabs, it may be necessary to once again prime the insulated part of the structure in those places where, when attaching the insulation, individual small irregularities formed.
- After priming is completed, reinforcement is performed. For these purposes you will need a special putty. Work must begin from the corners of the base: the technology will be the same as when attaching the insulation. We cut the mesh to the required length. Reinforcing putty is applied to the heat insulator with a spatula, with a thickness not exceeding 2-3 mm. We press the mesh to the plate and evenly move up and down to level the entire surface. The next sheet should overlap the previous one by about 10 cm. The mesh is covered with plaster on top. The use of fiberglass mesh allows you to make the surface smooth, prevents the appearance of cracks and various defects of the base. Using this method, the entire base is insulated.
- After all this work is completed, new facing material is laid or the surface is plastered.
Finishing the base

This type of treatment will give the surface a modern appearance and will also perform protective functions, preventing the destruction of the thermal insulation layer. Two types of finishing are offered: decorative plaster and laying brick or natural stone.
Decorative plaster is used to perform work both inside the building and for exterior work. The retail chain offers a wide range of such materials; there are substances of various colors, as well as mixtures that can be dyed. This finishing material is quite expensive, but its cost is justified, it lasts a long time, and the facade looks aesthetically beautiful.
The plaster is applied in the same way as plaster to level the walls before strengthening the foam. Using a level, you need to check whether the surface is flat or not. An appropriate primer is applied to the foam board; you can use a well-proven primer from the Contact-plus series.
When the primer has dried, decorative plaster is applied. It is applied with a metal spatula, then leveled with a grater, making circular or up-and-down movements. The final pattern on the surface depends on the actions taken. To make work easier, it is recommended to moisten the grater with water more often.
After the surface has dried, you need to apply the grater again, using great effort. To avoid unwanted joints, it is worth plastering the entire surface at once, while trying to fill the space from corner to corner. The paint is applied to a completely dry surface; it is preferable to paint it twice.
The next type of finishing is brick cladding. It performs a very important function, providing protection for the thermal insulation layer and giving the base a beautiful appearance. Stepping back from the edge of the heat-insulating layer by 10-20 mm, lay a layer of brick on a solution that consists of one part cement, three parts sand and water necessary to prepare a homogeneous thick mass.
After laying the first row of bricks, the next one is done with a half-brick bandage. In addition, when 3-4 rows of material are laid, nails with a diameter of 0.5 cm are attached directly to the insulating board. The nail is driven in so that it extends at least 2 cm, and its head with a diameter of 2-3 mm should lie on the brick. This will ensure the coherence and solidity of the insulation and brick cladding.
How to insulate the base with polystyrene foam - watch the video:
This method of insulating the base, when polystyrene foam is used as a heat insulator, is quite effective, relatively inexpensive and is currently widely popular.
Today on the construction market you can find a wide variety of thermal insulation materials that are, to one degree or another, suitable for. Both traditional and new technological materials do their job well. Insulating the base with polystyrene foam or penoplex is a modern trend, which is due to the many positive characteristics of the materials used.
In addition, these insulation materials are very affordable in all respects. Of course, you can use the usual polystyrene foam, but builders recommend paying attention to modern insulation materials.
Expanded polystyrene boards have good thermal insulation properties and are easy to install.
Insulating the basement of a house with extruded polystyrene foam or penoplex is a labor-intensive and difficult process. In addition, the importance of this work lies in the fact that the durability of the house will depend on the correct implementation of insulation. If, for example, the basement is insulated with polystyrene foam efficiently and in accordance with all the rules, then the cost of heating the house in winter will be noticeably reduced, because the entry of cold air flows into the room will be limited.
The construction market now offers polystyrene foam boards with a thickness of 30 to 120 mm. The required thickness of the thermal insulation layer should be determined taking into account the following parameters:
- The thickness of the erected walls and the material from which they are made.
- Climatic conditions of the area in which construction is taking place. For example, in central Russia it is recommended to choose slabs with a thickness of 50 mm or more. In the corners, by the way, the material will freeze faster, so for these areas you can take slabs of greater thickness.
- If the house is still under construction, it is recommended to build a sinking base, which will hide the layers of thermal insulation and waterproofing.
In addition, if you use polystyrene, expanded polystyrene or even ordinary polystyrene for insulation, it will be easier for you to carry out decorative work in the future. The materials are easy to process after installation. In addition, you can put brick, tiles and other decor on top.
Preparing for insulation of the base
Insulation of the base with penoplex or expanded polystyrene can be carried out only in the autumn or summer, because at a positively high temperature there will be the highest quality adhesion between the insulation and the adhesive composition.
Installation of insulation is carried out on a previously prepared surface.
It is necessary to prepare in advance the surface of the base that is supposed to be insulated. All defects that exist on the surface (pits, crevices, cracks, smudges, etc.) must be completely eliminated and coated with plaster. After this work, the plaster should be given a little time to dry, then it should be cleaned and the surface covered with an additional layer of primer.
Tools and materials
First of all, you need to choose insulation: polystyrene foam, polystyrene, expanded polystyrene. It must be taken into account that the density of the material must be high.
The base can be insulated with extruded polystyrene foam or penoplex of any width, but it is best to take a thicker one.
You will also need plastic dowels, which are used to fasten the insulation, and reinforced mesh, which is necessary at the puttying stage. Insulation of the base in this case will be of the highest quality.
What else do you need:
- Putty, paint, primer.
- Sloping corner.
- Hammer, construction knife, meter strip, notched trowel, brush and roller.
To make truly high-quality insulation, you should not skimp on building materials.
Work order
With the proper approach, insulating the base is not as difficult as it might seem at first glance. As soon as the surface is thoroughly cleaned of contaminants, you can begin priming. It is recommended to select a deep penetration primer that will provide the required surface characteristics.
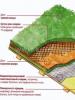
Scheme of proper insulation of the base.
By the way, the insulation of the base with foam plastic is carried out in the same sequence, so you can take this article as a basis when using this heat insulator.
- Upon completion of all preparatory work, you can begin installing the insulation. Regardless of what you choose: foam plastic, polystyrene or expanded polystyrene, it is best to start insulating the base from the corner. This approach will allow you to make high-quality markings, as well as cut the thermal insulation material in advance.
- Using a notched trowel, thoroughly coat the entire surface with glue, then apply polystyrene foam or polystyrene foam to the wall, hold for a while until the adhesive sets, and release.
- All joints that are formed when working with expanded polystyrene or penoplex must be carefully glued, for which traditional mounting tape is used. Once you have glued several sheets, you need to secure them with plastic dowels. Polystyrene, in principle, is easy to process, so making several holes can be done without difficulty. Using dowels, we carefully and securely fix the polystyrene. Thanks to this, it will not fall off or sag throughout its entire service life.
- As soon as the process of gluing and fastening the heat insulator to the surface of the base is completed, it is necessary to attach the slope corner to the same glue. Then the reinforced mesh is installed using cement mortar. It is best to cut the mesh to the size of the insulation material. Next, we wait until the solution dries, after which we begin finishing work.
The adhesion of the thermal insulation material will be of the highest quality if all stages of work are carried out at a positive temperature. When frost occurs, cracks will not appear in this case. In principle, any insulation of a room must, as already mentioned, be carried out in summer or autumn, when there is no precipitation or sudden temperature changes.
Features of slab installation and subsequent finishing
If, after purchasing polystyrene foam boards, you find that their thickness is not enough to provide normal thermal insulation, then the insulation can be fixed in two layers so that the required thickness is achieved. Many experts say that with good adhesion, the double layer of polystyrene foam boards will actually be one whole. To prevent the formation of cold bridges, it is necessary to ensure that the installation of two layers of slabs overlaps at the seams. However, with vertical displacements of the soil, the insulation layers delaminate, causing serious heat loss.
Options for fastening dowels.
The question of whether to install insulation in two layers is very controversial, therefore, if there is such an opportunity, it is worth returning the unused material back to the store, and purchasing slabs of the required thickness to replace it. As a rule, stores now accept goods back without problems for some time.
The insulation of the basement is carried out on the outside of the house. Expanded polystyrene boards are glued to the surface of the base using any suitable adhesive composition that does not contain solvents that can potentially destroy the material.
The bottom row of polystyrene foam boards must be laid with emphasis on the base. It's great if you have a small foundation overhang that was made during construction. Despite this, very often polystyrene is laid on a gravel backfill where the foundation was built. Polystyrene foam can also be installed over gravel backfill, although many experts caution against such steps. If there is no protrusion, it is convenient to insulate with penoplex.
As a decorative finish, tiles, bricks, natural stone, facade paint, and plaster are laid on top of the insulation. It is recommended not to use decorative tiles or sand-lime bricks, which at sub-zero temperatures lose many of their characteristics and chips begin to form at the edges of the material.
Advantages of modern insulation
The cost of modern thermal insulation materials is not as high as it was 10-20 years ago, so almost everyone can afford to buy polystyrene or use another equally high-quality material to insulate the base.
Using penoplex for insulation.
It should be noted that polystyrene and polystyrene foam, as well as, in fact, penoplex and expanded polystyrene, have quite similar characteristics:
- Minimum thermal conductivity coefficient.
- Excellent sound insulation characteristics.
- High moisture resistance.
Due to these basic qualities, you can use modern polystyrene, penoplex or other material to make high-quality insulation.
Expanded polystyrene from many respected manufacturers is an excellent alternative to the separate use of insulation, soundproofing and waterproofing materials.
The cost of expanded polystyrene is slightly higher than many traditional insulation materials, but in the end the total cost of installing high-quality thermal insulation will be significantly lower. If the high prices for polystyrene foam are scary, then you can use foam plastic for insulation, which is a little more affordable.