A flower garden or lawn on the roof - what is it for, and how to create it with your own hands. What is a Norwegian roof and do you need one? Who makes grass roofing?
When building their homes, humanity has made grass roofing since ancient times. In some cases, this type of roofing is called earthen. This type of roof does not present any complexity and the construction scheme is not difficult.
There is, however, one indispensable condition: the weight of such a roof is quite large, so the roof rafters must be as reliable as possible. If structures are being built from logs, beams, carriages, then a grass, heavy roof is even preferable - with its additional weight, the building being erected will go through the shrinkage process much faster. Also, the crowns will close together much more tightly.
You can divide the types of grass roofing into the following types:
- Turf.
Reed.
Shingle (wooden).
Slate.
Tiled.
Copper.
How to make a grass roof

Let's highlight the main components of a grass roof.
First of all, absolutely any vegetation can be used for styling. But hard-leaved is still better.
Next, lay a dense layer of earth (peat, turf), waterproofing is possible if necessary. Also, there is no way to do without insulation. Do not forget about drainage - it is acceptable to use gravel or crushed stone.
Please note that geogrid is used for large roof slopes. It makes sense to cover the drainage layer of crushed stone with a layer of geotextile.
Let's consider an environmentally friendly type of laying a grass roof.

The construction of a grass roof is similar in most cases. This is a load-bearing rafter structure and sheathing made of unedged boards, on top of which turf was laid.
Instead of the waterproofing widely used today from rolled bitumen or other materials, a layer of birch bark was laid on the sheathing, on top of which turf was laid in two layers or a soil mixture was poured for sowing it with grass seeds.
However, before touching on the technology of laying bark and turf, it should be noted that the dead weight of a green roof is about 250 kg/m2. This means that the shear load (especially on roofs with steeper slopes) can move the entire grass covering down. To avoid this, fencing was an indispensable structural element of green roofs. Their function was traditionally performed by turf fencing beams or boards laid along the overhangs - the so-called turf holders.
At the same time, the construction of the roof when creating a grass carpet had to ensure unhindered drainage of rainwater from the roof slopes. To do this, it was necessary not only to choose the right shape of the sod holders, but also to attach them to the sheathing accordingly.
Strips of birch bark were laid overlapping each other. In the overhang area they were laid in 5...8 layers. At the same time, the strips released from under the fencing beam and placed on it were laid with the outer side up. This was done in order to ensure effective water drainage and protect the sod holder and the end parts of the sheathing boards from moisture. In addition, the bark, laid with the outer side up, is an important decorative element of a green roof.

To increase the service life of the roof, on the rest of the roof the bark was laid with the outer side down, since its inner side provides more effective protection of the sheathing from the mixture of sigumic acids contained in the soil.
To protect the turf laid on the sides of the gable from wind and water erosion, natural stones were laid on the edges of the gable. Later, pediment wind elements, which were used as logs, began to be used for this purpose. They were laid so that the ends protruded above the ridge. The logs were joined crosswise. And since the logs were the same thickness as the sod holders, together they formed a kind of wooden frame for the entire roof.
In another option, a wind board was used to protect the grass surface from erosion. It was fastened with wooden dowels and covered with birch bark from moisture. Sometimes, instead of bark, a horizontally laid covering board was used.

One of the important elements of traditional grass roofs is the wooden gutter, which was made from boards screwed together at right angles or hollowed out from a tree trunk.
The weak point of grass roofs is the openings (in particular for chimneys). To prevent water from flowing down the walls of the pipe into the house, stone slabs protruding beyond the pipe were walled into its masonry.

At the same time, sheets of birch bark were placed under these slabs, diverting the flow of water to the roof. The stone slabs on the side of the slopes were arranged in steps, which contributed to more efficient drainage of rain or melt water from the pipe walls.
A log is used as a fencing element, supported by a stop hook secured under the sheathing. In this case, the hook, cut into the log of the upper crown, is secured under the sheathing, and the round timber itself lies completely on the birch bark. To prevent water from accumulating on the roof, the sod holder has slots for drainage.

The round timber, in turn, is also lined with birch bark. Despite the presence of such moisture protection, the sod holder still needed to be periodically replaced with a new one.
For example, when attaching a stop hook on top of the sheathing, a space is created between the birch bark and the turf holder to ensure effective drainage of water. And when attaching the enclosing element using a dowel, special slots were provided in the sod holder for water drainage.
Another interesting solution is when the fencing beam is attached to the side, with a distance of 5 cm from the edge of the overhang, which also ensures rapid drainage of water.
In all these cases, the turf holders are protected by birch bark. The overhang zone itself is covered with several layers of bark.

You can also use the option of fastening the enclosing beam using a powerful dowel embedded in the end part of the rafter. This method of fastening was used for roofs with hanging rafters protruding beyond the overhang by approximately 12 cm.
Often, in order to save wood, instead of logs or beams, boards 3...4 cm thick and 12...16 cm wide were used to fence the grass covering, depending on the thickness of the green roof.

To ensure water drainage, holes or slits measuring 3x3 cm were made on the lower edge of the board every 20 cm. On the side in contact with the turf, they were expanded, giving the shape of a funnel. Sometimes boards were installed without drainage holes. In this case, they were fastened so that they protruded 2...3 cm beyond the overhangs. To do this, as a rule, they used persistent steel corners, which were screwed to the sheathing with screws.
Choosing a roofing material is a responsible decision, and there is no place for trifles. And if the roof is made of metal tiles or you, as they say, don’t have a good heart, and your soul demands something unusual and extraordinary, it’s worth paying attention to the so-called " ". And FORUMHOUSE users will help you find out all its secrets.
"Green roof" is...
“Green roofing” is most widespread in the Scandinavian countries, and its history goes back more than one century. What is a “green roof”, and why, despite the fact that the most modern roofing materials are available to us, is it still in demand?
Forum user Novel(nickname on the forum roofing systems )
Novel:
– Essentially speaking, a “green roof” is a set of measures and solutions that allow you to recreate a piece of nature or a decorative garden on the roof of your house.
Microwave:
– “Green roof” is the roof of a building on which a layer of fertile soil is placed in which flowers, vegetables, grass, etc. are planted. The roof turns into a vegetable garden, garden, meadow area, clearing for relaxation. It’s a nice place to have a picnic, sunbathe, relax in the shade of tree foliage, enjoy the smell of flowers, practically without looking up from your workplace and without leaving the building.
And the idea of green roofs is becoming increasingly popular.

Green spaces help reduce the flow of water running off roofs during heavy rains. Water lingers in the soil for several hours and does not pour out in a violent stream from the gutters: a layer of soil 5-10 cm thick absorbs 75% of rainfall. And the vegetation of “green roofs” purifies rainwater from harmful impurities it contains.
Plowman:
– A turf roof complements the protection of the house from precipitation, wind and cold. After all, grass retains snow cover, and snow is a heat insulator. And the grass overwinters normally, just like on a lawn. Only the lawn is heated from the heat and, in turn, your home.
Excursion into history
Before moving on to the technology for installing a “green roof,” let’s remember how such roofs were created in those days when modern building materials did not yet exist.

Novel:
– “Green roof” came to us from Scandinavia, where from the 18th century to this day it has served to the local population as a roof covering. And earlier, when there was only stone and houses were built from logs, birch bark was used for waterproofing, because... it does not rot or decompose. It was laid over the floors, then drainage was paved with stones of various fractions, then a layer of turf and grass was laid.
 np28alex:
– For example, grass roofing has been used since ancient times in Norway. Such birch bark roofs stood for 50 years or more without repair.
Norwegian houses have a roof slope of 22 or 27 degrees - these are “earth pile corners”, flat enough so that the earth no longer crumbles.
An article about how it is customary to build houses in Norway is available .
But it turns out that such roofs are not only used in Norway.
Karluk:
– In Central Asia, in villages, grass soil still replaces the roof on many roofs. It retains heat well in winter, and in summer it is cool in adobe or adobe houses under such a roof.
In addition, on the roof of the building, in addition to the standard lawn, you can arrange a rock garden with a mini-fountain, a flower bed, a garden with dwarf trees and shrubs, or you can simply plant any plants.

"Green roof". Modern approach

A “green roof” is not only an aesthetic design, but also a thermostat that prevents buildings from overheating in the summer and acts as insulation for the upper part of the building in the winter. And the waterproofing roof covering lasts under a layer of soil several times longer than with an open type of roof.
Novel:
– Waterproofing under a “green roof” is carried out mainly with roofing waterproofing membranes. And before the professional roof drainage system was developed, it was done using bulk fillers, but the weight of the roof was 1 sq. m. m was colossal.
Now the main weight of the roof is the soil layer, all other materials weigh less than a kilogram per square meter. The main advantages of a “green roof” include the following factors:
- A “green roof” is an excellent thermostat, which means we save on roof insulation.
- A “green roof” means protection from ultraviolet radiation and extending the service life of waterproofing.
- Modern drainage systems under the ground accumulate water inside the “green roof” pie, which reduces the number of waterings of such a roof.
- Modern geomats will allow you to create any hills and slopes when designing a landscape design, and the area of the “green roof” will compensate for the territory occupied by nature for building a house.
- The quality of the materials used in the construction of the “green roof” will allow it not to be repaired for approximately 50 years.
And the process of installing such a roof can be divided into several important stages:
- The basis for the “green roof” is a monolithic floor with a sufficient margin of safety. Mineral wool slabs are laid on top of it.


The base for a “green roof” must be strong enough, since the weight of such a roof starts from 250 kg per square meter. In addition, the area of the roof saturated with moisture becomes even heavier.
- The insulation is laid in two layers with overlap, but given that the soil layer is also insulation, mineral wool slabs can be reduced in cross-section. Alternatively, the bottom layer is 50 mm, the top layer is 40 mm.


Funny Child:
– In cold climates, care must be taken not to ensure that there is as much insulation, for example, EPS (if it is an inversion roof), as possible, but to ensure that there is not too much of it. If you overdo it, the thin soil layer on the roof may become too cold and the plants will freeze.
For the middle strip above a heated room, the optimal thickness of EPS is 100 mm.
- Waterproofing is performed with a PVC roofing membrane.

One of the important components of a “green roof” is a reinforced PVC roofing membrane. A roofing membrane is a waterproofing coating designed for waterproofing flat roofs. Compared to euroroofing felt, it has a O a greater resource for durability and reliability, which is why it is recommended for use in green roofing systems that are not available for routine and routine roof repairs.
- The drainage and storage system reduces the number of waterings by half.
The first drainages were bulk materials: gravel, expanded clay, separated by geotextiles as a filter, which, in turn, increased the thickness of the pie and many times increased the weight of the roof per 1 sq.m.
Novel:
– Materials such as geomats for strengthening slopes, and geogrids, which are used to fill soil and create slopes, hills and other quirks of landscape design, would also be useful in a “green roof.”


You can find out how to make a drainage system on the site .
Next, plants are planted on the finished roof. Earth layer thickness should be at least 100 mm, but in general itdetermined by the capacity of the building’s load-bearing structures and the characteristics of the plant root system.

Novel:
– For roof landscaping, there are a large number of ground covers - so-called carpet plants. These are sedums of various colors and sizes. Unlike standard lawns, they require virtually no maintenance.
You can also create a simplified roofing “pie”.
- 1st layer – euroruberoid.
- 2nd layer - waterproofing made of geotextile.
- 3rd layer - coarse sand.
And then light and nutritious soil is laid.
But the following points should be taken into account:
1. The slope of the roof slope for moisture drainage should be 20-28 degrees, then there will be no need to install drainage. If the soil layer is about 20 cm, then the load on the roof will be about 7-15 kg per sq.m. Along the edge you will have to secure a side that holds the soil.
2. The most unpretentious and winter-hardy plants are selected. They will not require additional watering or any care at all. The roof may not need to be repaired for 2-3 seasons.
Roof plants such as dandelion, mantle, knotweed, plantain, and wormwood are remarkable in their natural simplicity. They correspond to the natural style and are most suitable for our climatic conditions.
Also, to complete the picture, the experience of constructing such a roof according to the recipe of our northern neighbors is interesting.
 np28alex:
– In Norway, they take the same soil that was removed during foundation work. They don’t sow anything, and what’s around grows on the roof. And in order to obtain stable turf, a layer of soil of at least 10 cm is required.
But even centuries-old experience should not be blindly copied, because It is necessary to take into account the specifics of our climatic conditions.
Funny Child:
– In Norway, the climate is warm, humid and foggy, due to the proximity of the Gulf Stream, and it has very little in common with ours in Moscow. And the classic Norwegian roof consists of several layers of birch bark, collected at a certain period (immediately after the end of sap flow) and only from high-quality trees no more than 40 years old. And this is not counting the many tons of soil that need to be thrown up.

You can often hear the opinion that “green roofing” is a very expensive solution and it has a lot of limitations.
Aleksej2000:
– At one time I considered a “green roof” as an option for a future home. And that’s why I read a lot about her. But in the end I refused due to, as it seems to me, many restrictions. For example:
- The large weight of the roof leads to an increase in the cost of the rafter system.
- The roof slope cannot be made steep, and because of this it is impossible to use the attic.
This means that you will have to increase either the area or the height of the house.
- The roof requires annual maintenance.

Novel:
– Regarding the weight of the roof: at this stage the main weight is a minimum 100 mm layer of wet soil and plants, the weight of waterproofing and drainage with a filter of 0.5 kg per square meter. That is, the entire structure weighs half a kilogram before filling with soil, and bulk heavy drainage is no longer used for landscaping the roof.
The roof slope can be absolutely anything; even a vertical surface can be landscaped. To obtain a pitched roof, we use the same technology, only we add a special geomat and an anti-erosion mat.
Novel:
– Maintaining such a roof is more of a hobby or pleasure. By the way, due to the presence of a water-collecting storage drainage, you can water a “green roof” three times less often than a regular flower bed, and in order not to care for the plants, you can plant such ground cover as the so-called carpet plants; they, like moss, do not require care, and if put drip irrigation, then this is absolutely beautiful.

Users of our forum will tell you how to plant grass on the roof yourself. All information about “green roofing” can be obtained. From this video you will learn how to choose modern roofing materials. And this video clearly tells about the so-called "hedge".
Recently, the technology of arranging vegetable roofs has become very popular. A green roof is a multi-level roofing “pie” on which you can grow unpretentious beautiful lawns or even set up a real garden. Today, green roofs are installed with your own hands not only on the roof of a private house in rural areas, but also on urban high-rise buildings.
Features of a green roof
Trees and grass growing on the roof are by no means a tribute to modern fashion. Suffice it to recall the Gardens of Babylon, which glorified ancient Babylon. In the 18th century, Icelanders lived in turf houses that they carved out of the hills. At the same time, it was discovered that the vegetation living on the roof can protect against cold and wind in bad weather.
Green roofs are a national tradition in Norway that has existed for several centuries. They are covered with birch bark, peat and overgrown with grass and moss. Green roofs have firmly established themselves on the roofs of Toronto, Zurich, San Francisco, London, and Madrid.

Plant eco-roofs are very popular, and there are several good reasons for this. Let's find out what's the matter:
- Durability. A green vegetative roof with gas will last longer than a conventional roof. After all, soil and plants best protect it from negative environmental factors, as well as from weather conditions. If you properly care for such a roof, the service life of the roof will exceed 20 years.
- Rainwater retention. This is especially true when there are heavy rainfalls, because the drainage system often cannot cope with large amounts of water. Lawns and other vegetation located on the roof are able to absorb part of the precipitation - about 27%. This is an effective way to help prevent flooding. In addition, pollution of nearby rivers and reservoirs is reduced.
- High levels of sound insulation. By setting up a roof garden, you will notice that the background noise in the living area has been significantly reduced. And this is especially important for residents whose houses are located in areas where it is very noisy.
- Great thermal insulation. The house under a plant roof is warm in the winter, and cool in the summer heat. Therefore, heating and air conditioning costs are reduced.
- Extra space. The area of the exploited green roof provides additional usable space for landscape design. Here you can sow a lawn, lay out a garden, and arrange a swimming pool. This will give you a great place to relax.
- Improving the situation from an environmental perspective. This is especially true for large cities. After all, sometimes it’s difficult to find a place for a park among concrete and asphalt. Plants located on the roof can clean the air efficiently. They retain more than 25% of dust, harmful impurities and substances contained in the atmosphere. They also reduce the greenhouse effect and smog. For example, in Chicago in 2001, a lot of green roofs were built - about 1000 square meters. m.
- Aesthetics. A house under a green roof looks unusual and original. And I can’t tell you how much attention it attracts to itself! In America there is even a special corporation for green roofs. She provides free installation of eco-roofs on any home. In Russia, such trends are not yet common.

Types of green roofs
There are several types of vegetable roofs, depending on the technology of their arrangement. Let's look at them in more detail.
Extensive green roofs
This kind of roof gardening involves using light soil (the layer should be 5-15 cm thick) and unpretentious plants that do not require constant watering. As a rule, evergreen and hardy species are chosen for planting, which form a continuous carpet on the roof, for example, sedums and other succulent specimens. The weight of the soil layer, as well as planted plants, per 1 sq. m. averages 20 kg. Therefore, there is no need to further strengthen the base.

This is a fairly simple technique for protecting your roof and creating an autonomous ecosystem. It is usually used to install a green roof on country gazebos, outbuildings, garages and private houses. The creation of recreation areas is not expected. Therefore, such a solution can hardly be called a full-fledged garden.
Intensive green roofs
This option involves laying out a full-fledged garden on the roof and creating paths. It is possible to design an area where household members will have a picnic and install gazebos. Often, swimming pools and other bodies of water are located on such roofs. Most often they are formed on multi-storey buildings, shopping and entertainment centers. Green roofs have long been not uncommon for expensive hotels.

To plant trees and shrubs, a reliable foundation is built and a layer of soil is poured, which is up to 1.5 meters thick. The load of the entire system with soil and plants, which is per square meter, in this case reaches 700 kg. Intensive systems require regular watering. Other care is also needed - mowing and fertilizing.
Flat and pitched eco-roofs
Roofs with a lawn or garden are divided into flat and pitched. For many centuries, vegetable roofs were installed exclusively on flat surfaces. For example, this is what tarred roofs in the city look like today. However, you can also create a green cover on the sloping roof of a private house located in a village. For this purpose, special screens are used. They are intended for plants on the roof. Thus, both landscaping techniques are used on flat roofs. On a pitched roof, it will be possible to arrange a lawn only using extensive green roof technology.
Green vegetative roof design
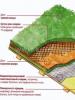
Any green roof is a so-called “layer cake”. It consists of several mandatory layers. Let's take a closer look at them.
1. Base
The first layer of vegetable roofing is the supporting structures of the roof itself. For a flat roof, these are concrete floor slabs; for a pitched roof, these are continuous sheathing. If there is a roofing covering, for example, tiles, it must first be removed. In the case of a flat slab, it is recommended to create a slight slope for the roof. It should be directed towards the drain and be about 1.5-5 degrees. For this, a cement-sand screed is used.

2. Waterproofing layer
Before you make a green roof, worry about waterproofing. Without exception, all plants need moisture and regular watering. But such exposure is extremely harmful to the materials from which the roof is made. Therefore, waterproofing is used, which fences off the soil on which the plants grow from the roof itself.
Make sure that the waterproofing layer is as reliable as possible. Otherwise, if there is a leak, you will have a hard time getting it repaired. After all, removing all the layers located on top of the waterproofing is very expensive and time-consuming.

For this purpose, polyethylene film or polymer membranes are used. Liquid rubber is also great for this. Waterproofing can be placed directly on the roofing. Or they can pre-create a coating from marine plywood. If you use boards, there should be no gaps between them. Usually 2 layers of waterproofing are done. The lower one is mechanically attached to the base. The top one needs to be fused. The seams are securely soldered.
3. Thermal insulation
The thermal insulation layer is usually created from slabs made of cork. Polyurethane foam or extruded polystyrene foam are also successfully used. The slabs are stacked closer together. If the top layers do not create enough pressure, connect them using special glue.

There is no need to attach the slabs to the base. On a pitched roof, additional insulation is not required, since this layer is already laid on the attic side between the rafters. If you decide to build a roof made of green moss, it will be useful to know that this plant has been used since ancient times to insulate the roofs of houses.
4. Root barrier
A root protection layer is necessary to prevent damage that can be caused by roots growing deep into the roof. The barrier for roots, as a rule, is an ordinary polymer film or foil. A film that has a metal coating is ideal. It is laid on a layer of waterproofing.

Many manufacturers produce waterproofing materials that contain anti-root additives. If you want to plant ground cover species on the roof, then you don’t have to lay such a covering. This also applies to the procedure for creating a lawn; do ordinary waterproofing, that will be enough.
5. Drainage layer
Drainage material is capable of retaining a certain amount of water, which is necessary for the life of plants. In this case, water should move freely along the roof towards the drain. In the case of a sloping roof, the water drains off on its own if you provide special holes for this in its corners.
On a flat roof, it is imperative to pay attention to ensure that water does not stagnate. To create bottom drainage, it is recommended to lay expanded clay, which has a large or medium fraction. Good results are demonstrated by crushed pumice, perlite coconut or polyamide.
You can buy special artificial mats. These include “geomat” made of plastic, which are mesh grids of great flexibility, similar to rough washcloths. In extreme cases, loosened clay and ordinary gravel are suitable. When arranging the drainage layer, take care to install perforated pipes to improve water flow.
6. Filtration layer
This layer is necessary to retain unnecessary precipitation. After all, they are capable of clogging drainage, coming from the soil with water. Geotextiles, which have a high density, are a good filter. In addition, the geotextile helps to avoid mixing the drainage layer with the soil, which occurs over time. It is laid with an overlap.

7. Lathing
If you are planning to green a low-slope roof, you should use a geogrid. After all, if the slopes are inclined more than 25 degrees, the soil will slide without fixation. The geogrid has the form of plastic cells. It's quite light.

When installing a green roof with your own hands on a roof that has a slight slope, it is enough to make special partitions from wood. They will not allow the soil to slide. To create an aesthetic effect, lay out a beautiful geometric pattern with latticework. Don’t forget to make borders around the perimeter to hold the “layer cake” together.
8. Fertile soil
At this stage, a layer of soil is created. This is where you will plant your plants. When choosing a soil mixture, the requirements of the plants being planted are taken into account. For ground cover species and grass, a layer 5-10 cm thick is required to create a lawn. The height of the soil for planting shrubs and trees should be up to 1 m. Soils for use on the roof should be light in weight, warm, moisture-absorbing and porous. It's good if they are resistant to compaction. The usual mixture from the garden is not suitable for this task.

You are recommended to use a light soil mixture, which consists of neutral peat with special components, such as fine expanded clay and perlite. Also add sand, clay and shale. If desired, crushed bark and wood chips. Don't forget about fertilizers. The top layer can be mixed with grass seeds, which is intended for growing lawns.
9. Plants on the roof
After laying all the layers for the green roof of a wooden house, you can start planting.
- When choosing representatives of the flora, keep in mind that conditions will be created here that are close to desert ones. This is the sun and the wind. Therefore, choose the most unpretentious species.
- Among trees, give preference to dwarf species. They should have a small root system.
- A roof planted with frost-resistant grass, as well as ground cover plants using extensive gardening technology - sedum, sedum, sedum, creeping phlox, looks advantageous.
- Choose moss, various meadow flowers, some bulbous flowers, and bells for planting on the roof. Also consider cloves, oregano and lavender.

Thus, greening roofs is a fashionable trend that allows you to radically change the appearance of buildings and add usable space to your garden. In addition, if you follow the technology correctly, you can protect your home from bad weather and excessive noise.
Decorating a summer cottage is no less important a task than growing juicy vegetables and fruits, and therefore, when working on a summer cottage, sometimes it is worth thinking about the beauty of the landscape and buildings. Today a green roof came into our field of vision, and more details about this design are available now.
A green roof at a dacha is not just a green roof that is clearly visible from afar, it is a whole complex of processes, objects, individual actions and stages of creation, which leads to an incredible result. At the same time, if we do everything correctly and in accordance with the latest requirements, then we will not load the floors, spoil the roof, and will not breed fungus and mold on the roof, but only beautiful ornamental plants that will seriously change the appearance of the dacha and its status.
Greening a roof is a wonderful way to expand the usable area of a site, but not only that, because we can decorate any building in an original way, carefully and originally fitting it into the landscape and exterior of the area.
Features and design requirements
As far as you understand, a green roof is a certain weight, and therefore, having decided to organize such decor, we must accurately calculate everything. First of all, it is necessary to take into account the strength of the floors, and only based on this, calculate the thickness of the soil and the type of plants for planting. We would like to immediately state that the safest and most suitable roof for our project is a reinforced concrete one, which can sometimes withstand up to half a meter of soil in thickness, which means that it will be possible to plant not only decorative flowers, but even shrubs and small trees. If the strength of the roof is questionable, then there is no need to risk it, because you can decorate it with other plants that require much less soil, for example, sedums or saxifrages.
Any green roof is a multi-layer structure, one might even say that this is an original layer cake, created from a variety of materials to decorate a country house.
Do-it-yourself green roof installation
We will describe the process sequentially and step by step so that absolutely everyone, even a beginner, can understand and assimilate it.
The basis
There can be many options here: wooden sheathing for installing a green roof, solid wood material, and even a special frame at an angle if you need to change the format of the roof and its design. But it should be assumed that the substrate or frame must be durable and well protected from atmospheric agents.
Waterproofing layer
 Each plant requires timely watering, otherwise you may not end up with a green roof, but, for example, a yellow roof made of dry plants. But water for irrigation has a beneficial effect only on plants, but not on the roofing material. Therefore, we need high-quality waterproofing that will prevent irrigation water from penetrating under the frame, stagnating there and ruining the materials. The water will be stored in cassettes with soil and constantly feed the plants, or you can make a light runoff through waterproofing (which is very correct and according to technology), but then change the watering schedule, make it a little more frequent.
Liquid rubber, polyethylene film or special polymer membranes are tightly placed on the base of our structure and secured.
Plant Root Barrier
The next layer must be placed on top of the waterproofing, otherwise over time the plants will grow and enlarge the root system, which will ruin the waterproofing layer. Replacing it will not be easy, and therefore it is better to take care of its protection in advance. A polymer film can be used as such a barrier, or when purchasing waterproofing, make sure that it already has a special anti-root layer.
Drainage layer
The drainage layer will ensure retention and drainage of water, that is, regulation of its correct and required amount in cassettes with plants. On a sloping roof, some of the water will drain through a drain, which it is advisable to think through in advance; on a flat surface, it will be necessary to provide for the drainage of water from the waterproofing into storm drains, since stagnation of moisture will not lead to anything good.
Drainage can be made from expanded clay, choosing a medium and large fraction for covering the layer, but you can also purchase geomats - special gratings that resemble washcloths and have good drainage properties.
Filtration layer
The next layer is a special filter, which prevents and completely eliminates clogging of the drainage with various inclusions. For this purpose, a special geolayer is usually used, which prevents mixing of soil and drainage.
Geogrid
A geogrid or cassette is necessary if the roof is uneven and has a certain angle. Naturally, on such a roof the soil will not stay on its own, and even if you manage to lay it somehow, after watering and rain it will slide and ruin everything.
In addition to the fact that a grate or cassette correctly fixed to the roof plane will retain soil, it will also help in design and create an additional aesthetic effect.

Fertile substrate for a green roof
Both the layer and composition of the soil will vary significantly, depending on the choice of plants for formation. For example, if you decide to cover the surface with ground-blooded species, then a layer of soil of only 5-7 cm will be enough, but if the plants are decorative, with a solid root system, then the layer of soil will have to be adjusted to suit them. Therefore, it is very important to think in advance about what exactly you will plant on the roof.
Remember that fertilizing such soil is necessary, especially since some of the fertilizer will simply be washed away during watering and precipitation. This does not mean that fertilizing will need to be applied more often or in large quantities, you just should not forget about its timeliness.
Creating a green roof on video
Before installing the structure, you will definitely need to create a consistent work plan and then strictly follow it. In addition, make a general estimate so that you don’t lose sight of purchasing the essentials and don’t spend extra money.
Every person can make a green roof with their own hands., and we are completely confident in this. You just have to have the desire, use your imagination, work consistently and in compliance with installation technology, so that the landscaping turns out to be of high quality and durable.