Sea glass decor. How to make sea glass with your own hands. Master class. The recipe for making glass for handicrafts
Collecting sea glass is a favorite pastime for many beachgoers. Here are some tips for finding sea glass that can be used for crafts, jewelry, other crafts, or just as a fun hobby.
What is sea glass
As the name rightly suggests, sea glass is that glass that comes from the sea. In general, this is the creation of human hands, but it was only cut by nature itself. And that doesn't mean it's something naturally produced in the sea, like shells. It is actually a term used to refer to smooth pieces of glass and etched pieces of glass that are washed ashore by the waves.
These pieces of glass are nothing more than the glass and bottles that people have been throwing into the seas and other bodies of water for many decades. These pieces of glass are smoothed as they remain in the water through constant rotation by waves and friction against the sand.
The composition of the glass reacts with seawater and the glass is separated into smaller pieces of glass, which are then found on the shore. This transformation process takes years, sometimes decades. Regular pieces of glass must go through all these changes to become real sea glass. This mystery of glass shards makes them even more attractive to search engines.
Once washed ashore, the shards take on the appearance of real and brilliant gemstones that are capable of displaying the entire artistic side of Mother Nature. This awareness is one of the reasons that pushes people to collect them so enthusiastically and turn them into their hobby. They become real collectors of sea glass. These pieces of glass are also known by another exotic name - mermaid tears.
The most common colors found when searching for such glass are white, green and blue. And sea glass in colors and shades of red, gray, turquoise, black, pink and yellow are extremely rare (occurring on average, one piece in 5,000) and orange (the least common, 1 in 10,000 pieces).
For amateurs and amateurs, collecting sea glass is no different from collecting professionals. But this work, it turns out, has its own nuances.
First, you need to know where to look for sea glass.
Secondly, determine the right time to collect them.
There are some beaches in the world where you are sure to find sea glass. One of them is the "glass beach" at Fort Bragg, which before the 1906 earthquake was an ordinary landfill. So, the search for those beaches that were once used as burial places for the waste of humanity is the main task of the searchers.

Beaches that were once used for mooring ships may also be suitable for these purposes. It is especially necessary to explore those places that were located near the pier.
The best time to collect glass is spring, during most high and low tides, and during the ebb of water after a storm.
Sale and purchase of sea glass
Nowadays, there are more and more people who want to become a collector of rare sea glass. But, unfortunately, glass fragments began to be found less and less often, as people began to use plastic containers more often and glass bottles almost stopped being thrown into the sea.
It turns out that in our time, sea glass sellers have begun offering their services to lovers of this hobby. It can also be bought on the Internet. But, for true lovers of this hobby, you should keep in mind that these will most likely be polished pieces of ordinary glass artificially made in factories. Artificial sea glass is physically denser and therefore copies lack the so-called surface etching that is usually always present in the original.
So, if you want to have original sea glass in your collection, then you need to take a bag, a stick, apply sunscreen and go to the beach.
Applications of sea glass
There are many options for using sea glass. For example, for making jewelry and jewelry, for decorating vases, candlesticks, plates, using wire weaving techniques -
How to make sea glass with your own hands. Master class
We will not collect glass on the beach from broken bottles, which the sea has polished all the corners until all corners are smooth. We will take a cunning path using a simple tool: we will produce materials for handicrafts from glass. Or rather, sea glass from bottles is the process of making it at home.


It is worth mentioning one wonderful place in California, where fifty years ago there was a huge landfill. After the closure, the sea recycled this material for needlework and this is what came out.
See how broken bottles and various glasses are polished to a shine, and the scale of this action is several kilometers long. The dream of every needlewoman.
So, let's get down to handmade production of smooth glass for handicrafts:
· We find colored glass, it can be: bottles, vials, jars or any glass
· We are looking for a concrete mixer. This unit is not easy to find, but it is possible. Look at construction sites, at dachas, and maybe even in garages.
· Carry protective equipment with you: reliable clothing, glasses and gloves. Oh yes, and a hammer.
The recipe for making glass for handicrafts.
First, we break the glass into small pieces, slightly larger than what you need for the product. This can be done in a bucket, container, or box. Be careful when breaking glass to avoid injury from flying shards.
Place in a concrete mixer:
- approximately 1-2 kg of broken glass pieces;
- 0.5 kg of salt, sea salt is possible;
- about 5 liters of water;
- 2 liters of coarse or fine sand;
We start the concrete mixer and look at the condition of our pieces of glass every hour.
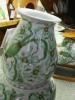
The process of making sea glass for handicrafts is very noisy, long, and unclean. Although, if you want to have such wonderful sea glass, you can wait about 4 hours. After all, such sea glass can be used as a material for needlework. For example, for making jewelry, for priming decorative artificial flowers, for decorating photo frames, photo albums, decorative vases and bottles, cups for handles and jewelry boxes, and even for priming in an aquarium.
She is a designer by profession, but her hobby is perhaps more interesting than her main job. Andria creates wonderful jewelry from pieces of glass thrown ashore by the waves.
Firstly, a walk along the seashore is a lot of fun and serves as an excellent stress reliever. Secondly, finding unusual stones, pieces of glass, and porcelain gives great pleasure.


When Andria finds sea treasures, she already knows what kind of jewelry she will use and how she will use them.


Her products are in demand and bring in a good income. And she finds the work itself very calming and therapeutic. Andria is proud to make its contribution to preserving the environment by clearing glass and porcelain from the shoreline.


The basis of these sparkling decorations are pieces of glass rolled by the sea. Each piece of glass is framed with shiny colored wire.

The pieces of glass obtained from the sea are decorated with classic jewelry materials, shells, rhinestones, and glass beads.


This decoration is based on a piece of broken crockery.

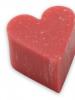
In this heart, according to the craftswoman, is the essence and abundance of the ocean, the beauty of which will be present all year round. It is covered with many beautiful shells of different shapes and sizes, interspersed with pieces of glass found on the beach, jewelry, artificial pearls, driftwood, sparkling rhinestones, curled vine tendrils and even a small crab. Everything is varnished together.

The photo frame is made of a wooden frame and covered with pebbles, pale pieces of glass found on the seashore. Shells, buttons, jewelry, and tiny delicate pearls are also used. Everything is varnished. The work was done using the technique of complex mosaic.

This photo frame uses pieces of ceramic or porcelain. Please note: the edges of the porcelain pieces are masked. They can be covered (glued) with small pearls, glitter, fabric outline, etc.

My interests, like my products I am quite diverse, which makes it quite difficult for me to somehow classify my style. A little alternative art, a little steampunk, mosaic, vintage... In this way, my jewelry is similar to me.
Sea-cured glass collected on the beach became my inspiration for creating a mosaic - both in the bathroom and in the hallway. This panel, for example, is located above the bathtub and is almost the length of the entire wall.
And the work is not particularly difficult, although painstaking. The wall needs to be cleaned and primed (this required my husband’s help). You also need to purchase a bag of dry tile adhesive. Like primer, it is “found” in construction markets; you can consult sellers there about a specific type of product (for the bathroom it is better not to skimp on mold-resistant materials). We dilute a little glue with water until it becomes a very thick sour cream, generously fill the concave side of the glass with it, press it against the wall, and remove the excess that has come out at the edges with your finger. We continue to put together the puzzle. ;)

The surface will be very dirty - don't be alarmed, the glue hardens quite slowly. Leave it on for a couple of hours (out of habit and this is a lot), then rinse gently with a washcloth, trying not to destroy what you have done. And let it dry.

This is what the work in progress looks like: below is yesterday's layer, on top is fresh. Don’t be upset if the mosaic doesn’t look impressive yet: when it dries, it turns pale, but when you take a bath and the room is filled with steam, it will sparkle like treasures in a fairytale cave!

When the entire wall/picture is finished and the last “batch” of glass has completely dried, you need to start grouting the joints. The special composition is purchased in construction stores/markets, the dilution proportion is indicated there, make the minimum portion, because the work is labor-intensive. The peculiarity of this particular material is that it needs to be stirred for a very long time and thoroughly. On an industrial scale this is done with a drill, but I could do it with a fork. You can also buy not colored, but just white grout and color it with pigments for paints.

We collect a little composition and begin to literally rub it into the seams, filling them and leveling (as far as possible with this crooked semi-natural material) the surface. The words “grouting joints” should be taken literally: when after a couple of minutes the composition has hardened a little, you need to return to this area and rub it with your fingers until the joints are as smooth as possible. You need durable gloves - buy them in abundance!

After completing the daily grouting requirement, you can take a walk for half an hour, and then begin to wash the surface - so that it is no longer washed out of the seams, and the glass particles are cleaned off before the mixture hardens.