How to properly install foundation blocks for a cabin. Do-it-yourself foundation for a cabin made of blocks: features and sequence of work. What can you install a change house on? Installation of a change house. Types of foundations for cabins
A change house is a structure for temporary residence that does not require a capital foundation. But if the change house is installed as a country house, bathhouse, workshop and there are no plans to move it to another place, then it would be advisable to take care of laying the foundation. The foundation will give the structure stability, prevent its deformation and extend the life of the structure. To build a foundation, it is not necessary to call in professionals or use expensive equipment, because you can do everything yourself - the main thing is to choose a simple, inexpensive and effective method of laying a foundation.
Do you need a foundation for a cabin?
Laying the foundation provides many undeniable benefits.
- Increases the strength of the structure, preventing soil shrinkage.
- Improves sound and thermal insulation.
- By insulating the base of the cabin from the soil, the service life of the structure increases.
- Improves aesthetic appeal.
The construction of a foundation is especially important for structures mounted on soft, unfavorable soil, as well as for premises with a large weight (warehouses).
Block foundation for a cabin
Installation of a change house on blocks
A foundation on blocks is the most common and inexpensive type of foundation for a change house. To create a foundation from blocks, you need to pour a mixture of sand and crushed stone onto an area previously cleared of vegetation. This is necessary to level and harden the surface. At a distance of no more than 1.5 m along the perimeter of the building, install columns made of blocks, 20–40 cm high. To improve waterproofing properties, it is recommended to place a piece of roofing material on each column.
To improve the strength of the foundation, a small foundation tile can be placed under the base of each block, which will prevent the block column from sinking into the soil. After this, the block foundation is considered complete.

Foundation for a shed made of tires
A foundation made from car tires is the cheapest and best way to install a lightweight structure. The step-by-step instructions include several steps.
- Clear the area of vegetation.
- Dig a pit 30-50 cm deep, taking into account a 20 cm indentation on each side.
- Compact well with crushed stone.
- Mark the area.
- Lay down the tires.
- Fill the space between them with sand and crushed stone.
- Install formwork around the perimeter and fill with concrete.
- Drop the surface.
Tire foundations can be made on clay soil, soft ground and in areas with high seismic activity.
Pile foundation for a cabin
Pile foundation technology is used in places where the soil topography is uneven or in areas with unfavorable soil prone to flooding, swelling, etc. There are several methods for installing piles.
- The driving method is based on deepening piles using a pile hammer.
- The drilled method is more accessible for independent execution. Using a hole drill, recesses are made along the perimeter of the building into which the formwork is inserted, reinforcement is laid and concrete is poured.
- A pile-screw foundation requires the presence of screw piles of the required diameter and length. The piles around the perimeter of the cabin are screwed into a dense layer of soil. Then they are connected to each other by a channel or I-beam.
How to make a foundation for a cabin with your own hands
The construction of any type of foundation must be approached taking into account the natural landscape, soil composition and weight of the structure. There are several basic ways to install a shed on a full foundation: use blocks, car tires or piles for this purpose. Each type of foundation will have its pros and cons. For example, for a flat, hard surface it is better to use blocks or make a strip foundation.
But for wetlands or areas prone to flooding, screw piles are more suitable, which will give stability to the structure. On soft soils, it is advisable to use tires that absorb uneven deformations that occur during temperature fluctuations.
Foundation for a cabin on stilts, video tutorial
Installing the trailer on a solid base is an opportunity to keep the module intact and maximize its service life. Even in cases where the rental of cabins involves a period of less than three months, correct placement allows you to avoid inconvenience, flooding, and problems during subsequent loading and delivery of the trailer to the owner. We have already described the options for preparing the base, now we will take a closer look at the placement of blocks and pedestals as support.
There are two options for using concrete blocks to install a shed. This is a columnar foundation and a strip foundation - the difference is that the second support is made in the form of a solid wall without breaks. To temporarily place a trailer, it is enough to use pedestals, an analogue of a columnar foundation. This option is also suitable for cases where the area is not flooded, the soil is quite dense, and there is no significant difference in elevation. If there is a need to connect block containers into a modular building, it is better to focus on a strip base.
What blocks are suitable for the foundation of a block container
The main material used is FBS parts (foundation wall blocks), marked 4-2-2, which means dimensions 390x190x190 mm with a weight of 39 kg. This is the optimal ratio for sufficient strength, stability and moisture resistance. When choosing the composition of the block, you should take into account the type of foundation - the greatest load falls on the columnar elements, so you should not buy blocks made of porous concrete, expanded clay concrete, or aerated concrete. They are suitable for strip foundations, which accept and distribute loads differently.
Preparing the site and leveling the blocks
Experts and craftsmen advise giving the base additional strength by laying paving slabs or stone under the block. This is justified in places where the risk of excessive wetting of the base is very high. The parts glued together with tile adhesive will create good support for the main block. But even for them you will need to prepare the surface.
The process of laying and leveling blocks for a change house is carried out in stages:
- find and mark on the site a level area of sufficient size, not floodable, preferably located in a high place, make preliminary markings with posts and ropes;
- remove a layer depending on the type of soil - sometimes 15 cm is enough, sometimes you have to go deeper, it depends on the soil and the behavior of groundwater;
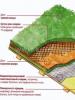
- form a sand or sand-gravel cushion, compact the layers tightly, after laying geotextiles on the ground to protect against sand erosion;
- make recesses for concrete blocks, lay paving slabs or stones in them, depending on the depth, lay a layer of waterproofing and install FBS.
At the stage of preparing the cushion, compacting and installing blocks, the level must be accurately determined and a completely horizontal plane must be created. To do this, small bases, for example, made of tiles, are installed according to the markings, a long board is laid on them, and measurements are made with a building level at the beginning and end. “Sighting” is done especially carefully in the corners so that the multidirectional sections of the foundation are in the same plane. The level determined in this way is marked with stretched ropes; the blocks that are higher or lower are leveled by adding or removing part of the soil. It should be remembered that the compaction must be dense, otherwise the foundation columns may sag.
Installation without site clearing
For the temporary installation of a change house, the site does not need to be cleared or the soil removed completely. It is enough to align the plane and make recesses with bedding and base only in the places where the supports are installed. The distance between them is approximately 1.5 - 2 m; with this arrangement, all conditions are created for uniform distribution of the load along the long side and corners of the trailer. If at the place where you use the trailer you are bothered by the summer heat in the cabin, you can leave the lower part of the base open for ventilation. But in the winter you will have to cover this gap with boards so that snow does not accumulate under the bottom of the container. Ventilation vents must be left in the strip foundation.
There are other types of temporary and permanent foundations for change houses. They are applied depending on the conditions in a particular area and the expected duration of use of the module. Savings on a change house are real if we are talking about the right choice of the trailer itself, and not an attempt to reduce costs and time for preparing the base. With proper installation and waterproofing, the trailer will last a long time, especially if it is cared for and periodically maintained by the finishing, cladding, internal frame parts and insulation layer.
The presence of a support base raised above ground level will ensure effective ventilation of the lower part of the cabin structure and prevent the formation of metal corrosion and rotting of wooden elements. In addition, the structure will be stable during operation without subsidence or distortion that could compromise the integrity of the structure.
Unlike heavy capital buildings, the foundation for a change house has a number of design features related to the low weight of the module and the conditions of temporary operation. The construction of a heavy permanent foundation for a cabin is not advisable and in most cases, simplified lightweight supports made from foundation blocks, lined stone pillars, on piles and even from car tires are used for its installation.
The foundation for a change house must be strong enough, inexpensive and simple in design. Its installation should not require the use of special construction equipment and can be done with your own hands.
Installation on concrete blocks
The use of blocks to construct the foundation of a cabin is one of the simplest and fastest construction options. However, installing block supports makes sense if you have used materials or can purchase them inexpensively. Purchasing new concrete foundation blocks may not be practical due to their high cost.
The block foundation is erected on dense, stable soils. To do this, the site must be cleared of existing vegetation and the top layer of soil must be removed to a depth of 20-25 cm in the areas where the blocks will be installed. The bottom of the dug trenches is filled with sand, crushed stone or gravel and then compacted well using a tamper. The height of the bedding layer should ensure the same height of the blocks above the ground in the horizon.
Block installation diagram
The block base can have a strip, transverse or columnar structure. In the first case, the blocks are laid around the perimeter of the cabin or along the longitudinal support beams. The transverse arrangement involves installing blocks perpendicular to the longitudinal axis of the module, and the columnar arrangement with gaps between the supports of 1.5-2.0 meters. For the construction of columnar supports, in addition to concrete, you can use solid brick, rubble stone and other materials with low porosity. It is necessary to lay a layer of waterproofing between the support pillar and the longitudinal beam of the cabin.
The most important thing is to set the tires strictly vertically and at the same horizontal height to evenly distribute the weight of the cabin. Backfilling is performed with non-metallic materials.
| Flaws | |
| Accessible | Hard ground required |
| Fast | Not aesthetically pleasing |
| Can be dismantled |
Foundation on stilts
Schematic diagram of a shallow strip foundation
If you need to install a change house for a long-term period, it is advisable to make a capital foundation. A 0 cm deepening into the ground is sufficient to ensure the necessary stability of the structure. Concrete grade M300-400 is suitable; the process itself is no different from installing a shallow foundation for any other building.
- A trench with a depth of 30-35 cm is being prepared, the coals can be made deeper - 40-60 cm in order to exceed the level of freezing in the soil in your region. The width will be sufficient within 30-40 cm.
- The reinforcement is installed in the frame, 2-4 beams around the entire perimeter. Here it is important to use a wire connection of the rods.
- Formwork is installed, if necessary, in order to level the horizon. If you do not use this method, the level can be drawn out in several rows of bricks.
- A sand cushion is poured into the bottom of the trench, which will serve as a buffer between the soil and concrete. The concrete itself is poured.
On such a foundation, any heavy structure, including a block container, will stand for quite a long time.
As you know, nothing is as permanent as temporary. Anticipating this, when building a temporary house for various household needs on a summer cottage, construction site or in any suitable place, it is necessary to think in advance about where to place the change house so that over time the base does not become the weakest link of the object.
The foundation is the basis
Even if you install a household house for only a few months, followed by its subsequent movement after the workers to another site, you cannot place it on bare ground. The fact is that the soil tends to settle and move under the influence of internal processes and atmospheric phenomena. Even the simplest foundation for a change house will provide her with:
- Stability.
- Safety.
- Sustainability.
- Safety.
A well-thought-out foundation of the structure will evenly distribute static and dynamic loads on the ground, protecting the building from premature destruction, deformation and erosion by groundwater. Those planning to lay a foundation for a cabin with their own hands must first calculate many parameters so that the installation work on the foundation itself does not cause the destruction of the entire structure. Among them:
- Soil quality and composition.
- Weight of the building.
- Availability of groundwater.
- Seismic situation in the region.
- Choosing the optimal material and type of construction for the foundation for a change house.
- Temporary or permanent structure.
It must be borne in mind that it is not a fundamental structure being built, and therefore there is no point in investing extra funds. It is optimal to calculate the most budget-friendly option for the basis. Everything that an amateur struggles with for a long time and irrationally is easily given to a professional. Therefore, the first thing you need to decide is whether it is worth spending your time and nerves on an unknown matter. Maybe it’s better to order a service from specialists?
Types of foundations for cabins
Depending on the functionality of the future trailer, a base for it is selected. If you need a storage room or temporary shed on a garden plot, then it is meant to install the structure in one place only once. In this case, we advise you to take a closer look at the shed on screw piles as the most reliable option.
It is better to place the mobile trailer on an inexpensive base, which, moreover, can be disassembled and taken with you. In this case, a welded metal shed is often used, which is placed on concrete blocks. Plus, low installation and dismantling costs. To make the right choice, you need to explore your options.
On screw piles
One of the simple and uncomplicated ways is to erect a temporary structure on the piles that are supposed to  screw into the ground. Here you will need to spend a little money, this is not the cheapest option, but having done the job well once, you won’t have to save a rickety house. For mobile structures, this method is not very convenient, but summer residents may take a closer look at it, especially in a relief area.
It is important to know exactly how to choose screw piles for a change house, but here the main parameter will be that the number of piles corresponds to the weight of the future structure and the absence of problems with the soil. According to the norm, for every one and a half meters of the contour it is necessary to screw in one screw pile under the change house. As for the soil, the ideal soil is one in which there is loam at a depth of about 2 meters.
The foundation for a change house on screw piles is an ideal solution on clay soil
On poles
Unlike a pile foundation for a cabin, the pillars are not a stationary support. If you have a flat area with hard, stable soil, and you plan to move the temporary shed from time to time, this may be your option. Moreover, it refers to low-cost methods of installing the base.
Pits of the required size are prepared, the bottom is reinforced, a concrete pad is poured with the ends of the reinforcement extended. A week later, the frame is attached to the left reinforcement and the formwork is installed. After this, the pillar is installed directly, for which both red brick and concrete are suitable. The shed frame is then placed on the poles.
In this case, you use either a prefabricated or monolithic method of foundation on pillars. This option is more labor-intensive than a screw foundation for a cabin, but no special equipment is needed.
On concrete blocks
An ideal option for construction and road crews, rotational expeditions and other mobile work teams are foundation blocks for change houses, which are “easy to lift,” inexpensive and quick to install. A parking space for the trailer is allocated, contours are marked, standard blocks are installed, and the horizontal is determined by the level. If necessary, the soil is added or dug up. You can park a trailer.
other methods
Creativity in a Russian person is not just a national trait. This is a way of being. And even in such a non-creative matter as the construction of a foundation for a temporary shelter, its “kulibin” appears in each individual case. Here are some options:

Optimal for everyone - foundation on blocks
Who can know exactly what will happen in a year, five, ten years? Will this trailer be needed in this particular place over time? Rhetorical questions. It is not possible to install piles under a cabin or use other methods everywhere. Some things are expensive, sometimes the ground doesn’t allow it, sometimes the necessary equipment is not available. And only the foundation for a shed made of blocks has no contraindications.
Let's focus on the choice of concrete blocks. There is no need to purchase bulky FBS (foundation wall blocks) unless the temporary shed is eventually going to be converted into permanent housing. These materials are large in size. It is better to choose a concrete block for the change house of the FBS 4-2-2 brand with dimensions 20x20x40, whose weight does not exceed 40 kg. For insurance, the blocks are fastened together with tile adhesive.
It is better to exclude aerated concrete, expanded clay concrete and foam concrete due to their high hygroscopicity. The material must be free of voids. If you already have exactly these, you shouldn’t buy whole ones. The voids can be filled with concrete. Of no small importance is the price of blocks for a change house, the most budget-friendly of all the options under consideration, except for car tires.
Step by step to installing a block foundation
If you decide to make the foundation for the cabin yourself, then our step-by-step instructions with photos will help you.
We will measure, if not seven times, then once, but very carefully, the parameters of the change house on the ground. First, we will clear the site from the top layer of soil, branches, roots, and debris. Let's start building the foundation:
- The site is marked by installing corner pegs.
- A cord is stretched between the pegs around the perimeter and diagonally to accurately determine the angles.
- The places where the blocks are installed are marked at a distance of 1.5 - 2 m from one another and at the center of the intersection of the diagonals.
- Holes are dug in the places where the blocks are installed, which are lined with geotextiles.
- Pillows of sand or sand-gravel mixture are filled, spilled and compacted to a depth of approximately 15 cm.
- A layer of crushed stone of 20 - 25 cm is poured.
- Two blocks are laid level and soaked in tile adhesive.
- Two more blocks are laid across the top.
- The order is repeated in all places marked for blocks.

The block base for the change house is ready. You can do all the work yourself. However, this will take up a lot of precious vacation time. Invite professionals!
Consult with our managers, our prices for foundations are more than reasonable.
A summer cottage is the best solution if the site is used for growing various plants. It allows you to completely abandon the construction of a house on the site, and at the same time promotes efficient and effective work.
The greatest advantage of a summer cottage is that this structure does not require a foundation underneath. At the same time, it is recommended to place the change house at the dacha not just on the ground, but on something else, which will avoid premature damage to the base of the change house. This article will discuss what to install a change house on at the dacha.
When considering the issue, you should know that if during the operation of the cabin it will need to be moved from one place to another, then it is recommended to use in this case exclusively wheeled versions of the cabin.
In all other cases, you can permanently install a change house using:
- Sleepers. In rare cases, cabins are placed on rails, logs and beams;
- On concrete blocks and specially laid stone piles;
However, before installing a change house in the country, using anything for these purposes, it is very important to choose the right place to install the change house.
How to choose a place in the country for a change house?
When choosing a place in your dacha to install a cabin, you should know that there are some standards. A shed installed in this way in a dacha must be located at least 5 meters from the dacha fence on the street side, and at least three meters from the neighbor’s fence.
All other nuances of choosing a place to install a change house in a dacha, as a rule, depend on the personal preferences of the dacha owner. Well, now let’s return to the question of what is the best place to install a change house in the country.
The above methods for installing a change house in a dacha are excellent for stationary structures that are not planned to be moved anywhere during operation.
If we consider installing a change house on sleepers, then the presence of a flat surface for installing a change house is therefore simply necessary. The ideal option is to pour a concrete platform for installing a change house in the country and only then lay out the sleepers under it.
In this option, both the sleepers for installing the cabin and the base of the structure itself will not be subject to destructive processes from moisture, which will have a positive effect on the durability of the cabin.

As for installing the cabin on blocks, a flat ground surface is not required. However, this process of installing a change house is the most expensive, since you will have to use either the services of special equipment to lift and transport the blocks, or manually pour them out of concrete.
Be that as it may, but to the question of what to put a change house on at the dacha follows, approaches wisely and prudently. It is better to choose several acceptable options for installing a change house in the country and only then settle on one specific method of installing a change house.
The fastest way to build a foundation today is to use blocks. Although this method has some disadvantages, it acts as a more advantageous solution in terms of saving time. Any builder will tell you that pouring a flat foundation surface and working with it in the future is much more convenient, but the concrete must reach the desired condition before you begin construction of the building itself. As for the block foundation, it can be erected in a short time; work can begin in the fall or spring, and such a foundation is suitable even for a change house.
Territory marking
Before you make a foundation for a change house, you must mark out the area. To do this, you need to mark the boundaries of the building. It is better to do this with the help of a rope, metal pegs and a building meter. When marking, it is important to take into account that the width of the foundation should be greater than the width of the wall.
Excavation

Once the marking work is completed, you can begin to prepare the soil. If you plan to build a columnar foundation from blocks, then around the perimeter of the marking and inside it you need to prepare holes, the depth of which will be approximately 1.5 m. If we are talking about a strip foundation, then you will need to remove the top layer of soil and dig a trench, which will turn out to be wider than the blocks by several centimeters.
When building a foundation for a cabin, you must remember that the depth of the trench will depend on the type of soil. If you have to work in sandstones, where the depth of the aquifer exceeds 2 m, then it will be enough to go deeper by 40 cm; in all other cases, this parameter should be increased.
Work technology

The above stages are preparatory in nature, while the next step will be the main construction, which must be taken seriously. When building a foundation for a shed from blocks, you must connect the elements together with cement mortar, which is sealed before laying.
Do not dilute the solution with water during operation, as this may reduce contact. The blocks should be placed one above the other using the principle of brickwork. In this case, deviations within 15 mm per 10 m are permissible. All seams and joints are filled with mortar to eliminate gaps.
Features of the construction of a columnar foundation

If you decide to build a foundation for a shed out of blocks with your own hands, then the work may be based on the technology of constructing a columnar foundation. In this case, the design will look like this: the support bollards are dug deep into the ground and located around the perimeter of the marking and inside it. This type of foundation can be used for light buildings, this includes not only cabins, but also:
- wooden baths;
- country houses;
- garages.
The construction of such a foundation for a change house is carried out in just one day. Along the perimeter of the building, it is necessary to install cabinets in prepared holes, the height of which will be approximately 40 cm. Their number depends on the weight and size of the cabin. However, before starting to install the pillars, it is necessary to prepare the holes. Their bottom is compacted using a special tool or a long stick. Next, crushed stone is poured, this layer should have a thickness ranging from 10 to 12 cm. The next layer will be sand, the thickness of such preparation can be equal to the limit from 5 to 7 cm.
Work methodology

The surface is leveled, only then can you begin installing the first row. The elements are fastened together with cement mortar. When erecting a block foundation for a cabin, you must remember that the supports must be level. If you allow even the slightest inaccuracy, this can lead to distortions, which will be quite problematic to correct. Therefore, when constructing a columnar foundation, it is necessary to monitor the level by first pulling ropes between the supports.
Construction of a strip foundation

A strip foundation made of blocks will be more durable. It consists of tapes that will be located under the load-bearing elements. Expanded clay concrete blocks are best suited for work, as they are lighter than concrete ones. In addition, installing such products is quite easy. Their weight is only 30 kg.
The construction of a strip foundation is carried out according to the scheme described above, however, a filter pad made of crushed stone and sand is placed in a trench. For the bottom row, you should use pillow blocks, and you should start laying them from the corners and those places where the walls will intersect. After installing the corner blocks, you need to check the correctness of their location using a building level, only then can you proceed to laying, focusing on the rope stretched between the first blocks.
After completing the installation of the bottom row, a waterproofing layer should be laid to prevent moisture from penetrating into the material. If you are thinking about the question of how to make a foundation for a cabin with your own hands, then it is important to remember that with the help of metal pins you need to mark the places for the lighthouse wall elements of the second row. The bottom row is covered with cement mortar, only then can you proceed to installing blocks from the next row.
Base for a shed made of tires

As an alternative solution, you can use a tire foundation. At the first stage, the construction site is cleared of stones and debris, after which a pit is dug, taking into account the trench indentation of 20 cm on each side. It is better to go deeper by 30 cm, but the final value will depend on the source material for filling.
If you are thinking about the question of how to make a foundation for a shed out of tires, then it is important to follow the technology. At the next stage, it involves leveling and compacting the bottom of the trench. Next, you need to prepare the tires by placing one at a time on the bottom of the pit. They should be positioned end to end, parallel to the ground plane. The space inside the tires is filled with broken bricks, sand, earth and crushed stone. The space between the tires is filled according to the same principle. The fill layer must be positioned so that the tires are completely covered.
When laying out the foundation for a tire shed, you must prepare the foundation for pouring. The first step is to lay sheets of roofing material, which will act as waterproofing. Then you can proceed to For this, a board and timber are used. The formwork should be laid out in such a way as to create a monolithic slab of concrete that acts as the top of the foundation.
The structure is additionally reinforced; for this purpose, metal, channel or mesh is used. Filling is carried out with a regular solution, to which a plasticizer should be added. This will prevent the formation of cracks and chips. The poured solution is covered with a rag, which should be soaked in ammonia, this will save time on drying. Such a foundation for a change house is left for a week to gain strength and reliability. Then the formwork can be disassembled. When pouring, it is important to ensure that the surface of the future slab is horizontal. To check this parameter, you should use a building level.
Conclusion
The foundation acts as the basis of any structure. Building it from new building materials is not a cheap pleasure, so home craftsmen eventually began to look for budget solutions. The foundation for a change house can be built from tires. This approach is cost-effective and easy to implement. A special feature of this design is that the installation process does not require the specialist to have special skills and experience.
This technology is suitable not only for change houses, but also for bathhouses, gazebos, garages, sheds, and chicken coops. At the same time, you can solve two problems at once: build a strong and inexpensive foundation, and also recycle used tires.
Currently, most summer residents use cabins to ensure a comfortable existence in their garden plot. The structures serve as a warehouse for gardening tools, a place to relax, or are used as a workshop. Any communications can be connected to them, which allows the building to be a full-fledged country house.
But unlike a permanent structure, they can easily move from place to place, which puts household structures in the status of movable property. So is it necessary to register a change house installed on a summer cottage, or is it not subject to registration?
Is it necessary to register a change house?
Since a change house is a structure that can be used as a full-fledged house or an adjoining building, a reasonable question arises about its registration. But at the same time, the structure is considered mobile and can be moved to another site without compromising its integrity.
According to the requirements for state registration, immovable objects include buildings with signs of capital construction, the movement of which without causing damage to the integrity of the building is impossible. The change house, on the contrary, is easily transported to any summer cottage. Hence the conclusion - the change house is not subject to registration.
Is it necessary to register a cabin on the site?
In private household plots, cabins are used quite often and serve as a place for rest of service personnel, are used as canteens and are used for arranging sanitary blocks. In this case, the structures are considered temporary housing, so they do not need to be registered. But on a suburban plot for individual housing construction, at the request of the owner, you can register the change house as a permanent structure.
To do this, it is necessary to fulfill a number of requirements for residential premises, namely, to provide the building with all engineering systems, including heating and ventilation. There is another way to turn a change house into a permanent building - make a small foundation and cover the structure with bricks or blocks. Next, having collected the necessary documents, you need to contact the Committee of Architecture and Urban Planning to enter the structure into the housing register.
A change house is a simple non-permanent structure designed to solve problems not related to more or less long-term living. In particular, you can store equipment and tools, workwear in it, use it as a locker room, and the like.
A change house is an ideal option for a summer house, which is used not for outdoor recreation, but as a real garden plot. Under such conditions, there is no need to build a full-fledged house, but some kind of premises is still necessary. However, a change house can be installed even if a house already exists. As we have already said, it is assigned completely different functions.
Summer cottages can have different design solutions. It could be a ready-made trailer, or it could be a simple wooden structure. In any case, its main distinguishing features from other structures:
- Lack of a complete foundation;
- General simplicity of design (one floor, use of lightweight materials, lack of internal layout);
- Possibility of carrying, without loss of properties.
The simplest version of a change house is, of course, a ready-made trailer. Theoretically, it can be installed directly on the ground (after leveling the site). But in practice, we would not recommend doing this - the bottom will quickly wear out due to corrosion and rotting.
An option that is often practiced by beekeepers is to install the cabin on a wheeled platform. However, if you do not plan to change the installation location of the change house every year, this approach will not be very suitable for you either.
Thus, we come to one of the most optimal installation methods, which is suitable for both trailers and built cabins. It consists of installing a change house on a highly simplified version of a columnar foundation.
In its simplest form, it can look like several blocks (bricks) supporting the corners of the cabin, slightly lifting it above the ground. In principle, this will be enough to prevent contact with the ground and accelerated wear of the bottom (floor) of the cabin.
If you want to get something more thorough, you will have to work a little:
- Leveling the site. At this stage, we level the area for the shed and clear it of vegetation and other debris. Ideally, it would be nice to remove the layer of turf and make a sand cushion, but this is for a completely reliable foundation.
- A layer of waterproofing material (thick polyethylene film is perfect) is laid on the site so that it extends beyond the boundaries of the future shed.
- The insulating material is sprinkled with sand, which is compacted. If you are already tired, then you can install a light change house right now.
- If you are not tired, then install concrete blocks around the perimeter of the shed site. You can also put a couple in the middle.
- It is advisable to cover the upper end of the blocks with a dense insulating material, for example roofing felt.
- You can install a change house on the resulting structure - it will be reliably protected from moisture.
- If we are talking about building a cabin for a summer residence, then you will need a little more blocks to ensure better stability. The main thing in this case is to make the floors correctly, but this is a separate topic.
The change house is perfect for temporary living during the construction of a full-fledged house. But even after the completion of the main construction work, the change house will not remain out of use. It can be equipped as a budget country house, a place to store various equipment, work clothes, bicycles and other household supplies.
Ready-made cabins are relatively inexpensive. But why spend money if you can build such a structure on your own by purchasing only the necessary materials and tools? We present to your attention instructions for arranging a cabin made of wood, a finished trailer and a metal profile. Choose the option you like and get to work.


The change house is a secondary utility room, but you should not take the process of its construction and arrangement too lightly.
Select the dimensions of the structure and its layout at your discretion. As a rule, industrial structures intended for living are about 5-6 m long, about 2.5 m high and similar in width. Otherwise, regarding the dimensions of the house and its layout, be guided by your needs and preferences.
Choosing a place to build a shed

When choosing a location for our house, we take into account a couple of important points.
Firstly, we think about whether we will transport the structure somewhere in the future. For example, you are going to build a lightweight house for a couple of seasons, and then remove it to another place. If moving is part of your plans, it is best to place the change house as close as possible to the exit from the site.


Secondly, we decide on the purpose of the room. If the shed will be used only as a shed for storing various tools and other household supplies, it is best to install it approximately in the center of the long side of the main house so that it can be easily reached from any side of the site.

Helpful advice! If you do not rule out that in the future the shed will be converted into a new one, build it in a remote, secluded corner of the site, keeping in mind the fire safety rules.
Making the base
We will have the same for all three cabins. The only exception would be a ready-made trailer on wheels - there is no need to build a foundation for it.


We make the basis as follows:
- we get rid of the top fertile layer of soil;
- compact the bottom and walls of the resulting pit;
- cover the hole with geotextiles;
- pour a layer of sand over the geotextile and compact it thoroughly;
- We place the cinder blocks symmetrically on the resulting pillow;
- We wrap each support with a layer of roofing felt.
Important! If you plan to attach a small porch to the shed, consider installing supports for it at the same stage.
We are building a wooden cabin


Let's start building the frame of our cabin. First, we lay a wooden beam around the perimeter of the future structure, as well as in its center to further strengthen the structure.


We connect the opposite sides of the beam. To do this, we fasten the logs to the beam of the lower trim. You can connect in any suitable way. Connections using the tongue-and-groove method, using metal corners and anchors, have proven themselves well. We made preliminary selections to connect the elements and additionally strengthened the fastening points with nails.
We install vertical corner and intermediate posts. We install intermediate supports in meter increments. To do this, we use timber with a cross section of 15x15 mm. Don't forget to leave an opening for the door. To securely connect the frame elements, we use metal corners and self-tapping screws. At the same stage, we install support pillars for the future porch, if its presence is provided for by the design of the cabin.


Important! The height of the vertical supports on the rear and front sides of the cabin should differ by approximately 50 cm. Such a difference will ensure an optimal slope of the roof and precipitation will not linger on it.
We mount the top trim. The support posts of our cabins have different heights, so we work as follows: first we lay the timber on the tops of the higher supports, then we connect the low posts and install the side crossbars perpendicular to them. We make connections using the already familiar method with samples and nails.


Laying floor beams
As a result, our frame will be divided into a number of rectangular sections. To strengthen the structure, we connect the opposite lower and upper corners of each such section with jibs made of boards.
We attach the rafter beams to the top roof sheathing. We use the boards that are as even as possible to make lathing easier in the future. We install the rafters in increments of about 500-600 mm. We pay special attention to the strength of connections on roof beams.


We construct it so that it protrudes slightly beyond the boundaries of the frame. This will allow us to arrange a base for drainage on the back side of the cabin, and mount a canopy on the front part.


We choose the material for the finishing roofing at our discretion. For example, it will work well. We lay it with an overlap, starting from the bottom of the slope. Before laying ondulin, you should lay out a continuous sheathing of boards and attach a waterproofing film on top of them. Instead of ondulin, you can use slate or other material of your choice.
Change house from a construction trailer


Don’t want to bother with assembling the frame and other related activities? You can buy a ready-made trailer and equip it for a cabin. Such trailers do not even need their own foundation - you just need to carefully level the site and install the container (trailer).
If you equip a used trailer as a cabin, carefully examine its condition. Clean off traces of rust, replace heavily damaged cladding elements with similar ones, weld patches onto the through holes, coat the metal with a special primer and paint.
The installed structure must be insulated. The rest of the arrangement is at the discretion of the owner. These points will be discussed separately below.
You can also buy a trailer on wheels. The option is mobile and very easy to use. After completing all the measures for arranging such a trailer, it is installed on the frame of the trailer.
We build a shed from metal profiles


The construction of a frame made of metal profiles will require more effort compared to the construction of a wooden analogue. But the iron change house will last much longer.
The set of necessary tools includes:
- hammer;
- welding machine;
- drill;
- screwdrivers;
- corner;
- grinder;
- tassels;
- construction stapler;
- roulette;
- hacksaw
We also buy the following materials:
- profiled pipe measuring 2x2 cm, 4x2 cm, 4x4 cm and 4x6 cm;
- mounting rail 2x4 cm;
- galvanized sheet steel;
- corrugated sheeting;
- primer for metal;
- self-tapping screws for fastening corrugated sheets;
- screws for metal;
- staples for a construction stapler;
- rivets;
- OSB boards;
- polyurethane foam.
Making the base
We will assemble the base of the frame from a pipe measuring 4x6 cm. We cut the pipes in accordance with the dimensions of the structure being built.
We weld the pipes according to their external dimensions and get a rectangular edging. In total we need to make 2 identical rectangles. We will make the floor from one, and the upper part of the cabin from the other.
To make the floor reliable, we create a grid inside the rectangle from the same profiled pipes. We are making a change house with a width of 250 cm. With such dimensions, it is enough to weld 2-3 longitudinal pipes along the entire length inside the edging. We weld cross pipes every 50 cm.

Next, we take a galvanized sheet and fix it with self-tapping screws to the base of our change house. We turn the base over and lay it with the galvanized sheet down on cinder block supports or simply a leveled area. The structure does not need to be attached to the cinder block - the cabin will be sufficiently supported by its own weight.
We mount the racks

Installation of racks

Installation of racks


We make vertical supports from a 4x4 cm pipe. We cut it into pieces in accordance with the planned height of the change house. Usually it is 250 cm.
We place the first supports in the corners of the foundation constructed at the previous stage. We check that the angle at the junction of the posts with the base is strictly straight.
We fix the leveled rack by welding. Similarly, we set up the racks in the remaining corners.
Additionally, we will need to install intermediate racks. To do this without disturbing the geometry of the structure, we take the second rectangular pipe base made in the previous step and lay it on top of the corner posts.
We scald the resulting “cube” with intermediate posts and spacers. First, we take pieces of corrugated pipe 4x4 cm along the height of the structure and weld them vertically between the lower and upper bases. The recommended installation step is 100 cm. At the same stage, we provide an opening for the door.
We weld the horizontal cross member around the support structure. The pipe must be welded to the vertical posts at a height equal to half the height of the change house.
We make the spacers from a 2x4 cm profiled pipe. We cut it into 30-centimeter pieces. We cut each edge of the workpiece at a 45-degree angle. We scald all the corners of the structure with the resulting spacers. Additionally, we can scald the floor with them.
We make the roof

We made the bottom part of the frame and the wall. Next we are engaged in the manufacture of the “skeleton” of the roof.
We make trusses in the form of isosceles triangles. We use a 2x4 cm pipe. The recommended installation step for the trusses is 1 m. We weld them along the length of the frame. We cover the roof with corrugated sheets. If you wish, you can use another material of your choice.
We cover all metal elements of the frame with a special primer, and after it dries, we apply paint of the desired color.
Arrangement of a change house
We install windows and doors (it is better to purchase them ready-made). It is advisable that the windows have a hinged design and there are at least two of them - you will not have to waste time installing additional ventilation. We are starting to further arrange our cabin.

Making the floor
First, we construct a subfloor from treated boards. We lay them out as tightly as possible to each other and attach them to the frame with self-tapping screws.


We spread it on top of the boards. We attach it to the joists using a construction stapler with staples.
We nail additional logs to the base for laying thermal insulation and attaching the second layer of boards. We fasten the logs in increments equal to the width of the selected thermal insulation material. Mineral wool, a relatively inexpensive and time-tested thermal insulation material, is well suited for floor insulation.
We lay insulation in the space between the joists. We fix a layer of vapor barrier material on top. A stapler with staples will help us with this again.
We lay the finished floor boards. We attach them to the joists using self-tapping screws. Finally, we varnish or paint the floor.
We carry out external cladding


The trailer cabin can be left without cladding, but a structure made of wood or metal will require mandatory external finishing. We won’t just leave the “bare” frame, will we?
We cover the frame with waterproofing film. Carefully seal the joints of the waterproofing strips with tape. Many different materials are suitable for external wall cladding:
- wooden boards;
- composite panels;
- siding, etc.
Choose at your own discretion. The cabins covered with a block house also look very nice.


Sheathing a metal shed with corrugated sheets
Important! The area of the frame allocated for the porch is not sheathed.
Interior decoration


We place it in the space between the frame posts. We cover it with a layer of vapor barrier material. We attach the vapor barrier to the frame using a suitable method.
We fill transverse slats on top of the frame to secure the insulation. We attach the selected internal lining material to the same slats. Most often, lining is used for interior decoration. For the rest, focus on your preferences and available budget.
Electricity


We will not install full-fledged wiring into the change house. Such buildings are not permanent and do not require such equipment. But how, in this case, can at least organize lighting and heating? A good extension cord with a cord of suitable length will help us with this. We turn it on to the nearest available source of electricity and pull it into the change house.
In a change house, we can include a tee in such an extension cord for greater convenience and the ability to use several electrical appliances at once.
Lighting
We arrange it at our discretion. In general, a few simple lamps installed in the main functional areas will be enough for a change house.

Water supply
For maximum ease of use of the cabin, we run water into it. We will not build a major expensive water supply system. It is enough to connect a flexible hose to a water supply source, insert it into the household through a pre-prepared hole in the wall and equip it with a tap to shut off the water.
We can install a compact one near the hose attachment point. Special bulk models are available on the market. It is enough to remove the top cover from such a tank, fill the container with water from a hose, plug in the heating unit, and after a short time use warm water at your discretion. If desired, a hose with a shower head can be easily connected to such a water heater.
A compact sink wouldn’t be out of place in your household. We attach it to the wall in a convenient place. We connect a corrugated pipe to the sink drain to drain water. We remove the corrugation through a pre-arranged hole in the floor and connect it to the sewer pipe. Water will flow through the sewer pipe into a drainage hole or other designated place.

Heating
The heating is done electrically. Budget option - a couple. More expensive and efficient - an oil heater or convector. We select the power of the heating unit in accordance with the area of our shed.


At the end, all we have to do is furnish the room. At this point, we focus entirely on our preferences and needs.
| Parameter | Metal shed | |
|---|---|---|
| Price | Cheaper. To further reduce the cost, natural wood can be replaced with wood boards. | Expensive. Metal has a higher cost. |
| Durability | Lasts less than metal ones. Wood does not tolerate moisture well. | Lasts for decades. |
| Mobility | It is easier to transport, but there is no guarantee that the wooden structure will withstand transportation normally. | Transporting is more difficult, but safer. |
| Possibility of installing communications and additional elements | Can. More difficult. | Can. Easier. |
| Environmental friendliness | Eco-friendly | Less environmentally friendly when compared with wooden cabins. |
Good luck!