How to make a moonshine still from a pressure cooker with your own hands. How to make a moonshine still with your own hands - step-by-step instructions Weld a moonshine still from stainless steel with your own hands
Hi all! I promised to write this article for a long time, but I kept putting it off. The time has come to fulfill the promise. Today I will tell you how to make a moonshine still from a pressure cooker with your own hands.
What does a moonshine still consist of?
Let me first briefly remind you what a home moonshine still consists of and how it works. The simplest design includes a distillation cube (a container for boiling mash) and a refrigerator (direct-flow or coil). The diagram is shown in the figure below.

Making a distillation cube
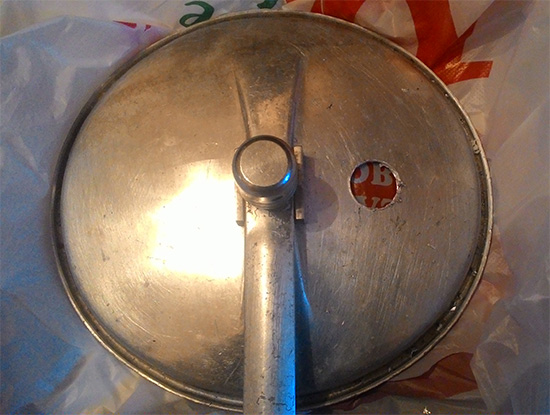
I will make a still from an old Soviet 6 liter aluminum pressure cooker. She is almost the perfect option for this.
I say almost, because... it has a significant drawback - its volume. You can pour no more than 5 liters of mash into such a container, which will yield approximately 1 liter of 45% moonshine.
I won’t tell you much, but it’s quite enough to start distilling moonshine and understand whether you want to do this business. And the activity is very exciting, believe me.
So, we have this pressure cooker.

I got it from my parents, but it won’t be difficult to buy it. I just found exactly the same one on Avito for only 400 rubles.
The first step is to cut a nipple into the lid to connect the distillation cube to the refrigerator. I will insert this one, with a ½” thread.

The lid already has two holes for pressure relief valves; we will not touch them. Let them perform their function. Let's make a new hole with a size 20 wood drill bit.

Why wood? It’s just that it’s much cheaper than a metal drill, and it cuts aluminum very well.
First you need to mark the center and drill a hole for centering with a small drill.

And then drill it out with a large drill.
If you get sloppy edges, they need to be cleaned with a finely notched file. Now you can insert the nipple.
After using a size 20 drill, I get a hole well suited for a ½” nipple, I even had to use a wrench to screw it in. It fits so tightly that no additional gaskets or seals are needed.
Tighten the nipple with a nut from the inside.


A fitting for attaching a Ø12 mm hose is screwed onto it.


If your pressure cooker still has the gasket, then the distillation cube for your home moonshine still is ready. I didn't have it. Therefore, we will make it.
Making a gasket to seal the cube
Any kind of rubber will not work here; when it comes into contact with moonshine vapor, it will give off an odor and ruin the entire product. Here you need silicone, and not just ordinary silicone, but food grade silicone.
You can buy a ready-made gasket or, if you don’t find the right size, buy a sheet and cut the gasket yourself. They are sold in moonshiners' stores and in stores with laboratory equipment.
I will make a gasket from liquid silicone for aquariums. It can be bought at pet stores, construction supermarkets and plumbing stores.

It is needed specifically for aquariums, it is definitely safe and does not give off any foreign odors.
Fill the groove for the gasket on the lid with a small heap and let the silicone dry. After a day you can start distilling.

Let's move on to the next step.
Making a refrigerator

How to connect parts
Now all that remains is to connect the distillation cube and the refrigerator. For this I use a silicone hose with an internal diameter of 12 mm. The hose should also be made of food-grade silicone. No rubber or PVC!

Now the moonshine still is ready. This is enough to make your first drink.

That's all. The process is very simple and not long. If you have ideas or comments, please leave them in the comments. I always welcome constructive criticism. Also subscribe to the news, I plan to add mash recipes soon.
Bye everyone. Dorofeev Pavel.
Do-it-yourself moonshine and its subtypes - cognac, bread wine, liqueur - have always been popular. At least once, but have everyone wondered how to make a simple moonshine still at home? They ask the owners of this wonderful liqueur: how they were able to do it, what they used, how they learned it, etc. Having more or less familiarized yourself with the first steps, then comes the study of Internet sites.
Before moving directly to the design, let's tell a little background.
China, 4th century BC. The Chinese alchemist, having distilled the wine several times, received the first homemade moonshine. Later this technique was used by both the Greeks and Egyptians. The device itself was largely made of stone. Only the Arabs began to improve it, replacing the stone with copper. Thus, the mash began to heat up evenly and remove fusel oils, creating a drink that could be consumed without harm to health.
- 9th century Persia and the invention of the coil, but not quite a full-fledged one.
- The 10th century was the heyday of moonshine. Healers and alchemists create moonshine by adding elixirs to it.
- 15th century improvement of the coil. Basil Valentin lowers the coil into cold water, thereby increasing the alcohol condensation.
- 17th century - a unit is brought to Tsar Alexei Mikhailovich as a gift from Venice. This is how the history of Russian moonshine begins, because until this moment in Rus' only mash and mead were consumed.
The principle of operation of the moonshine still
Let's move directly to our question “How to make a moonshine still?” To make a simple unit with your own hands, you need to have an idea of the circuit of a moonshine still, its main components;
- Alembic
- Coil, aka refrigerator
- Connecting hoses
- Dephlegmator, bubbler
- Distiller
Alembic
What is a "still"? This is a reservoir where the mash boils during the heating process. For the cube, it is best to take a pressure cooker, as it has one very good advantage - its tightness. The pressure cooker neutralizes excess pressure with a fitting, which is a ready outlet for alcohol vapor, provided that the valve is removed from it.
Next, the fitting is connected to the coil, that is, the refrigerator. These two devices can be connected using a stainless steel tube or a hose. In addition to a pressure cooker, you can use other containers, for example, milk cans, enamel pans, and you can also make a moonshine still from a flask. The main thing is that the cube is spacious and hermetically sealed.
Coil
 Refrigerator for moonshine still with coil is a reliable and durable solution for making a moonshine still with your own hands. You can also take a ready-made laboratory refrigerator, but this is impractical, since the glass is very fragile and this can lead to problems.
Another advantage of a refrigerator with a coil is its low cost. It is assembled from a tube, for example, a copper one, which is sold in any hardware store.
In order to make a refrigerator for a moonshine still from a tube with your own hands, you need wrap it around a pipe of the required diameter a certain number of times. It should be noted that in order to prevent the tube from being damaged, sand must be poured into it.
Next, we connect the coil to the container. An important condition is a well-sealed entry and exit point of the coil. Afterwards, we make two more holes in the tank: one for the cooling solution, the other for its exit. Then, supply the cooling solution (water).
Connecting hoses
As was said, the refrigerator and the distillation cube are connected to each other either by a tube (sometimes copper, sometimes stainless steel) or by hoses. Which hose to choose? to make your own moonshine delicious? It’s no secret that material can affect taste. The best option is silicone, which does not undergo a chemical reaction with alcohol vapor. Consequently, moonshine will not have foreign odors and tastes, as can happen when using a rubber hose.
Dephlegmator and bubbler
In order to prevent fuses, which are extremely unhealthy for the human body, from getting into it when making your own moonshine, the moonshine still complements the device with your own hands - reflux condenser, which is a capacity of 1-3 liters. It should be placed in the middle between the container and the refrigerator. Condensation of boiling components occurs in it; then, when harmful substances enter the reflux condenser, they no longer boil.
Don't forget about the bubbler. As part of a moonshine still, it is a multifunctional element that flavors, filters and speeds up the process.
To make a bubbler For a do-it-yourself moonshine still, you need to use a glass jar with a screw cap as a basis. Capacity 2-3 liters. Next, 2 holes are made in the lid for the tubes. Diameter 0.5-1 cm. A prerequisite is sealing.
The principle of operation of a bubbler in a home moonshine still is as follows: steam that passes through the tube and condenses, thereby settling as a liquid to the bottom until the transom of the long tube drops into the liquid. The boiling process begins. The alcohol vapor goes into the refrigerator, while the fuses remain in the jar. To improve the quality of moonshine, you can use several bubblers, thereby increasing the alcohol yield. You can add different flavors to the bubbler. For example, oak bark, orange peels, etc. Using this simple remedy, you can purify more than 50 percent of moonshine, as well as flavor it.
Distiller
 Experienced moonshiners believe that medical steel- the best means for making moonshine, but it should be noted that a glass still is also popular. The glass distiller is the object of controversy among moonshiners, because no one can say for sure whether it is needed? Some believe that it is an essential part of a homemade moonshine still, while others doubt its necessity. And yet, what functions does it have and how to make a distiller with your own hands?
It is safest to purchase a ready-made glass distiller. To understand whether it is suitable for your device, you need to read its data sheet, where you can find information about the size of the parts; you also need to carefully study the shape of the hole in the refrigerator.
The form varies: triangular, pentagonal, faceted, etc. Having learned this, you can go to the store to select a distiller. Be sure to open the package and make sure it is not damaged! Any scratch or abrasion affects the quality of the device. Don’t forget about the instructions, which describe in detail all the steps that should be carried out correctly - in order to assemble your device yourself. It also contains temperature data and restrictions.
One of the main advantages of a glass distiller is its transparency, because thanks to this you can easily observe and control all processes. But there are still some minor drawbacks. Despite the fact that its functionality is not questioned, its advantage is also its disadvantage. Although it is made of durable glass, glass, be that as it may, remains glass. The operation of this element must be extremely careful. The key to success:
- Pin items
- Correct dismantling
- Proper cleaning
By following these recommendations, you will extend the life of your device. So, we got acquainted with the question of how to make a moonshine still at home and how to use the moonshine still. After reading the above recommendations and conditions, you can prepare your own drink, enjoy homemade brew, after pouring it into flasks.
Sooner or later, everyone who has tried homemade moonshine at least once (or its variations - cognac, bourbon, liqueur, etc.) sets out to make the same thing, only even better. First, the owners are interrogated - as best they can, teach, show, lend. This is the first wave of moonshiners. Afterwards, he begins to explore the Internet in the hope of finding how to make a moonshine still with his own hands. This is the most inquisitive wave, which is trying to understand tons of information, what is true and what is false. We have already talked about how to manufacture and assemble individual parts of the unit, now it’s time to talk about how to assemble a full-fledged device.
History of the moonshine still
They first learned about moonshine back in the 4th century AD, when a Chinese alchemist compared the drink to clear wine distilled 9 times. Its technology was used at different times by the Greeks, Romans and even the Egyptians.

This is what, according to official documents, one of the first moonshine stills developed by the ancient Greeks looked like.
But if this unit was mostly made of stone, then the Arabs went further - and made the structure out of copper. This allowed the mash to heat up evenly, gradually, completely remove fusel oils (remember, extremely harmful to health) and create a drink suitable for internal use.
The term alcohol was also proposed by the Arabs; literally translated, the word meant an intoxicating drink - al gogol.
In the 9th century, a coil was invented in Persia - a copper tube was bent into several turns, but still left in the air for cooling.
From the 10th century, with the help of alchemists and healers, moonshine literally flourished, combined with the development of recipes for potions and elixirs. At the same time, in Italy, the monk Valentius declares that he has invented the water of life, which is capable of turning old people into young men. Need I say that it was moonshine?
In the 15th century, Basil Valentin came up with the idea of immersing a coil in cold water to increase the alcohol condensate, and this was the starting point for the creation of a modern apparatus with a distillation cube, a refrigerator and a steamer.

This is what the device looked like in the 16th century (the principle of operation has been preserved to this day):
- A vat for heating the tincture
- Tube for supplying hot tincture to the cube
- Stove
- Cap
- swan neck
- Coil
- Coil in the refrigerator
- Refrigerator with cold water
The first moonshine still in Rus'
In Rus', moonshine was first tried only in the 17th century, when a unit was brought from Venice to Tsar Alexei Mikhailovich as a gift.
Until the 17th century, only mead and mash were consumed among homemade alcoholic drinks in Rus'. It was only in the 19th century that they learned to create highly purified 96% alcohol.
This concludes the brief excursion into history; now it’s time for modernity.
Buy or collect
There is no clear answer to this question. Of course, for a beginner, it is much more preferable to buy a ready-made device, when there is no need to look for individual parts and bring them to perfection. But, on the one hand, such a purchase can cause a hole in the budget - a good device with normal performance will cost 15 thousand rubles or more, on the other hand, it is still more interesting to create and invent.
We will tell you how to make a moonshine still with your own hands, and from what materials.
First, let’s define what moonshine (distillate) is and how it differs from rectified distillate. The principle of obtaining one or the other is absolutely identical. A sugar-containing (less often starch-based) mash is prepared, yeast is added, then over a certain period of time the mushrooms create a colony and secrete waste products. Actually, they are precisely the concentrate of various alcohols, of which only ethyl is suitable for internal consumption.
Under the influence of temperature, the mash decomposes into a liquid residue and alcohol-containing vapors, which during the distillation process break down into gaseous and liquid fractions.
Even after repeated distillation, it is not possible to clear the drink of all harmful impurities. The only way that allows you to obtain a perfectly pure product is rectification using a drawer or distillation column. In this case, alcohol-containing vapors are divided into fractions in several stages. Making a distillation column with your own hands is not easy, and a completely reasonable question arises - is it necessary to obtain pure alcohol in this way, if it can be bought at any pharmacy?
Rectified alcohol is extremely harmful to health precisely because of its purity, since pure poison is absorbed by the body much faster and better than moonshine with a certain amount of harmful impurities. In addition, all famous drinks - bourbon, rum, whiskey, Calvados, scotch, etc. - are made on the basis of distillate.
So, taking into account the given characteristics of moonshine, it is clear that the main stage of production is heating the alcohol-containing liquid to a state where the alcohol begins to separate. Afterwards, it is cooled until it is converted into a liquid fraction in the form of a finished drink.
Taking this into account, we can determine the main components of a moonshine still:
- a distillation cube, where the mash is heated to the required temperature;
- refrigerator - a storage or flow-through container with cold water where the coil is cooled;
- coil - a spiral tube made of copper, stainless steel or glass, through which alcohol-containing steam moves and is divided into fractions;
- steam trap - catcher of fusel oils and mash residues;
- receiving tank - a place where cooled moonshine flows;
- connecting elements.
This is the first and main element of the moonshine still, on which the efficiency and final taste depend.
Most often, milk cans, pressure cookers (multi-cookers), and beer kegs are used as such. Less commonly, a distillation cube is made by hand from stainless steel or steel, welded into a container, but this option is not reliable. On the one hand, the mash will stick to the stainless steel, and you won’t be able to stir it due to its tightness. On the other hand, the slightest error in the weld can lead to the fact that when the mash boils, when the pressure reaches 180-220 Pa, the cube will simply burst.
How to make a still from a can

This is the simplest version of the still, since the can is relatively airtight, especially if we are talking about a new container. But its “adaptation” for distillation has its own characteristics.
The rubber gasket on the lid of the can is absolutely not suitable for heating - the mash will absorb a specific aroma, which will immediately affect the taste of the finished drink. It is optimal to use silicone gaskets, or even better - aquarium silicone. Experts advise using food-grade silicone as such gaskets, which is used to make baking molds. But in general, this option is suitable for sealing the lid and will not give any taste or smell.
How to make a silicone seal correctly
.jpg)
This process is carried out in several stages, the minimum of which should be three. First, apply aquarium silicone sealant to the edges of the lid, let it dry completely, apply a second and third, also leaving time for drying. After the third layer has been applied, apply regular cellophane to the neck of the can and close the lid. Leave for several hours to allow the silicone to dry completely. The result is a truly airtight vessel that can be used for several years.
To prevent the can from becoming like a colander over time, wash it thoroughly after each use. You can use regular or laundry soap and plenty of running water. The use of soda is strictly prohibited. Stainless steel or aluminum reacts very poorly to alkali.
If you don’t want to change the rubber gasket to silicone, you can simply wrap it with several layers of overlapping fum tape. This is also a fairly tight connection.
Some “experienced” moonshiners recommend using dough to seal the joint. It would seem, why not? It seems like a decent sealant, and it smells like bread in the room, and not fusel during the cooking process. But! After the first volumetric distillation, when you have to start the unit several times, you will get tired of constantly scraping off the dough and gluing a new one. Scraps of dough all over the kitchen, broken nails and wasted time are unlikely to make the process enjoyable.
To connect the can with the coil, make a hole on the lid for a 22 mm pipe and a 12 mm coil using a 0.5 inch thread. You can buy an adapter at a plumbing supply store.
What else to look for when choosing a flask for a moonshine still:
- the material of manufacture is stainless steel, since aluminum will withstand a small number of cycles;
- the minimum volume is 25 liters to obtain 4-4.5 liters of moonshine;
- wide neck, which is convenient to work with - pour mash and wash after cooking;
- wall thickness and overall build quality directly depend on the price, and ensure a period of normal operation.
Distiller (moonshine still) based on a milk can
How to make a distillation cube from a pressure cooker (multi-cooker)
Scheme of a moonshine still based on a pressure cooker:

This is a minimum program for a beginner. Today, every second person tries to make a moonshine still with their own hands using a pressure cooker. And there is a completely logical explanation for this:
- price - the cost of the most inexpensive pressure cooker is 1500-1700 rubles, which is quite acceptable for any budget;
- tightness - this is an absolutely sealed device that does not require any additional manipulations;
- ease of inserting fittings into the lid - anyone can handle this.
The downside, it should be noted, is much more significant than all the advantages - this is the volume. The bowl of the largest household pressure cooker is only 6 liters, respectively, the mash will fit only 4.5 liters, since the volume should not exceed 2/3 of the total quantity. With this amount of mash after double distillation you will get a little less than 750 ml of moonshine. You can try, but it’s unlikely that you’ll be able to taste it.
Screw a fitting into the place of the valve on the lid, to which attach a connecting hose (silicone or copper).

If you don’t want to reinvent the wheel and look for a suitable option for making a cube, buy a ready-made one. The average price of such an element depends on the volume - 12-liter up to 4,000 rubles, 25-liter - from 5,500 rubles, etc.
.jpg)
Moonshine still from a pressure cooker with a steamer on video:
Fridge
An equally important element of a homemade moonshine still, on which the distillation speed and volume of the finished drink depend.
If the water in the refrigerator is not cold enough, the volume of moonshine is reduced by 15-20%.
Refrigerators for moonshine stills are divided into 2 types:
- flow-through;
- cumulative.
In flowing water, as the name suggests, it constantly moves through the coil without having time to heat up. In order to make such a unit, it is enough to connect two hoses to the container - the inlet, as a rule, from the tap, and the outlet - from where the water comes out into the sink.
The storage tank is a closed container into which water is first poured and drained as it heats up. This is the worst type of refrigerator because it does not allow the coil to cool completely and constantly, which reduces condensation and reduces the amount of final product.
A storage refrigerator is installed only if it is not possible to make a flow-through one. It’s precisely the lack of opportunity, not laziness or lack of time.

This type of equipment is quite compact in size, where the main area is occupied by the coil. The refrigerator itself is closed on both sides, but two tubes are connected to it - receiving and discharging water. Making a refrigerator with your own hands is not difficult, but it is necessary to ensure that it is level in relation to the device so that the water moves constantly.
.jpg)
A flow-through refrigerator is more productive, unlike a storage refrigerator, even with a smaller coil size. At the junction of the two media, the tube is instantly cooled, which ensures faster separation of fractions.
Manufacturing process
.jpg)
You will need:
- pipe and adapter weave - 300 mm;
- 2 meters of bellows hose for the coil;
- half-inch nipples;
- 3 half-inch nuts;
- soldering iron;
- gun and silicone;
Procedure:
- Roll up the bellows hose into a spiral

- Make holes in the pipe and cut the plastic with a knife


- Screw in the nipple

- Install gaskets and tighten nuts

- Screw the coil to the plug


- This is what the entrance and exit look like

- Anything that leaks or leaks is filled with sealant; the vessel must be completely sealed.


As such a device, a bucket or tank with a volume of about 20-30 liters is usually used, where a hole is made in the lower segment for collecting water.
In non-flowing devices, water is always drained from the top, and always poured into the refrigerator from the bottom.
The simplest and most affordable is a regular plastic bucket. In winter, it is easier with such a handy device, since you can add snow or ice, which is much better for cooling the coil than water.
When choosing a storage refrigerator, try to keep the temperature in the distillation cube at minimum heat in order to reduce the amount of alcohol-containing steam released and, as a result, increase the volume of the finished moonshine.
In order to check how effectively the coil is cooled, periodically test the escaping moonshine on your wrist. Ideally, it should be cool, worse - if warm, and even worse when the drink is hot - in this case, a third of the steam comes out unprocessed. In addition, this is also dangerous, since the distillation cube is heated over an open fire, the alcohol can catalyze and there will be a big disaster.
Coil
The best material for the coil is copper. This is a relatively inert material that does not react with alcohol materials, has good thermal conductivity and an adequate price.
Those who are truly professional in preparing moonshine only have a copper moonshine still based on such a coil. Any experiments. Including fragile glass, they are fraught with loss of quality of the drink and the raw materials.
How to make a coil
Before we begin the description, we note that a coil is a tube connected to a distillation cube (if there is a steamer, with it) and placed in cold water, through which alcohol-containing vapors move and the fractions are separated into gas and moonshine.
The longer the coil and the more compact its spirals, the more the steam is cooled and the greater the amount of condensate.
You will need:
- copper tube with a diameter of 15-20 mm and a length of 2000 mm;
- base for winding the tube, fixed in a vice.
Before you start screwing the tube onto the base, it must be filled with sand. This is done in order to prevent deflection or one-sided deformation, which will subsequently retain condensation. Close the tube on one side with a wooden or cardboard cap, pour sand in a thin stream, periodically tapping it on the table so that the sand is compacted well. When the tube is filled to capacity, close the other end with a similar clip and begin to wind it onto the base, making even turns and trying to ensure that they do not touch each other.
.jpg)
This is what a ready-made coil looks like, which is immersed in the refrigerator and connected with hoses through fittings to a cube or steam chamber.

This completes the assembly of the required elements of the moonshine still; all that remains is to find out which hoses can be used and what materials are acceptable when working with alcohol.
Well, for now let’s focus on such an optional, but extremely useful device as
Sukhoparnik
.jpg)
We do not know whether there were discussions about the need for a steamer in those ancient times, which were written about at the beginning of the article. But now there is fierce debate on this issue. Some insist that fusel oils should be removed as much as possible, others claim they are useless and a waste of time.
Without actively taking either position, we will present only dry facts.
The steamer is really not an integral part of the moonshine still, and it is installed at will. Structurally, this container is 10 times smaller in volume than the distillation cube, which is located between it and the coil.
The main task of the steam chamber is to instantly reduce pressure and, as a result, temperature due to different media. When the steam enters this container, it suddenly becomes liquid, but is immediately pushed out by the next portion of hot alcohol-containing steam from the cube. And although this is only a moment, during this time some of the fusel oils have time to settle on the walls of the steam tank. With double or even triple distillation, practically no fusel remains in the finished drink, which has a very beneficial effect on well-being.
How does a steam generator work according to the laws of physics?
As water boils in the distillation cube, alcohol begins to separate and evaporate. Taking into account the fact that boiling is a rather violent process, the alcohol fractions have time to “pick up” the heavier fractions of fusel oils. Probably everyone has heard that moonshine is often called fusel - precisely because of the characteristic smell that fusel oils emit. The less fusel in moonshine, the less aggressive its aroma and the more acceptable its taste. It is not possible to completely get rid of oils; this can only be achieved using a distillation column, but no one set out to obtain medical alcohol.
The vast majority of alcoholic drinks are bourbon, whiskey, rum, Calvados, etc. made on the basis of moonshine with a certain amount of fusel oils. The production process varies in nuances, but in general it is the most banal distillation of mash.
Collecting fusel oils with a steamer allows you to make the drink, on the one hand, not so strong and “fragrant”, on the other hand, safer for health with an almost imperceptible feeling of a hangover (if consumed wisely).
Particularly common is the use of three steam tanks at once, located relative to each other in a cascade. With this organization, the strength of the drink reaches 80% already on the first distillation. This will really be a very high-quality and highly purified product that can be consumed immediately after distillation, and not wait until it is purified with a carbon filter or potassium permanganate.
Three cans in a cascade is the optimal number. Less is not enough, more is a waste of time, since after the third can, each subsequent can does not perform any function.
How to make a steamer from a can
We remind you that the volume of the container should be 10 times less than the volume of the distillation cube. If you have a 20-liter cube, take a 2-liter jar, for a 30-liter jar, take a 3-liter jar.
The method of preparing such an element is quite simple and suitable for any volume. All manipulations are carried out with the lid - holes are made and fittings are cut into. Next, the lid can be put on any jar with a threaded neck.

You will need:
- screw-on jar lid;
- 2 fittings;
- connecting tubes.
Cut 2 holes in the lid - they can be made with a screwdriver in a circle or with a knife, so that there are no burrs.
Insert the fittings and connect them to the hoses.
.jpg)
The steamer is placed immediately after the distillation cube. In any other place it is of no use. It is necessary to periodically drain the accumulated liquid so that excess does not enter the coil and spoil the taste and aroma of the product.
By the way, the steamer can be used not only as a fusel oil trap, but also as a flavoring agent for moonshine. Here the same process of sharp cooling of the steam and its movement further occurs, but with the collected amber of berries or herbs.
As an aromatic component in a jar you can use:
- dried fruits - apples, pears, apricots;
- berries - any, preferably dried, they give off more flavor;
- spices - any to taste, you can use hops, suneli, cinnamon, vanilla, etc.;
- aromatic herbs;
- citrus fruits - orange peel, lemon zest.
Since such a binding of aroma will be subtle and not palpable at all, you can try a variety of additives. In this case, experiments will only be beneficial, even if the result is not impressive.
Connecting tubes
The finished moonshine still is a detachable connection of all required elements using threaded connections. There is no need to look for additional tubes and choose their quality in order to connect everything together.

There are completely permanent connections, for example, the lids of the distillation cube, steamer and refrigerator. This is done to facilitate labor and installation.
You can, of course, make the work easier when assembling a homemade moonshine still by connecting all three pipes by welding, but this will not in any way affect the taste of the final product, but maintenance can make it very difficult.
The most optimal way to connect the elements is a silicone hose. Some people don’t understand the difference between PVC and silicone and don’t even pay much attention when choosing. We explain - polyvinyl chloride is a non-inert material with respect to alcohol. When in contact with hot alcohol-containing steam and alcohol, PVC releases toxic substances, which in high concentrations are harmful to humans. It is clear that nothing will happen to you in 1-2 times, but if we are talking about systemic use, it is better to refuse such a connection.
How to distinguish silicone from polyvinyl chloride (PVC)
Set fire to a piece of both materials. PVC burns hard, smoky, with a very specific smell. Silicone burns with a subtle aroma, does not smoke, and light ash remains after combustion.
Silicone feels much more pleasant to the touch than PVC, it feels silky.
If you suddenly find yourself in a dilemma - silicone or PVC - outside in the cold, know that silicone, even at -10, remains flexible and elastic, and polyvinyl chloride hardens, although it does not lose its properties.
What metal is suitable for use
Despite the abundance of opinions on this matter, there can only be one definite answer - food-grade stainless steel. It is this material that does not react with any of the elements in the moonshine chain and is easy to maintain and use. And over the entire period of time it does not form deposits that are of little benefit to health.
Previously, it was believed that copper was the “head of everything,” since copper moonshine was ubiquitous. However, this is a misconception. Copper began to be actively used during Soviet times. Because it was an affordable material both in price and in quantity. If we talk about a truly correct tincture, then you won’t find anything better than an oak barrel. Oxygen penetrates through its walls, aldehydes and ethers evaporate, which, by the way, are formed, among other things, when the copper elements of the device come into contact with hot alcohol vapor.
Aluminum reacts negatively to vinegar, which is always present in mash. In this case, poisonous salts - alum - are released.
Glass, which is inert (not active) to aggressive environments, is also considered optimal, but a moonshiner’s kitchen bears little resemblance to a laboratory, and this material is also very fragile.
Of course, you can get poisoned or die more quickly from general intoxication due to alcohol abuse or purchasing low-quality products than from copper oxide. Moreover, as a coil, copper has no analogues at all in terms of thermal conductivity and manufacturability. Therefore, a combined combination of materials is completely justified. This can be a cube made of stainless food steel or an aluminum can, and a refrigerator with a copper coil in a stainless or plastic case.
And finally, a video on how to make a moonshine still with your own hands
Moonshine stills are easy to make. The circuit of a moonshine still consists of two parts - a heated tank with mash and a coil. You can add a steamer to a homemade moonshine still and it will greatly improve the taste of the distilled moonshine. Or you don’t have to use a coil; in the article above we already gave an example of a method of making moonshine in which you can actually get by with just a saucepan.
Many today prefer to buy a moonshine still on a website on the Internet or from a special company. But the cost of a purchased unit is usually high and amounts to 8-16 thousand rubles. At the same time, you can make a moonshine still with your own hands at much lower costs and cost 1-2 thousand rubles. In this article we will talk about making a simple moonshine still from a saucepan using improvised means.
To assemble a moonshine still, you will need the following tools: a hacksaw, a drill and pliers. Of course, you can use a Dremel instead of a hacksaw and drill, but this is at your discretion.
This design does not require drawings of a moonshine still, everything can be done virtually “by eye”, and the article has a sufficient number of photographs so as not to make mistakes during production.
The list of materials for manufacturing looks large, but all the components are easy to get and they are very cheap.

We will need: a large saucepan with a lid - this will be a heated tank, a piece of plastic plumbing pipe (45 mm in diameter) and 2 meters of aluminum or copper tube (the latter can be taken from an old refrigerator) - this is for making a coil.
2 fittings with hoses, a half-inch plumbing coupling and a nut for it, a dropper from a pharmacy or another flexible and thin tube, a piece of rolled aluminum (an old curtain or corner will do, you can take runners from an old children's sled), fluoroplastic tape (at a plumbing store - fum lena for pipes), a couple of anchors with nuts and tin from a beer can.
To make a steamer, you need a jar with a tightly screwed lid (suitable for store-bought gherkins or salted mushrooms).
The following adhesives will be required: a package of epoxy glue and cyanoacrylate superglue (a couple of tubes).
As you can see, a lot can be found already in the house or in the rubble of old things in the garage, and even if there is a lack of materials, you can buy all this at the flea market very inexpensively.
How to make a coil
Making a homemade moonshine still begins with winding a coil.

The moonshine still’s coil is the main thing in the entire unit! Look at this article, a lot of interesting things are described there about the coil and its installation.
To prevent the tube from being crushed during the manufacturing process, fill it with dry sand, tamp it, clamp the ends of the tube with pliers and carefully wrap it around any round object of a suitable size. The finished coil should be inserted into the plumbing pipe with a gap of approximately 0.5-1 cm.
Attention! All actions with the tube (bends for installation, etc.) must be performed only with a tube clogged with sand! Otherwise, the tube may flatten or break!

This is what the coil looks like before it is inserted into the cooling pipe.

We cut off the cooler tube 4-5 cm from the end of the coil.

We will modify the fittings for water supply and drainage.

They are glued overlapping onto the cooler, so we cut off the sides using a saw or Dremel. This is what the device looks like.
We heat the finished fittings on a gas stove or lighter and press them tightly to the plastic pipe. This will allow you to form flat areas to which the fittings will be glued.

After this, glue the fittings to the pipe using cyanoacrylic superglue. If such a connection seems unreliable to you, you can clean the area around the glued fitting, degrease it with acetone and additionally coat the outside with epoxy glue or use a heat gun. But, as practice shows, if there are no blows or attempts to deliberately break off the fitting, then it will hold perfectly even with superglue.


After this, carefully drill holes in the pipe using the fittings as guides for the drills.

Inside you get something like this hole. Burrs can be cut off with a knife or the inner surface can be sanded with sandpaper.

There are 2 fittings - for supplying and discharging running water through the coil of the moonshine still.

The end caps are cut from tin beer cans. You can use plastic caps for three-liter bottles - they are thicker and easier to adjust to the diameter of the cooling tube.

We make cutouts in the covers for the coil tubes and carefully glue them into the cooler with superglue. The main thing here is to fix and fill the gaps between the cover and the cooler. To seal cracks, you can use a hot glue gun or soda. Soda is poured along the contour, a “side” is carefully formed using superglue, and a very rigid composite is obtained.

Now it is necessary to completely seal the coil. To do this, dilute epoxy glue (you can mix it with silver or myrosphere to give a noble shade and reduce glue consumption) and fill the end of the cooler tube. All that remains is to wait for the glue to polymerize and repeat the procedure for the other side of the cooler.
Making a hotbed
It is better to make home moonshine with a steamer. A steam reflux condenser is necessary to remove fusel oils between the distillation tank and the coil. Heavier fusel oils released together with alcohol in the form of vapors settle in the steamer and the moonshine turns out more tasty. Headache during a hangover is the result of drinking fusel oils along with moonshine. Moonshine that was made on a machine with a steamer does not give you a headache!

A hole is cut in the lid of the jar for the coupling.

We clamp the inserted coupling with a nut. This must be done carefully, so that you do not then have to use a rubber gasket for the coupling to ensure sealing. Drinking moonshine with a rubbery taste is not very pleasant, so be careful and be careful again!

We try on and bend the tube from the coil to the steamer, and take the rest of the tube to the pan.

Now we clean the surface of the tubes with sandpaper, wind them together with threads and insert them into the steam container. We seal the space between the tubes and the coupling from the inside using cotton wool and fill the outside with epoxy.
After the epoxy has “set”, remove the cotton wool and check the tightness. The steam steamer should not “suck” air!

If everything is fine, we proceed to the manufacture of the distillation tank.
Distillation tank of a homemade moonshine still
We make a heated container - a distillation tank - from a large saucepan.

To do this, drill a hole along the diameter of the tube in the sidewall, 4 cm from the top. We put the tube inside and bend it so that there is 4-5 mm between the lid and the edge of the copper tube. In this case, the tube will only collect sublimation vapor and will not “choke” if the mash boils.

We seal the tube with the pan using the usual sealing procedure with epoxy glue.
Now you need to ensure the lid of the moonshine still is sealed.

To do this, we make a holder from anchors and an aluminum profile.

The ear of the anchor heats up and extends. An isolette is wound around the handles of the pan or a piece of PVC tube is put on (cut up). This will allow you to more “softly” regulate the force of pressing the lid onto the pan.

In the places where the lid is pressed, pieces of bottle cap are glued to the holder; they will also cushion and protect the lid of the pan from scratches.
Homemade moonshine still
This is what a homemade moonshine still looks like assembled.

In this case, a furniture aluminum profile is used as a holder. The cuttings were taken from a kitchen manufacturing site. If you don’t have the opportunity to get aluminum, you can use a piece of stick from a hockey stick or a handle from a shovel. The latter, of course, is too massive, but cheap and can be easily bought at the “Everything for the Dacha” store.

All that remains is to ensure that the lid fits tightly to the pan. Here fluoroplastic fum tape from the hardware store comes to our aid.
When preparing moonshine at home, wrap 6-7 layers of this tape around the edge of the pan and, covering it with a lid, attach the structure using anchors.
All that remains is to perform a test run of the homemade moonshine still - to do this, fill the pan halfway with water, seal it and place it on the stove. Hot steam will go all the way and clean the system. The same thing needs to be done every time after you have made the next batch of moonshine and are going to put the device away for storage.

When producing moonshine, a hose from a dropper is attached to the outlet of the coil and connected to the receiving container. Hoses are put on the cooler sockets, cold water is supplied to the lower one, and water is discharged from the upper one to the sink. It is better to place the coil at an angle to the surface and place it at a distance of 20-30 cm (or more) from the pan. The photo shows the unit intended for transportation. At the place of use, the tubes will be carefully bent and the steamer will take its place on the straight line between the pan and the coil.
How to make a simple moonshine still with your own hands
Nowadays, given the large amount of counterfeit alcohol in stores, more and more of our compatriots are leaning towards making moonshine at home. Nowadays, the law does not provide for punishment for moonshine brewing for personal purposes, so this is a good solution for those who want to have 100% high-quality alcohol at their feasts. Today, stores offer a huge variety of different moonshine stills, ranging from the simplest distillers to almost professional home mini-distilleries. The price also ranges from quite acceptable to very impressive amounts.
But still, for a novice moonshiner it is better to use a homemade moonshine still. Firstly, it will be cheaper than buying ready-made equipment. Secondly, without much understanding of moonshine equipment, you can ruin expensive equipment, and in the process of making a moonshine still, you will begin to understand what is needed for what and how exactly distillation occurs. Thirdly, and this applies not only to beginners, when buying a homemade moonshine still in finished form, you will not be sure of its quality or you may even run into a fake.
In this material we will try to reveal in as much detail as possible all the intricacies of how to make a moonshine still at home. We will consider the classic version of the distiller. Using it, you are unlikely to be able to make exclusive or exotic drinks like Calvados or whiskey, but it is time-tested, simple, reliable and inexpensive to assemble.
Design of the simplest moonshine still
The simplest scheme of a moonshine still consists of a distillation cube and a refrigerator. The mash boils in the distillation cube, and alcohol vapors settle in the refrigerator, resulting in the formation of moonshine. However, this simple moonshine still will saturate the drink with fusel oils and other harmful impurities. To get rid of them, you need to add something else to the design, or, as it is also called, a reflux condenser. We will tell you how to make a moonshine still from available materials, with minimal financial investment.
Alembic
So, the first element we will look at is the distillation cube. A distillation cube is a container in which the mash will boil during the distillation of moonshine. What can it be made from?

Most often in old, still Soviet devices, there is an aluminum cube. The distillation cube was made from a flask or can, in which milk was previously transported. It is not recommended to use such material for the manufacture of a moonshine still, because aluminum partially reacts with various acids and alcohol in the mash. In addition to the fact that unnecessary impurities appear in moonshine, with frequent use the aluminum still begins to leak after a short time and fails.
Enameled dishes. This material is neutral to acids and alcohol. If used carefully, without hitting or scratching, it can last quite a long time even with frequent use. However, it is quite difficult to seal a moonshine still from a pan well. Craftsmen have also learned to make cubes from a milking machine tank for cows, but this option is unlikely to suit a city dweller.
The most reliable option is food-grade stainless steel. Such a cube will serve for a long time; it does not come into contact with the mash, which eliminates additional harmful impurities in the finished product. However, cubes made from this material are quite expensive, and often ordinary galvanized steel is sold under the guise of stainless steel, and this is also not so durable.
You can also use a copper container as a cube, but as a rule, this is too expensive an option for a moonshine still.
The volume of the distillation cube must be selected according to the volumes in which you intend to produce moonshine. Ideal for household needs from 25 to 35 liters.
It is important to follow one rule! Never fill the still completely, it should be filled to about 80%. This is done for safety reasons, so that when boiling, the pressure in the cube does not exceed the permissible value and the cube does not burst. When choosing a container for the distillation cube, pay attention to the width of the neck. It should be large enough to make it convenient to pour the mash and wash the cube after distillation.
Don't forget about the size of the container either. The cube must be placed on the stove, be stable and not interfere with access to the entire apparatus.
You can make an electric moonshine still. For him, a distillation cube is made from a pressure cooker. It has a small volume, but it has its advantages - there is no need to use a stove, since it has its own heater, and it is initially sealed. You only need to make a hole in the lid for the steam outlet tube.
A milk can, preferably made of steel, is best. This is the simplest option. Just be sure to replace the rubber gasket under the lid with a silicone one, because alcohol vapors absorb harmful substances from the rubber. This will certainly affect the quality, taste and smell of the finished product.
How to do it yourself: remove the rubber gasket, then apply silicone sealant to the edges of the lid and leave to dry. Repeat several times. Place cellophane on the neck of the can and close the lid. Keep it this way until completely dry. This will make an excellent silicone seal.
Moonshine still refrigerator
The refrigerator in the moonshine still plays a very important role - it is in it that the alcohol vapors condense and the finished product flows from there. To make a refrigerator, it is enough to understand how the principle of its operation works.

There are two types of refrigerators: direct-flow and coil. A straight-through refrigerator consists of a straight metal tube that is placed inside a pipe with a wider diameter. Water flows continuously through this pipe, acting as a refrigerant. You can make a simple refrigerator for a moonshine still with your own hands from a copper tube with a diameter of up to 10 mm and a polypropylene pipe with a diameter of more than 20 mm. Fittings with plugs are screwed onto the polypropylene pipe, and holes are drilled into them with a diameter similar to that of a copper pipe. The copper tube will need to be inserted into these holes and seal the cracks. The copper tube is connected to the distillation cube, and the fittings are connected to the water tap.
Coils are made of glass, copper, aluminum or food grade stainless steel. Copper and aluminum have good thermal conductivity and are easy to make a coil from. But they have disadvantages - they are oxidized by alcohol vapor, so they must be cleaned with vinegar or citric acid after each distillation. It is impossible to make a glass coil yourself; you can buy it in a special store. However, they are very fragile, so it is not recommended to use such devices. Food steel does not oxidize and does not release any substances into the finished product, however, the thermal conductivity of steel is three to four times lower than that of copper. The best option is a copper coil. In some countries, copper is even the only permitted material for the manufacture of distillers. But it must be constantly cleaned.
The longer the coil tube, the more contact there is with the cooling element, but tubes that are too long have poor performance. The optimal option is 1.5-2 meters. The inner diameter of the tube is approximately 8-12 mm.
The copper tube must be twisted in a spiral with a small distance between the turns. The coil itself is lowered into a reservoir with a coolant, usually water. Systems can be closed - the water is constantly in the tank and does not circulate, and open - the water is constantly moving. A closed refrigerator is easier to manufacture and uses less water, but its characteristics are worse - even if you change the water regularly, it heats up quickly enough, as a result of which alcohol condenses poorly. Therefore, the losses of moonshine are quite large. An open system is more difficult to manufacture, but moonshine condenses better and its quality is higher.
The simplest and cheapest option is to wind a copper tube into a spiral with an outer diameter of approximately 100 mm, and use a 110 mm piece of sewer pipe as a reservoir. Drill two small holes on the sides of the pipe for silicone tubes leading to the coil, place the spiral inside and close the pipe on both sides with special plugs. They also drill holes for the cold water supply and outlet hoses. The structure must be connected to the water supply in such a way that cold water flows in the opposite direction to the movement of steam.
These elements are designed to clean steam from fusel oils and other harmful impurities. The principle of operation of the device is that the condensation temperatures of these impurities are lower than the condensation temperature of alcohol, therefore, alcohol vapors passing through these devices are cleared of fusel oil vapors.

A steamer can be made from an ordinary glass jar with a screw-on lid. You need to drill two holes in the lid for inlet and outlet of vapors, screw the fittings into them and connect the hoses. After which the lid is screwed onto the jar. The inlet tube must be lowered below the outlet tube by 15-30 mm. Alcohol vapor will escape through the outlet tube, and fusel oil vapor will settle on the walls of the jar. A steamer made in this way is easy to clean and rinse.
The bubbler performs the same function as the steam steamer. The difference is that the alcohol vapor passes through a layer of water. In a bubbler, the inlet tube descends almost to the bottom of the jar, not reaching 2-3 cm. Before distillation, cold water must be poured into the bubbler. The outlet tube must not touch the water.
How to assemble a simple moonshine still
Assembling the device is very simple. A hole must be drilled in the lid of the distillation cube to which a tube must be connected to allow steam to escape. This tube is connected to a steamer or bubbler, and from there it is connected to the refrigerator. A refrigerator with an open cooling system must be connected to the water supply and drain. A container for the finished product is placed or connected under the outlet tube of the coil. The assembly of the moonshine still is complete.
Pay attention to the material from which all connecting hoses are made. It is best to use food-grade silicone; it does not react in any way with alcohol vapors. The main thing is not to confuse it with PVC pipes, which begin to melt from the high temperature and harmful impurities are added to the alcohol vapor. You should also not use rubber, due to the fact that alcohol vapor absorbs harmful substances from this material.
It is not recommended to seal the entire structure tightly after assembly. The tubes must be made easily removable, and the connection must be airtight. If you make the tubes non-removable, then servicing, washing and moving the assembled device will be very inconvenient.
If you wish, you can install thermometers on the still or the distiller itself to make it easier to monitor the temperature of the process.
That's all, the home moonshine still is ready. Now you know how to make a moonshine still with your own hands. You can put in the mash and start distilling; you can get your high-quality alcohol at home.
If you still have questions about making a moonshine still, you can look at photos and videos that explain each step in detail. Descriptions and drawings of all devices can be found there.