What to make from vegetables and fruits. We make crafts from vegetables and fruits. How to make eclairs from plastic bottles
Hello! Well, has everyone prepared for the winter? Salted and fermented and pickled? If yes, then you are great! At least you got rid of some hassle. But the harvest does not end there and it still needs to be processed.
However, if your family has children of school and preschool age, then this problem can be easily solved. After all, there are autumn exhibitions ahead about gifts from gardens and dachas. This means that you can make a real masterpiece from vegetables and fruits and take a prize.
Therefore, we have solved the problem with the fuss in the kitchen, but now we need to do creative work. But it doesn’t matter, because the Internet is full of cool ideas, just choose and make them. Well, as always, I will try to make this process easier for you and put everything together.
Let me remind you that questions regarding the manufacture and have already been considered. That's why today we create from vegetables and fruits. I must say right away that the choice is very large. So take your time and read everything to the end, I’m sure you’ll definitely like something.
DIY crafts from vegetables and fruits for an exhibition (pictures inside)
As always, first let’s see what can be made from these gifts of nature. Of course, everything depends on your imagination. To be honest, I have a hard time with her). Therefore, I always look at the options of those people who put their creations on display. And then I just supplement the work with something of my own.
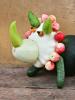
For example, you can make such a fancy rhinoceros. You will need a small watermelon, squash, zucchini, peppers, apples, a couple of berries and cucumbers. You can connect the parts using toothpicks, sticks or wire.

For a girl, you can suggest making an elegant swan from a twisted zucchini. But glue or sew beautiful wings from cotton pads.

Look what a bright parrot you can create. The technology is still the same: find suitable fruits and vegetables and combine them with each other. To make this craft you will only need an orange, carrot, pepper and zucchini.

I really liked the idea of bell pepper frogs. Beauty, and that's all!

But what can happen if you use a thread. Of course, the work requires certain skills and abilities, but you can try to do this with older children.

Here's a very simple option. Find small fruits, make faces out of plasticine and place them on a zucchini wheelbarrow. That's it, the craft is ready.

For any composition you can make such a small mouse from a lemon. I think you can see from the photo how it should be done.

An excellent composition is obtained from pumpkin and natural materials. Take it into service.

For variety and to stand out, you can work hard and do work on the topic of the inhabitants of the seabed. Cool idea!

You can also make different animals. Look, aren't these cute pets adorable?!

As you can see, creative work is not a dime a dozen. So let's move on.
The most beautiful crafts on the theme of autumn from fruits and vegetables
Everyone's favorite carriage! How elegant it looks due to the carving. By the way, the mouse and horse can be replaced from soft toys with vegetable or fruit ones.

Spiny hedgehogs are simple and beautiful. The pear fits the face very precisely, and the spines of grapes and toothpicks perfectly complement the entire composition.

And here is a snail and a caterpillar. Such cuties!

Whoever came up with the banana dachshund is a great guy. The main thing is that such work is very easy to do. And the kids will definitely be happy with the result. Also see how you can build an elephant from cabbage and beets. Or make a crocodile Gena from cucumbers.

Well, this mischievous monkey will not leave anyone indifferent. Be sure to save it!

Ideas for works made from fruits on the theme “Miracles from an ordinary garden bed”

A cute little toothy made from pineapple and melon. We make ears from eggplants, handles from peppers, and a bouquet of carrots as an addition.

Very simple products from vegetables and fruits. We make characters from the cartoon "Chippolino".

And here the forest inhabitants came to visit. Natural materials, plasticine and paper will help you.

What kind of mushroom came from zucchini or squash. Pay attention to the rear view, there are many compositions made of flowers and fruits.

Here is a watermelon stroller for hedgehogs. The wheels are made of oranges and rosebuds as decoration.

It’s a great idea to make various carved vases and candy bowls from the gifts of nature. Looks very bright.

Here are some simple potato pigs. By the way, this is a symbol of the New Year 2019. So take note, otherwise you also need to make crafts for the New Year.

Here are more examples of fairy-tale characters: Cheburashka, chicken, owl and matryoshka.

And a cheerful frog traveler!

Autumn crafts from vegetables and fruits using scrap materials and paper
I would like to invite you to make a very cool spider. Look how bright it looks, and everything is done very simply, as always.
Spider

You will need: 1 small round pumpkin; 1 pear-shaped pumpkin; 6 carrots; “caps” from acorns; toothpicks; knife; felt-tip pen; autumn leaves; glue; cardboard.
Work process:
1. Take a carrot and cut it diagonally. Fasten the two resulting parts with toothpicks so that you get a bent foot. Make 6 such paws.

2. Take a sharp knife and make a hole in a round pumpkin.

3. Connect the resulting carrot legs to the body using toothpicks.

4. Make a head from a pear-shaped pumpkin. Simply attach eyes made from acorn caps to it and insert the fruit into the hole.

5. Use a felt-tip pen to draw a mouth. Glue a clearing from autumn leaves and cardboard and plant the finished spider.

Also look at what else you can build:
- "Boatman";

- "In the clearing"

- "Pumpkin Clock"

- "Fairytale frogs";

- "The Hen and the Chicks";

- "The Smile of the Caterpillar";

- "Animals."

What crafts can be made in kindergarten for the autumn holiday?
Now I’ll share a small selection for our kids. After all, they are the most important creators.
Turtle made from squash, tomato, carrots and potatoes. It's very easy to put together.

And what kind of playful horse can be made from ordinary raw carrots? Just a treat.

Here's a whole vegetable train. Class!

And here is a penguin, and palm trees, and mushrooms. A whole fantasy composition.

Plane, plane, take me on a flight. Idea for a boy.

Here are some more funny and amusing animals. Choose whatever you like.

Well, the following products are a little complicated for preschoolers, but with the help of adults, the children will definitely be able to do everything.

Here is a cool basket with vegetable flowers. You will also need the assistance of parents or teachers.

And an awesome vegetable bouquet. It can then be processed into salad. 😉

Well, a real firebird. How do you like this job?!

Simple crafts from vegetables and fruits for an exhibition at school with your own hands
Let's figure out what our schoolchildren can do. Yes, absolutely everything. You can choose the options described above or choose from the works presented below.
I won't give a detailed description. Honestly, it seems to me that there is no need for words, and everything is so visible and understandable.
- "Hedgehog";

- "Car for a cat";

- "Smeshariki";

- "Bear";

- "Two Comrades on the Road";

- “Mikhailo Potapych with berries”;

- "Weirdo-Judik";

- "Tractor driver";

- “Vupsen and Pupsen”;

- "Autumn crafts."

Step-by-step master class on making caterpillars from fruits and vegetables
And now I want to tell you in detail and show how you can make a beautiful caterpillar.
Caterpillar

You will need: green-red apples 6 pcs.; a sprig of viburnum (rowan) for beads; wooden toothpicks; cocktail umbrella; carrots; eyes for dolls (or black peppercorns, or 2 cloves); grapes, flowers for decoration.

Work process:
1. First you need to assemble the body. To do this, you need to string the apples onto toothpicks in the center. Make the legs from carrot circles and toothpick halves. Collect the beads on a string.

2. Now stick the legs into the body one by one, two for each apple.

3. Next, secure the head. Make mustaches from grapes. Then attach a nose and an eye. Tie the beads. Open it and stick the umbrella on the side. Make a stand from available materials and install the finished caterpillar on it.

Well, how did you like this fashionista?
Video about how you can beautifully make crafts from vegetables and fruits for exhibition in kindergarten and school
And in conclusion, I suggest you watch a video that contains numerous works from fruits and vegetables for autumn competitions.
That's all. I wish you creative inspiration and a great mood! I hope I was able to find the most beautiful, vibrant and original works from the gifts of nature. And you have already chosen your craft that you will make. Give classes and write comments. See you again!
The fruit season has begun, which means you can start making interesting crafts from fruits that can be taken to kindergarten or school - little children really like this, since everyone loves fruits. You don’t need to buy expensive toys to develop your baby’s motor skills; you don’t need to spend money on all sorts of things that develop thinking, imagination and perseverance. Just engage your child, be it a boy or a girl, in making fruit crafts with your own hands. Now you will find out what can be made from fruits quickly and beautifully, because it can be crafts in the form of animals, still life and much more. When a child makes crafts, he first of all remembers their name, learns colors and shapes, develops his thinking, imagination, and associations. One of the simplest crafts can be considered applique. Just show your child what you can put on a fruit plate. Make funny animals, a boat or a flower with it. He will really like to build and come up with new interesting compositions himself. If a child does not eat well, then such a game will interest him, and he will eat with pleasure! Well, if you don’t have time to read the whole article, I advise you to watch a video where fruit crafts are presented.
Owl made of fruit
An owl will be a very simple craft that you can make with your own hands together with your child. Such an owl can be taken to kindergarten, and most importantly, it can be made at any time of the year, even in the fall, because all the required fruit can be bought in the store. You can see detailed instructions on how to make such a craft. 
You will need:
- Pear
- Grapes (dark and light)
- Strawberry
Progress:
- Cut a piece of the pear almost halfway. This will be our foundation.
- Cut two circles from the kiwi and peel the peel with a knife. We place the circles on the wide part of the pear to make eyes.
- We cut one dark grape in half and attach the kiwi on top, like pupils, using a short toothpick.
- Cut the strawberry into 4 parts. We attach a sharp piece, more like a beak, to the pear.
- We divide the dark grapes in half, and then cut each half into 3 parts. These will be our legs and we attach them down the body.
- We cut out the edges from the same grapes. Divide the grape into 4 parts and prick two pieces above the eyes using toothpicks.
- We make small wings from light grapes. Divide the grape in half and make one cut in each half. We need 4 such halves, 2 on one side and 2 on the other. Using toothpicks, attach them tightly to each other on the sides. Our cute owl is ready.
Video master class owl made from fruits
Lemon mouse
For kindergarten-age children I would like to offer such a cute mouse that can decorate your holiday table. Such a craft will not take much time and effort, but will cause a storm of emotions among guests. To make the craft yourself, see detailed instructions below. 
You will need:
- Lemon
- Sprig of parsley
- Scissors
- Knife (small for carving and large for slicing)
- Toothpick
- Black pepper
Progress:
- Cut off a small side piece from the lemon for stability.
- From the cut piece we cut out thin and round ears.
- The mouse's muzzle will be on the side where the elongated tail of the lemon is located. Use a small knife to make indentations for the ears and insert them into the holes.
- We also make holes for the eyes and antennae. To make the holes more even, you can finish them with a toothpick.
- We cut the dill stem lengthwise and insert it in place of the tendrils, using a toothpick.
- Insert pepper in place of the eye.
- Cut the peel from the remaining lemon in a circle and cut out the tail using scissors. For the tail, we make a cut from the back of the mouse and insert our workpiece. Our wonderful mouse is ready.
Video on how to make a mouse out of a lemon
Hedgehog in the fog
You can make a funny hedgehog out of a pear; both you and your child will enjoy working together with your own hands. It’s good to make a hedgehog in the fall as a craft for kindergarten or school. You can see how to make such a hedgehog in our master class with detailed instructions. 
You will need:
- One pear
- Grape
- Toothpicks
Progress:
- Using a knife, you need to peel the pear from the sharp side. This will be the face of a hedgehog.
- Now take the grapes and insert a toothpick into each berry. This should be done so that the sharp end of the toothpick peeks out a little.
- Now the prepared toothpicks with berries need to be evenly inserted into the pear. It is in the unpeeled part of the fruit.
- We make a nose for a hedgehog, for this we take one black grape and string it in place of the tail of the pear.
- Eyes for a hedgehog can be made simply from matches or cloves.
How to make a hedgehog from fruits with video instructions
That's it, your funny hedgehog is ready. Please your baby with a fun and tasty toy. You can come up with a whole fairy tale and tell it to your child while eating.
Typewriter
You can make many of these cars for a child’s birthday and amaze your little guests. We are sure that more than one child will not refuse such a homemade treat. Fantasize together, and we wish you a delicious and entertaining activity. And to make such a machine very simply, your child can help you with this. 
You will need:
- Grape
- Banana
- Apple
- Toothpicks
Progress:
- Take an apple and cut it in half to make a semicircle.
- Now peel the banana and cut it into rings as well. Each ring must be cut in half.
- Take toothpicks and pierce the apple where the wheels should be. Do this evenly.
- All that remains is to place the prepared banana slices on both ends of the toothpicks and secure it all with a grape.
Banana dachshund dog
If your child loves bananas, then our funny dog can attract him. Please your child and for dessert present him with a craft you made yourself, or perhaps together with your child. In order to understand how to make a dog out of a banana, we will now tell you in more detail. 
You will need:
- Two bananas
- Toothpicks
- Peppercorns
- Black felt-tip pen
- Knife
- Carrot
Progress:

That's it, our funny dachshund is ready and can delight the whole family. Look carefully at the photo and follow the instructions, it's very simple. We wish you a fruity mood!
A simple children's craft made from apples - funny little people
It is very easy to make such funny little people with your own hands with your child. This craft will not take you much time, but will interest your child for a while. These little people can be used to decorate a children's table or for exhibitions.
You will need:
- Green apples
- Apple seeds
- Toothpicks or matches
- Sharp knife
Progress:
- Take two apples, one should be larger than the other. Place the apples on top of each other so that the small apple sits on top of the large apple. Secure the craft with toothpicks or matches.
- Now take the third apple and cut 4 pieces from it. Two of which will be the legs of a man, secure them at the bottom of the body. And the remaining two are on the sides in the form of hands.
- Cut a small apple into two parts. One will be a hat for your little man.
- The seeds will serve as eyes; you can simply press them into the apple. The mouth can be cut out with a knife or made from leftover apple pieces. At your discretion.
Your simple and fun craft is ready. It will please the child; he can play with it or put it on the table during lunch. Enjoy yourself and make a small holiday for your baby.
Children's craft - rat Larisa made from radish
Quite an interesting craft for kids that you can make with your own hands together with your baby. It’s not difficult to make, the main thing is to apply imagination and skill. This craft can be made for a kindergarten exhibition.
You will need:
- Large white radish
- Lettuce, but better than cabbage
- One small radish
- Olives
- Sharp knife
- Toothpicks
Execution Process
- You need to rinse and dry the large white radish well. Remove all the roots, leaving only the tip of the radish, they will serve as tendrils. You shouldn’t remove the tops either, they will become tails. But if there is a lot of it, thin it out, tear off the excess.
- After this, you need to cut off the front part of the radish and use a toothpick to secure the radish at this place. This will be the nose of the craft
- We make the ears using notches, making them small. You need to carefully insert lettuce or cabbage leaves into them.
- Now all that remains is to make the eyes of our rat, for this we take olives. We cut the olives into circles and attach them to the radishes using toothpicks. Eyebrows can be made from the remaining radishes.
So the funny girlfriend is ready. Give it to your grandfather and make him happy for the holiday. After all, he already has Shapoklyak.
Original helicopter made from eggplant and carrots
If your child loves helicopters, then you can surprise him with a joint craft made from vegetables. This craft can be presented both for kindergarten and 1st grade school. With detailed instructions you will succeed easily and quickly, you can also watch the video master class. 
You will need:
- Carrot
- Eggplant
- Toothpicks
Progress:
- We take an eggplant and cut off a beveled piece of peel - this will be our windshield.
- Cut two circles from the carrots for the wheels, about 1 cm thick.
- Using toothpicks, attach the wheels to the eggplant. The tail of the eggplant should be facing up.
- Cut the carrots lengthwise into strips so that they look like blades. From the same carrot we cut out a cylinder with a small diameter, about 4 cm high.
- We attach the cylinder to the top of the helicopter using a toothpick. Part of the toothpick must be visible in order to attach the 4 blade strips to them.
- We cut a circle from the carrot, and from the circle we make a screw, cutting out 4 triangles from it. Our helicopter is ready.
Video helicopter made from eggplant and carrots
Crafts little mice
If your child has trouble eating cucumbers, then we can offer you an interesting solution. Together with your child, make a quick and delicious craft called Little Mice from a vegetable. It won't take much time, but we assure you, your child will love eating cucumbers. Moreover, they contain so many useful substances and vitamins. 
Useful tips
You can make a huge number of different crafts from vegetables and fruits.
Many of these crafts can be made together with children - this will not only bring pleasure, but will also have a positive effect on the child’s imagination.
Here you will find crafts for every taste and color.
Arm yourself with the necessary materials and use the accumulated information to create beautiful and original crafts.
Read also:
Crafts from autumn vegetables for children
Children will love playing with paints. To make it fun for them, make vegetable stamps for them.
Potatoes, for example, can be cut in half and a certain pattern can be cut out in each half - the child will dip the potato in paint and stamp it on the paper.


Besides potatoes, there are other vegetables that can be used.
Look closely at the pictures to see how you can surprise children with simple vegetables and colors.


Crafts from vegetables for kindergarten: eggplant man

You will need:
1 eggplant
Glue stick
Pompoms
Plastic (toy) eyes

Everything is very simple, and even small children can do the craft.
1. Glue the toy eyes to the eggplant.

2. To make the nose, you can glue a large pompom or cut a circle out of paper and glue it on.

3. You can glue small pompoms in the shape of a person’s mouth. Instead of pompoms, you can also use colored paper, cardboard or even other vegetables - a strip cut from a carrot, for example.
DIY vegetable crafts: potato men

Making eyes
* To make eyes for a potato man, you can use small buttons of any color (except white), which should first be sewn to a piece of white fabric - then cut the fabric in a circle, grease it with glue and glue it to the potato.
* You can also make eyes from: peas, berries, black pepper, seeds, colored paper, or pieces of carrot, which are secured with a toothpick.
Making the nose
To make a convex nose, use a button sewn to a piece of fabric - cut the fabric in a circle a couple of millimeters larger than the button. Spread the fabric with glue and attach it to the potato.
Making ears
To make the ears, use pumpkin seeds - just insert them into the potatoes, pointy end down. You can also make ears using plasticine.
Making hair
Hair can be made from different materials, such as thread, paper (cut into fringe) or thin wire.
Crafts from vegetables for school: potato pony

INyou will need:
Three potatoes
Toothpicks
Carrot
1. Insert one toothpick into a small potato - this will be the head.
2. To make the neck, take out a small potato and insert the other side of the toothpick (from step 1) into it.
3. For the body you will need a large potato. Attach it in the same way.
4. Use toothpicks to make the horse's legs. Insert them into a large potato, i.e. horse's body.
5. To make the horse stand, attach small pieces of carrots to the toothpicks that act as the horse’s legs.
6. You can also make ears from carrots. Insert the ears into the pre-cut holes.
7. For the mane and tail, use knitting threads. Just cut as many as you need and glue to the craft.
How to make a vegetable craft: radish flower

Before you start cutting the radishes, soak them in cold water for a couple of hours - they will become firmer and fresher.

1. Cut off the bottom of the radish. Decide how many petals you want for your future flower, and think about where you will make the cuts.
2. Take a knife and start making cuts from bottom to top (see image).
*You may need to practice a little to ensure that all the petals of the radish flower are even.
* If you want the petals to be more open, gently move them with your finger from the center of the flower in the opposite direction.

3. Using scissors, cut the petals so that you get “arrows” (see image).
4. Repeat the previous steps to make a second layer of petals from the middle of the flower, but this time the petals should be between the outer petals.
A similar flower can be made from tomato or kiwi peel:


How to make a flower from a tomato - video:
Crafts from vegetables instructions: flowers-decorations from vegetables
These crafts can be used as decorations for dishes or simply as a beautiful display of vegetables for children who are known to not be very fond of vegetables.
You can use different vegetables. This example uses cucumber and carrots. You will also need a toothpick.


Food crafts: snowman made from eggs

You will need:
6 large boiled eggs
6 small boiled eggs
Black pepper (peas)
1 carrot
1 skewer
1. Peel one large and one small egg and cut off the top and bottom parts.


3. Place a small egg on a large one and secure them with a skewer - thread it through.

4. Make a hat from carrot rings. To attach it to the snowman, first make one hole with a skewer through the circles. Now place the hat on the protruding skewer.


* You can safely trim off the excess part of the skewer.
* Instead of a skewer, you can use thick, uncooked pasta.

5. Make eyes, nose and buttons using black pepper and for the nose you can use a small piece of carrot.


6. You can use parsley as arms for the snowman.

Children's crafts from fruits: decorations from dried orange slices

You will need:
Orange
Oven
Oven rack
Satin ribbon
1. Cut the orange into several slices approximately 1-1.5 cm wide.

2. Place the orange slices on the grill.
* Do not use a baking sheet, otherwise the slices may burn.
3. Place the slices in the oven and keep them there at 130 degrees Celsius for a couple of hours (monitor them periodically).
4. Remove the orange slices from the oven and let them cool. You can put them on a plate to cool.

5. Now the slices can be used to decorate dishes or for a Christmas tree or interior - they not only look beautiful, but also smell nice.
6. You can make holes in them and thread a ribbon so that the slices can be hung.

DIY fruit crafts: fruit cup

You will need:
Orange or grapefruit
1. Take an apple and place it on the table with the handle down. Cut off the top part, and the bottom part will act as a cup.
2. Using a knife, cut out the core of the apple.
3. To prevent the apple from turning black inside, brush it with lemon juice.
4. Make a cutout in your apple cup for a handle. Cut a slice of kiwi and insert it into this cutout - it will act as a handle.
5. For the saucer, just cut a slice of orange or grapefruit.
You can also make a fruit cup like this to decorate the table:

Berry crafts: strawberry Christmas tree

You will need:
Scissors
Baking paper
Paper (lace) napkin
Adhesive tape (scotch tape)
Strawberry
Chocolate
1. Make a cone out of cardboard. To find out how to make a cone, you can go to our article: Paper cone. Also cut a circle out of cardboard - this will be the base of the tree.
*Instead of a paper cone, you can look for a foam cone in stores.

2. Cover the cone with baking paper. You can insert the ends of the paper inside the cone. To secure the paper to the cone, you can use adhesive tape.
3. Melt the chocolate to glue the cone to the base.
4. Cut a circle in a napkin with the same diameter as the base of the cone and push the cone through the napkin.
5. Prepare the strawberries and separate them by size. Remove the tails.
6. Start gluing the strawberries from bottom to top, starting with the largest berries. Dip the strawberries into the melted chocolate and stick to the cone (wrapping paper).

* Save the smallest berries for the top of the tree.

7. You can also attach other chocolate decorations (ready-made or homemade) to the tree.
Children's crafts from vegetables and fruits: butterflies

You will need:
Clothespins
Toy (plastic) eyes
PVA glue
Sealed bag (ziplock bag)
Thin brush or wire (if desired)
Paints (if desired)

1. Using glue, attach the toy eyes to one side of the clothespin and let the glue dry.
2. Place your favorite treats (yours or your children's) in a ziplock bag - you can distribute them to the sides, but this is not necessary.

3. Use a clothespin to grab the bag as shown in the image.
4. If you wish, you can make antennae for the butterfly from a thin brush or wire. You can also paint the clothespin if you feel it is necessary.
Crafts from vegetables: pumpkin faces

Autumn is the golden time for picking fruits and vegetables. This is space for children's imagination. Therefore, autumn crafts from vegetables turn out colorful and unusual. Get ready to create with your kids. Interesting ideas will help with this.
Autumn crafts from vegetables for children
Do you want to prepare the most original craft for kindergarten or school? Then here is a list of ideas with step-by-step implementation:
- Chipmunk.

To create a wonderful animal you will need:
- red onion - 2 pcs.;
- green onions;
- raisins or peppercorns;
- sugar - 2 tbsp. l.;
- toothpicks;
- threads;
- plasticine.
Learn how to make a children's craft from vegetables:
- Peel the red onions. Using a sharp knife or blade, pry the skin of the onion to create white stripes.
- Trim the bottom of one bulb to create a stable trunk.
- Attach the head to the body using a toothpick.
- Bend a bunch of onion feathers so that the tail comes out. Tie with thread.
- Prepare sugar syrup. To do this, boil 3 tbsp. l. sugar with 1 tsp. water.
- Once the crystals have dissolved, brush the syrup onto the onion feathers, forming the curves of the tail.
- When the syrup has hardened, attach the tail to the body with a toothpick.
- Make the legs by cutting the lower part of the body. Poke them out by placing pieces of plasticine.
- Make ears from onion scraps. Insert them into the cuts on the head.
- Attach raisins or peppers to form eyes.
This is such a wonderful beast. You can make him a girlfriend for company.
- Piglets.

Potato crafts are easy to make and look very cute. To make a family of piglets, prepare:
- potatoes (one large and three smaller);
- plasticine.
To lay out the piglets, think about the base in advance. This could be a piece of cardboard or a plastic plate. The big potato will act as a sow, the rest will be piglets.
So, start assembling:
- Wash and dry the potatoes.
- Use black plasticine to form eyes for the piglets, and use pink plasticine for ears, tails and nickels.
- For the pig, use red plasticine.
Install the family on your tablet and proudly take it to the exhibition.
- Giraffe.

Original crafts are made from carrots. What is the figure of a giraffe worth? All you need to create it is:
- carrots - 7 pcs.;
- peppercorns;
- matches;
- toothpicks.
Here's how to create an autumn craft with your own hands:
- Peel the carrots, wash and dry.
- Select the two longest vegetables for the torso and neck. The smaller ones are suitable for the legs and head.
- Position your torso lengthwise.
- Attach the legs to the bottom with toothpicks. Pre-trim these carrots from the bottom for stability.
- Stick two matches into the head, forming horns.
- Make eyes out of peppers.
To complete the look, you can use a black marker to add spots on the body. The carrot giraffe is ready.
- Turtle.

Photo: artem-kashkanov.livejournal.com
An unusual turtle will be made from pumpkin fruits. It is difficult to find a more autumnal vegetable, and its bright color will help create an original craft. Here's what you'll need:
- small round pumpkin;
- sunflower seeds;
- toothpicks.
Learn how to make a pumpkin craft:
- Wash the pumpkin, cut in half, remove the seeds.
- Make a shell from one half. To do this, use a knife to cut a pattern on the peel that follows the patterns of the real shell.
- Make two cuts on the sides in the shape of an arch. Do the same with the front part.
- From the remaining pumpkin, cut out four legs (in the shape of slices) and a head.
- Insert the blanks into the holes and secure with toothpicks.
- Make eyes from sunflower seeds.
- Cut the toothpicks in half and decorate the paws with them. This stroke will make the paws look like flippers.
Now place the pumpkin turtle on the base. The craft is ready.
DIY fruit crafts
Autumn crafts for kindergarten can be made not only from vegetables, but also from fruits. Do you want your creation to stand out from the rest? Then feel free to create crafts from vegetables and fruits. Here are ideas for exciting work:
- Record player.

It turns out that autumn fantasies are not limited to animals and flower vases. Making a tape recorder is also possible. Prepare the following components:
- rectangular box;
- green onions;
- cucumber;
- carrot;
- lemon;
- yellow and red bell peppers;
- grapefruit;
- toothpicks;
- Double-sided tape.
So, the progress of the work:
- Cover the box with double-sided tape, then cover the entire surface with onion feathers.
- Prepare the details. Cut the cucumber into thin strips, leave the tail of the pepper, and chop the rest into rings and strips. Cut the remaining vegetables and fruits into rings as well.
- Secure the parts with toothpicks as shown in the photo.
Children and adults will definitely enjoy this extraordinary work.
- Hedgehog.

Take an oblong pear, grapes and toothpicks. Proceed with assembly:
- Cut the pear in half.
- Place one part on a plate.
- Cut long toothpicks in half, stringing grapes on them.
- Stick the spines into the back area, leaving room for the muzzle.
- Make the eyes and nose of the hedgehog from peppercorns.
For ambience, you can cover the plate with lettuce leaves and then place a fruit hedgehog.
- Caterpillar.

The beauty of this fruit craft is that you can choose the variety and color of apples at your discretion.
What you will need:
- apples - 5–6 pcs.;
- carrots - 1 pc.;
- Rowan;
- grape;
- toothpicks.
- Cut the carrots into rings (no more than 5 mm).
- Attach two rings from the bottom to each apple - these are the legs.
- Now fasten each apple together with toothpicks - this is the body.
- Place one apple on top - this is the head.
- Make the eyes from rowan, and the nose from grapes.
- Also make the horns from rowan, stringing the berries on toothpicks.
These colorful crafts allow you to create autumn fruits. Unusual creations will decorate any exhibition, and the child will have an interesting time.
Good afternoon, today we will make crafts from vegetables and fruits. In this article I have collected the most complete collection of the cutest crafts, with a theme suitable for kindergarten and school. Autumn competitions at school are often organized on the theme of crafts made from vegetables (and not just from chestnuts and cones). It happens very often that that your child did not immediately tell you about the competition, often you will only find out about the craft by Monday on Sunday evening. And therefore, it is important to quickly EVALUATE the contents of your pantry and FIND an idea in the depths of the Internet that will suit your vegetable household stock.
That is why I decided to combine in one article all types of vegetables and fruits who can take part in creating crafts for the garden and school. You don't have to sift through heaps of Internet pages. Here you will find all ideas for children's crafts– in one article at once.
Here's what we'll be doing today:
- Crafts from cucumber, pepper.
- Crafts for the garden from onions, cabbage and potatoes.
- Crafts and eggplants and zucchini.
- Carved sculptures-crafts from carrots and radishes.
- Flat crafts-paintings from vegetables and fruits.
- Animal crafts from oranges, kiwi, bananas and lemons.
- Crafts from watermelons, pineapples, and melons.
- And I put it in a separate article
CRAFTS FROM VEGETABLES.
We'll start with vegetable children's crafts... and then we'll move on to sweet fruit sculptures. You will see that you can make a chipmunk out of an ordinary onion. And cut roses from radishes, which will bloom on their own if you put them in a glass of water. What am I telling you... now you will see everything for yourself.
Crafts FROM ONION for school and garden.
You can make many interesting sculptures from vegetables as well as from fruits. Here are the onion chickens. We take the young onion out of the garden right along with the stem, and cut the stem-stem into feathers - we move them apart, this “broom” we place on a carrot base post.

And here is another craft FROM RED ONION. Chipmunk with white stripes and fluffy tail from onion feathers. I'll tell you in detail how to make it yourself...

Take two red onions suitable size and shape (it is better to take fresh bulbs, straight from the garden - they are then even in color and elastic). And we immediately make white stripes on them - to do this, you need to cut the top skin of the onion with a blade and then carefully remove it (like shavings) so that you get a white “bald patch” in this place.
Forming a little body- take a long wooden skewer or toothpick and stick it into the belly bulb in the area of the future neck. And stick an onion head onto the protruding end.
Making a tail- bend the green feathers of the onion into the shape of a tail, the lower part of the tail tie with thread or rubber band in a bundle.. And in a saucepan cook sugar syrup(3 tablespoons of sugar + half a teaspoon of water) - when the sugar melts and boils, coat the onion feathers with this sticky sweet glue (so that they stick together into a single tail) - dry it all. And then we pierce the lower and middle part of the tail-bun with toothpicks and stick it into the back of the onion-butt.
Paws- these are cuts on the onion-tummy. To make the paws detach and protrude from the tummy, you can place pieces of plasticine under them. Ears These are small slices from another onion - we stick them into the slits on the chipmunk’s head. Eyes- these are olives (you can use raisins, or pieces of black eggplant skin). The tendrils are also white cuts on the colored skin of the onion.
You can paste over a rectangular box (of tea or cookies) with onion feathers and make it from such a blank VEGETABLE RECORDER... or RADIO. Vegetable buttons are pricked with toothpicks or glued to sugar syrup (see recipe in Onion Chipmunk).

PUMPKIN CRAFTS
flesh carving.
Crafts from PUMPKIN PUMP . Even pumpkin pulp can become a source of beautiful crafts. The pumpkin is soft enough to cut out whatever your heart desires. For example, these majestic pink flamingos.

Birds can also be cut out from regular CARROTS. In the photo below we see how a man creates his masterpieces right on the street.

You can make a simple sculpture from the whole side of a pumpkin - for example, the face of a donkey.

Pumpkins are a very interesting product for creativity. You can talk about it for a long time and with photo examples. That’s why I’ve collected a lot of different pumpkin crafts in a special article.
Crafts from radish vegetable
white and pink.
From WHITE RADISH You can also cut out beautiful parrots. White radish - resembles a huge white carrot. It can be cut perfectly with a knife into any shape. And the wings don’t have to be made from radishes either. You can take hard stalks from BEIJING CABBAGE. A beautiful and simple vegetable craft for kindergarten and school. The jury will really like it.
And here is a craft made from red radishes... Also a very cute family of pink birds in a nest made of tops, pods or onion feathers.

And a gorgeous bouquet of vegetable roses. Here are photo instructions on how to do it. We cut the radishes with a knife into shavings - in a checkerboard pattern (like cabbage leaves on a stalk). Then we put such a cut radish in water - and under the influence of water it swells and opens its petals. We string the buds onto wooden skewers - and so that the stems are green, we insert each skewer inside an onion feather.

FLOWERS FROM VEGETABLES
crafts-bouquets for the garden and school.
And below we see how flowers are created from vegetables and fruits. Oval flowers with a halo of narrow petals (also from radishes), orange buds with a berry in the middle (from tangerines). Palms made from bell peppers and a carrot trunk, or a skewer trunk and grapes strung on it.

Here's an idea on how to create lush tulips from sweet peppers. Or delicate white daisies made from thinly sliced white mini pumpkins (with a yellow carrot center). An excellent craft for children who are bored at the dacha.

And here is a way to make ASTRA from the stalk of Chinese cabbage. If you add rose flowers from red cabbage to such a Beijing aster, you get an elegant composition for an exhibition at school or kindergarten.

Crafts from Zucchini and other vegetables.
Here is a penguin bird from ZUCCHINI - with a sweet red pepper bow and orange eyes. It’s very easy and accessible to make with your own hands, even for children.

And here is another bird with a tomato head and a green crest and green pepper wings. The belly is a white zucchini.

You can make human or animal heads from squash crops.

If the fruit has a pointed shape, then you can play it like the face of a puppy or mouse.

You can also make a sculptural dragon craft from zucchini halves. But this is a real challenge to our creativity. The most important thing here is the head - if you have the muzzle, then you can continue and make the body.
Using the same principle, you can create similar composite sculptures from oranges.

BLACK EGGPLANT
vegetable crafts for the garden.
The black color of the eggplant tells us the creation of black and white animals that live on our planet - and these are ZEBRAS, WHALES, PENGUINS, AND KOALAS. (I didn’t find koalas among the photos of crafts - but it’s a good idea).

Eggplant can act as an insert element in crafts made from other vegetables (see photo below with a rooster and monkey).

Crafts from cabbage and other vegetables.
Cauliflower is an interesting material in its structure. Its bizarre shapes themselves suggest the theme of vegetable sculptures. These are, of course, sheep, polar bears, poodles and other furry animals.


CRAFTS FROM POTATOES.
Even ordinary potatoes can become an interesting tool for children's creativity. These minions can be made from potatoes - they can be dressed in overalls made from black eggplants. The minions themselves can be painted with yellow gouache paint. Glasses can be cut from round carrots (cut the carrot into a circle and cut a round hole in the circle).


The very shape of the potato can give you an idea for a craft - in the photo above we see that the potato in the shape of panties suggested the idea of creating a girl in shorts. You can also look for interesting shapes in a bag of potatoes - for example, in the form of Peppa Pig's head, you very often come across them.
You will find more ideas for potato crafts in a special article on our website
Crafts FROM PEPPERS and other vegetables.
Sweet and hot peppers can be a source of inspiration. Their smooth, shiny shape guarantees the beauty of the final craft. Like this motorbike can be assembled by connecting all the parts with toothpicks (plasticine can be placed inside as an additional fastener for toothpicks). Thread citrus wheels onto toothpicks as well.

Roosters and overseas birds can be made from peppers in a fancy curved shape. You can look for these in a store, or better yet, at the market or at your dacha.

And here crabs and crayfish... They are made from several pepper vegetables. And to be honest, PHOTOSHOP has also WORKED here (they removed what was unnecessary and added what was not needed) - but the idea is still worth trying to implement it for real.


And here, in the photo below with dragon, everything is fair. No photoshop – only the skillful hands of a master and the eye of an artist. Bean pods (whiskers and horns), corn stalks (ears and tail), apple (for the muzzle), carrots (paws and spinal teeth), toothpicks (claws and fasteners).
It is important to be able to look at fruits and vegetables this way an artist's eye, squint, blur your eyes and suddenly, in this foggy haze, see a future sculpture in a pile of vegetables.

CRAFTS FROM CUCUMBERS.
Sculptures for kindergarten are most often animals. Children love animals, and animals love children. This is how nature intended it. Therefore, we will make cute animals from cucumbers. Cucumbers are, of course, GREEN CROCODILES.

Although sea inhabitants (dolphins and sharks) can also be carved from a green greenhouse cucumber. Make fins, gills-cuts, a white neck with a slit of a toothy mouth.

PICTURES FROM VEGETABLES.
But what kind of flat collage crafts can be made from vegetables and fruits. You can take famous paintings by famous artists as an ideological basis. And try to repeat them in your vegetable creativity.
Alon Zaid, an elderly artist, came up with the idea of recreating famous paintings from fruits and vegetables. Here is the quiet Mona Lisa by Leonardo da Vinci, The Son of Man by Rene Magritte, the portrait of Dora Maar by Pablo Picasso

Here you go, Mona Lisa, aka Gioconda, by the great master Leonardo Da Vinci.

Here is another famous painting by Pablo Picasso.

You don’t have to repeat the MASTERPIECES of painting from the Hermitage... but come up with your own painting from vegetables.

And also don’t forget that in addition to vegetables, THERE ARE ALSO FRUITS. And they have their own visual capabilities. Its bright colors and interesting cut patterns.


So, since we got to the fruits, let's see what we can do for the garden competition using these fruits.
FRUIT CRAFTS
And now, let's move on to fruit compositions and sculptures. I will show you the easiest crafts to implement with your own hands from apples, pears, bananas, pineapples, aruboza peels and melon fruits.
Crafts from pulpy fruits
apples, kiwi, pears, bananas.
Here are some cute childish crafts made from kiwi. To create them, you need to select unripe hard fruits. The cut sections of the slices should be blotted with a paper napkin so that the juice does not bleed through.

But crafts from apples and pears - if you use one whole fruit + a thin slice of the second fruit, you can get such interesting crafts (a mouse and an elephant). Where thin slices serve as details for the ears and face. And from an apple cutting you can make a trunk for an elephant. Delicious and fun crafts that you can make with your kids and then eat.

And here are crafts made from juicy pears. To create such birds, we choose harder varieties.
And to prevent the cut area without the peel from darkening, you need to lubricate it with a brush dipped in lemon juice.

And if you are making a craft from a pear, without the peel, and even with finely chopped feathers (as in the photo of the birds below), then it is better to protect such a craft so that it does not darken, and so that the “feathers” do not fall out and wrinkle. We use gelatin for protection. Pour gelatin powder with water. When it swells, heat it until it dissolves (but do not bring it to a boil!!!). And we grease our entire craft with this warm gelatin syrup. It will become shiny and will look fresh for a long time, nothing will darken or wither. Only important— we make the gelatin solution for such a lubricant 2 times thicker than jelly. That is, we read the instructions on the package and pour 2 times more powder into 2 times less water.

Crafts from bright red apples are made using exactly the same principle. Treat white sections with lemon juice(so that they don’t turn black) and you can also grease them with gelatin syrup (so that they don’t wilt or wrinkle).

Can be done crab craft from apple slices - also paint it in beet juice so that it is red, or grease it with lemon juice so that it remains white (does not rust).
You can make it from a green apple hummingbird. A great little fruit craft for kids.
You can make pots with flowers from the tops of large apples - cut the bald spots of the petals into them - you will get an elegant composition with your own hands from vegetables.

Children's crafts from bananas.
Of course you need to make minions out of bananas. This is clear to everyone. Bananas are yellow, so are minions. You can dress them in overalls made of cucumbers. You can make a whole family for an exhibition in a school or kindergarten.

You can make an octopus out of a banana. Add citrus fish and red pepper crab to it (see photo below in this article). And make a whole underwater kingdom out of vegetables and fruits.
Or make a cute duck family out of banana tails.

Here's an idea for dachshund puppies - with skinned ears and green tails. The eyes are cut out and the pupils are inserted from black paper.

CITRUS CRAFTS
along with helping vegetables.
In lemons, you can play with their shaped feature - a POINTED NOSE. And make these cute little mice out of lemon (you just need to cut off their side so that the mouse lies on its tummy. Cut round ears from the peel of the cut lemon tummy. Cut a lemon on the top of the little mouse’s head and insert an ear into the cut. Cut a thin tail from the scraps of skin. And honey A children's craft for a competition for kindergarten or school is ready. By the way, you can FROM A PIECE OF PUMPKIN make MOUSE CHEESE and even cut round holes in it.

If you cut a lemon or orange peel along the contours we need - and then peel it off. We get a curly “bald patch” on the orange (as in the photo with crafts below). This citrus “bald patch” can serve as a white belly for two chickens or penguins (in the right photo below).

From oranges you can make a cat (with cut stripes on the back and tail) and a bear cub with tangerine ears.

All parts are pinned onto toothpicks and stuck into the orange pulp.
Citrus peels cut perfectly into any flat shapes (like cardboard). Therefore, it can be used to carve complex carved shapes of fish fins and tails. Beautiful crafts in underwater style, add crabs made from apples, starfish from orange peels.

Citrus fruits can be used in crafts as an addition to a sculpture made from vegetables (for example, in the form of a wing for a parrot made from tomatoes and onions). Or the entire sculpture can be made from oranges cut into round shapes (as in the photo with the lion below).

If you take a rectangular cardboard box and cover it with orange peel, you will get the basis for creating a camera.
PINEAPPLE CRAFTS
and other fruits and vegetables.
Here are interesting ideas for those who don’t mind sacrificing pineapple for the sake of children’s creativity. A small melon can become the head of an owl - we make eyes from round radishes and olives, winged eyebrows from the peel of black eggplants, yellow paws from lemon halves.

From half a pineapple you can make a crocodile with eyes (radishes and olives) and paws (kiwi). Of course, such a crocodile requires a lot of pineapple sides. It’s not my salary to get carried away with this - but if you don’t have financial problems, then choose this cutie - the pineapple crocodile will definitely not remain in a modest shadow at the school exhibition.

Or you can make a turtle from one half of a pineapple - and cut the legs and head from the pulp of a pumpkin, carrot, potato or other vegetable or fruit. A simple and beautiful children's craft made from vegetables.
And here is a pineapple hedgehog. To be honest, this is most likely the result of Photoshop, or the very painstaking work of a pineapple pulp cutter - you need to cut the peel off the side of the pineapple, then shape the pulp into the shape of the legs and head. Then use toothpicks to secure the stem comb to the hedgehog.

But the idea with a parrot bird is suitable if you find a pineapple with a long tail. We cut it from the pineapple by pushing the knife deeper into its pulp so that the tail is cut off along with the yellow center. We stick a red pepper nose and olive eyes into the parrot's head and attach it to a wooden skewer to its habitat.
Crafts from WATERMELON RIDS.
You can make many crafts from watermelon. We are all familiar with the masterpieces of watermelon rind carving. Here I will not offer complex sculptural tricks. We are simple parents - we are not that talented - we need simpler ideas. Here I have collected the most accessible crafts made from watermelon rind to the common man.
Here's a turtle The craft is easy to do with your own hands - Cut the watermelon so as to remove the side round part (this will be the shell) - remove the pulp so as not to interfere. On this oval part we draw future patterns with a felt-tip pen, and then we cut all the contours with a knife - we get a carved pattern of the shell. All that remains is to cut out the paws and head from other pieces of crust - attach all this with toothpicks to the bottom of the shell.

And here are the gaping mouths of sharks and frogs. We also draw future cuts on the watermelon. Cutting a segment of watermelon - we get a mouth cutout. We remove all the pulp from inside with a spoon and eat it. And then with the empty watermelon belly we do what we need - either a frog or a shark . Shark teeth are very easy to make– first, we make a shallow cut-groove along the edge of the mouth (to the depth of the green layer). Then we cut off the thin green skin along this groove and leave the thick white skin. From this remaining white part we form teeth - we simply cut out and throw out triangular segments from it - and we get triangular remains - teeth. We make a slot - insert the fin into it - make a chipped indentation for the eyes and insert black olives.
And the frog doesn't need to have teeth - the eyes are made from halves of a green lime and two cherries on toothpicks.

Here is an example of how you can make a cartoon character out of a watermelon. In the first case (minion), we put a large yellow POMELO fruit inside the green watermelon overalls.

But here are crafts for boys made from oblong watermelons - watermelon ships and a submarine. We don’t sell such oval watermelons, but you can try to make similar crafts from round ones.

Or use an oval melon. Sails made of orange peels.

You can make a chicken out of an orange and put it in a small melon like a shell. A rabbit with ears, a frog, or create your own character.

But crafts made from melon are more complicated - an owl with lettuce leaves and a watermelon belly. Fish with carved scales and fins.

Here are some ideas for crafts made from vegetables for an exhibition in the garden or school. I hope you have found a craft that suits your needs here and will be happy to make it with your children. What you do with your own hands heals the soul. It seems to me that it doesn’t hurt for every person to take a break from watching TV and please their soul and their children a little.
Doing something together, amicably, without arguing or quarreling in the process is another day that you will remember with warmth years later. It's moments like these that are remembered.... and not those when the boss handed you a certificate... Everything vain fades from memory over the years... but the present takes root and remains a bright picture in old age. Let's collect such pictures - in our hearts.
Let's create such moments for our children - let them have something to remember about their childhood. After all, what do we remember about our childhood years? Only these are the days when dad and mom suddenly forgot about their adult affairs and spent time in stupid and useless, but so fun and necessary, fun with the children.
Happy vegetable gardening.
Olga Klishevskaya, especially for the site
If you like our site, you can support the enthusiasm of those who work for you.