DIY installation of programmable diode strips. Programmable LED Sign Controllers Materials and Tools
Smooth increase and decrease in the current level, the ability to work with LEDs from different manufacturers and with different binning, time-based dimming programming without laying a separate control bus, ensuring a stable luminous flux as the LEDs wear out their lifespan, a high degree of protection IP67 - all these are features programmable LED drivers production companies MEAN WELL And Inventronics.
When developing an LED lamp, an engineer has to solve a number of problems related to ensuring the required lighting performance, electromagnetic compatibility, and thermal conditions. At the same time, it is important not to forget about the availability of the selected components on the electronic components market. In addition, economic and technological aspects should be taken into account. When solving these problems, the developer must determine the manufacturer and type of LED, as well as the manufacturer and type of secondary optics, and calculate the required number of LEDs. When calculating the number of LEDs, it is necessary to adapt to a certain “standard” current value of power supplies available on the market. When choosing LEDs, you should take into account binning and its range, additional losses that arise in the secondary optics and when the LED module heats up. The connection circuit of the resulting array of LEDs must be such that a given current flows through the LEDs, and this current would correspond to the current of the power supply available or intended for use. It turns out that the developer, and subsequently the manufacturer, is tied to the selected components and their availability in suppliers' warehouses at the right time. And one of the main components on whose parameters this choice is based is the power supply or LED driver.
The market situation changes quickly, and sometimes unexpectedly. What was profitable yesterday may not be profitable today. In Russian realities, it is often necessary to manufacture products in emergency mode, and the supplier may not have the required components. On the other hand, there is always a wide selection of components on the market from both famous and not very well-known manufacturers, and their products may be in stock at a given time. Manufacturers are constantly changing product lines, improving parameters and/or reducing costs. Some LED manufacturers even have standardized housing sizes, for example, 3535 (the type produced by the company Cree and similar ones). We have already come to the conclusion that LEDs and even secondary optics from different manufacturers can be used on a specific printed circuit board without redesigning it. Of course, changing the type or manufacturer of the LED will lead to some lighting technical changes (components from different manufacturers have different binning and efficiency), but these changes could be compensated for by changing the power supply current. However, if an unregulated power supply has been selected, this becomes impossible. Changing the existing power supply will require new certification tests for the luminaire. In addition, there is no guarantee that these tests will be met.
It often turns out that the output current of the power supply needs to be changed quite a bit, literally within 10...20%. In this case, it is impossible to replace the unit, because the output current step, even within one series, is significantly larger and has a standard value, and we need some intermediate value.
So, the power supply selected earlier at the development stage may in the future turn out to be a limiting element and will not allow, if necessary, to replace some individual components of the lamp or its parameters.
We know that there are power supplies with adjustable capabilities that could be selected at the design stage. There are three options for such blocks, but how convenient are they?
The most common power supplies are adjusted by an internal potentiometer. However, when using them, the complexity of assembling the lamp increases, since adjustment is required using a measuring device. In addition, such power supplies fundamentally cannot have a degree of protection from external influences higher than IP65 (due to access to the potentiometer).
Power supplies with current changes via DIP switches have a discrete adjustment step, which may not suit the designer. Again, due to the presence of such switches and the need to access them, such units are only suitable for indoor use and are not suitable for outdoor lighting.
The third type of power supply with adjustment includes power supplies with a “3-in-1” dimming function (PWM, 0...10 V, resistance). By connecting a constant resistor to the control input, we can reduce the output current to the value we need (at the same time the output power will also decrease). In this case, a degree of protection of IP67 is possible. Overall this is a good option. However, not all power supplies have this possibility of dimming with resistance. Also, the dimming function means an increase in the cost of the product, and the use of this function will be quite limited.
Thus, among the available methods for adjusting the output parameters of a power supply, there is no ideal option.
Currently, another class of power supplies has appeared on the LED driver market - programmable ones, which, along with the ability to change the output current, provide a whole range of additional properties and useful functions, and also lack some of the disadvantages mentioned above.
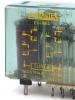
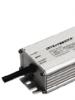
Programmable drivers are available in the product line of such companies as MEAN WELL(family) and Inventronics(families , EBD) (picture 1). The use of this class of drivers in luminaires allows for the following functions:
- change in output current in the range of 10...100% without reducing the degree of protection from external influences. The degree of protection remains at IP67;
- smooth increase in current through the LEDs when the lamp is turned on. This has a beneficial effect on the reliability of the LED module, especially in winter;
- possibility of smooth increase/decrease between programmed current levels (smooth change in illumination);
- compensation for “aging” of LEDs. It is possible to produce a lamp with a constant luminous flux throughout its entire service life;
- forced switching on at the right time of the lamp operating in time dimming mode to maximum brightness (MEAN WELL only);
- alarm about the end of the lamp's life (MEAN WELL only);
- programming the required parameters of external temperature protection of the LED module or the lamp as a whole, upon reaching which the output current will decrease (Inventronics only);
- user programming of various fixed and adaptive dimming profiles over time (up to 5 current levels): proportional mode and midpoint mode.
|
|
|
| Rice. 1. Programmable LED drivers: a) Inventronics; b) MEAN WELL | |


Let's take a closer look at some of the above functions.
LED aging compensation
LEDs are very durable (50...100 thousand hours). It is generally accepted that the end of service life is a decrease in luminous flux by 30%. During operation, the luminous flux of the lamp slowly decreases. This fact can be initially taken into account when programming the LED driver and set the initial current through the LEDs lower, for example, by 20%, but increasing by the end of the service life to 100% (Figure 2). Of course, one should take into account the increase in power consumption of the lamp towards the end of its service life.

Rice. 2. Screenshot of the software interface from Inventronics and MEAN WELL in LED aging compensation mode
Dimming by time
The dimming function is very popular in lighting. It is especially interesting in outdoor lighting, as it allows for optimal energy consumption. Moreover, the current GOST R 55706-2013 “External utilitarian lighting. Classification and Standards" allows for a decrease in illumination at night (up to 30% and up to 50%) on streets, squares and local areas, depending on the intensity of traffic.
Implementing the ability to dim outdoor lighting requires significant costs. Only dimmable power supplies must be used in luminaires, and, at a minimum, a control line for these luminaires must be installed. Using programmable power supplies, dimming can be implemented without installing an additional control line or an additional controller, which will significantly reduce the overall cost of the lighting system. Such power supplies allow you to program different output current values depending on the start of the lamp operation time (Figure 3).

When we consider time dimming (fixed and adaptive modes), it is important to understand that the lamp itself does not turn on or off. Switching on and off is carried out by the operator in manual mode or by a sensor signal in automatic mode. The dimming program always runs from the very beginning and every time it is turned on.
From Figure 3 it can be seen that the dimming profile of LED drivers manufactured by Inventronics can be programmed for a period of up to 19 hours (at MEAN WELL in fixed profile mode - up to 24 hours). However, this does not mean that after 19 hours of operation the lamp will turn off. The lamp cannot turn off on its own. It’s just in this interval that you can change the output current. After 19 hours of operation and until forced shutdown, the power supply will continue to operate in the same mode in which it was operating before the end of the programming period. If we do not take into account the realities of the north, where night and day last for six months, then for the rest of Russia this period of time (19 hours) is quite enough. If not, then you can organize a short-term switching off/on of the lamp using an external timer so that the daily countdown starts again.
The presence of a time dimming function from Inventronics and MEAN WELL are called “Timed dimming” and “Smart Timer Dimming”, respectively. In terms of functionality and capabilities in terms of fixed and adaptive dimming, they are very similar to each other and work according to a similar algorithm, but there are some differences in general capabilities.
Fixed dimming means that the power source always operates strictly according to the programmed profile. This would be good if not for seasonal changes in light. For example, if we program the first reduction in illumination 4 hours after the start of operation, which corresponds to approximately 01:00 in the summer (provided that switching on occurs at 22:00), then in winter this will correspond to 21:00 (switching on at 17:00), and at this time there is heavy traffic on the streets. Due to seasonal changes in illumination, a fixed dimming mode in outdoor lighting is almost impossible to use.
A more interesting option that can be practically implemented is the use of adaptive dimming, that is, adjusting to seasonal changes in illumination.
Both manufacturers under consideration have two adaptive dimming modes in their programmable power supplies: the proportional principle and midpoint self-adjustment. When programming the power supply, the program interface allows you to choose between any dimming options.
Adaptive dimming: proportionality principle
The principle of proportionality ensures a proportional change in each section of the programmed profile in accordance with the increase or decrease in the total operating time of the luminaire. Let's assume that we have programmed the power supply to operate in the autumn-winter period according to the profile shown in Figure 4a. The total operating time is 15 hours a day. Here and further in the text, the profile type is chosen conditionally.

Rice. 4. Power supply profile: a) programmed for the autumn-winter period; b) rebuilt for the summer
As we approach summer, the total operating time of the lamp decreases. For example, turning on and off occurs using a light sensor. The power supply microcontroller analyzes the operating time and determines that the time the source is in the on state has decreased. Then, the next time you turn it on (the next day), the programmed profile is rebuilt in proportion to the change in the operating time of the source.
Let’s say that in the summer it turns out that the power source no longer works for 15 hours, but only 9. Then its profile will be rebuilt and will have the time intervals shown in Figure 4b. The figure shows that the duration of each interval decreased in proportion to the reduction in total time with a proportionality coefficient of 9/15.
During programming, we chose that the first reduction in current should occur at 00:00 hours, and after the restructuring it will occur at 00 hours 35 minutes. An inaccuracy of 35 minutes is quite acceptable, since we considered the edge cases (summer-winter).
To understand the algorithm for restructuring the profile in power supplies manufactured by MEAN WELL, you can refer to Figure 5.

The base reference period is seven working days, with the longest and shortest working periods being ignored. For the remaining five days, the average operating time is calculated, and if this average time differs from the previous result by more than 15 minutes, the power supply adjusts its profile in proportion to the change that has occurred.
Adaptive dimming: self-adjusting at midpoint

A fairly accurate result of restructuring the power supply profile can be achieved in the midpoint adjustment mode. You can select midnight (00:00) as the midpoint. Let's say we chose the dimming profile shown in Figure 6a in winter. The total operating time is 16 hours per day (8 + 8 hours relative to the midpoint). The first current reduction will be at 23:00, and the second at midnight (00:00). Let the total operating time of the source be 8 hours in the summer, then the power source will rebuild its profile relative to the selected point (midnight) so that this point remains in the middle of its operating cycle (4 + 4 hours). In this case, we see that we have retained the time of the first current decrease (23:00) and the time of the second current decrease (00:00). The result was that the power supply simply “cut” the time at the beginning and end of its cycle in accordance with changes in seasonal light.
We find that this algorithm is the most convenient, best supports the programmed profile depending on seasonal changes in illumination, and can be used for dimming outdoor lighting.
Programmable LED Drivers
MEAN WELL has introduced programming functionality into its popular family of power supplies (Figure 1). Programmable models have the suffix D2 at the end of their name, for example (100 W, 700 mA, programmable). The product line includes both series with current stabilization (CC) and series with dual stabilization mode (CV + CC) in the power range of 75…240 W. The main parameters of the ELG family are shown in Table 1.
Table 1. Basic parameters of programmable power supplies
| Parameters/Name | /D2 | EBD | ||
| Manufacturer | MEAN WELL | Inventronics | ||
| Power range, W | 75…240 | 75…600 | 75…240 | |
| Output parameter stabilization mode | Current; current and voltage | Current | ||
| Input voltage range, V | 90…305 | 176…305 | ||
| Dimming protocols | 0…10 V, PWM, resistance, DALI, Smart Timer Dimming | 0…10 V, PWM, DALI, Timed dimming | 0…5/0…10 V, PWM, Timed dimming | |
| Protection against high-energy pulses, kV | 6/4 | 6/10 | ||
| Degree of protection from external factors, IP | 67 | |||
| Temperature range, °C | -40…70 | |||
| Peculiarities | Full programming functionality | Current reprogramming and fixed dimming profile | ||
| Manufacturer's warranty, years | 5 | |||
A special feature of the family under consideration is its low cost, comparable to the cost of products from Russian manufacturers, and a long warranty period of 5 years. It should be taken into account that Russian manufacturers do not yet have programmable drivers in their product line, and when we talk about cost, we mean comparing models without a programming function. The programming function implies an increase in cost compared to non-programmable models by approximately 15...20%, depending on the output power of the source.
When programming, you can change the output current in the range of 10...100%. As the output current decreases, the output power will also decrease. It is known that with a decrease in power, the value of the power correction factor and efficiency deteriorate. In the family under consideration, when the output power is reduced by 50%, the power correction coefficient remains at 0.95, which is an excellent indicator. The real deterioration in this ratio was seen when the output power was reduced to 30% of the nominal value, in other words, if a 100 W source was operated at a load of 30 W. Therefore, when operating this family, you should expect to use it in the output power range of 100...50%. In this range of output power changes, the efficiency varies within 2...3%, for example, from 91% it will drop to 89%.
The Inventronics line of programmable LED drivers consists of three families (Table 1). They differ in technical capabilities and cost. For example, the EUD family has the widest range of series in the power range of 75...600 W and full programming functionality. Full functionality means that in addition to the ability to change the output current and a fixed dimming profile, adaptive dimming capabilities, compensation for LED aging, and programming of external temperature protection are added. The EUD family of power supplies has maximum programming/dimming functionality. It is represented by the largest number of models in the power range of 75…600 W.
In this article we will talk about color LEDs, the difference between a simple RGB LED and an addressable one, and add information about the areas of application, how they work, how control is carried out with schematic pictures of connecting LEDs.
1. Introduction to LEDs
LEDs are an electronic component capable of emitting light. Today they are widely used in various electronic equipment: flashlights, computers, household appliances, cars, phones, etc. Many microcontroller projects use LEDs in one way or another.
They have two main purposes:
Demonstration of equipment operation or notification of any event;
use for decorative purposes (lighting and visualization).
Inside, the LED consists of red (red), green (green) and blue (blue) crystals assembled in one housing. Hence the name – RGB (Fig. 1).

2. Using microcontrollers
With it you can get many different shades of light. The RGB LED is controlled using a microcontroller (MK), for example, Arduino (Fig. 2).

Of course, you can get by with a simple 5-volt power supply, 100-200 Ohm resistors to limit the current and three switches, but then you will have to control the glow and color manually. In this case, it will not be possible to achieve the desired shade of light (Fig. 3-4).


The problem arises when you need to connect hundreds of colored LEDs to the microcontroller. The number of pins on the controller is limited, and each LED needs power from four pins, three of which are responsible for color, and the fourth pin is common: depending on the type of LED, it can be an anode or cathode.
3. Controller for RGB control
To unload the MK terminals, special controllers WS2801 (5 volts) or WS2812B (12 volts) are used (Fig. 5).

With the use of a separate controller, there is no need to occupy several MK outputs; you can limit yourself to only one signal output. The MK sends a signal to the “Data” input of the WS2801 LED control controller.
This signal contains 24-bit information about color brightness (3 channels of 8 bits for each color), as well as information for the internal shift register. It is the shift register that allows you to determine which LED the information is addressed to. In this way, you can connect several LEDs in series, while still using one pin of the microcontroller (Fig. 6).

4. Addressable LED
This is an RGB LED, only with an integrated WS2801 controller directly on the chip. The LED housing is made in the form of an SMD component for surface mounting. This approach allows you to place the LEDs as close to each other as possible, making the glow more detailed (Fig. 7).

In online stores you can find addressable LED strips, where up to 144 pieces fit in one meter (Fig. 8).

It is worth considering that one LED consumes only 60-70 mA at full brightness; when connecting a strip, for example, with 90 LEDs, you will need a powerful power supply with a current of at least 5 amperes. Under no circumstances power the LED strip through the controller, otherwise it will overheat and burn out from the load. Use external power supplies (Fig. 9).

5. Lack of addressable LEDs
The addressable LED strip cannot operate at too low temperatures: at -15 the controller begins to malfunction; in severe frosts there is a high risk of its failure.
The second drawback is that if one LED fails, all the others along the chain will also refuse to work: the internal shift register will not be able to transmit information further.
6. Application of addressable LED strips
Addressable LED strips can be used for decorative lighting of cars, aquariums, photo frames and paintings, in room design, as New Year's decorations, etc.
An interesting solution is obtained if an LED strip is used as an Ambilight backlight for a computer monitor (Fig. 10-11).

If you use Arduino-based microcontrollers, you will need the FastLed library to simplify working with LED strip ().
Do you want to give your office an attractive and complete look by decorating it with programmable LED strips? See how we achieved this by creating a collection of work surfaces that decorate our entire workspace at night with a beautiful interweaving of lines of light.
Materials and tools
Programmable LED strip, Arduino controller and corresponding power supply;
Pliers for cutting LED strips;
A beam of poplar or harder wood, twice the length of the LED strip;
Bench saw and groove tool, or milling machine;
Sandpaper;
Wood glue;
Double-sided adhesive tape or special mastic for gluing LED strips to wood.
Installation
First of all, purchase an LED strip. We bought two five-meter coils for our windows. By purchasing in reels, you not only pay less, but also have the opportunity to cut it exactly to the required size. To decorate the window display, we used five meters of LPD8806 tape.
The LPD8806 is an analog type LED strip with built-in controllers for each pair of LEDs. This means that you can load the software library into your Arduino controller and set individual settings for each LED strip.
The Adafruit website has a good programming tutorial and a list of all the hardware needed.
Once your program is running, you can use the Arduino controller to create all sorts of lighting effects.
First, you must carefully measure the dimensions of your windows and cut the LED strips into the required lengths. In this case, at each end it is necessary to leave about two centimeters of space for the connecting wires, i.e. the strips must be cut into pieces slightly shorter than the dimensions of the windows.

Solder the ends of the strips of tape to the connectors so that they can be tightly connected. Check that each strip has enough wire to fit smoothly around the perimeter of the window.
Now you will need a tabletop cutting machine, which will make it easier for you to cut panels (wooden blocks with grooves selected in them for laying LED strips) to the desired size.


For making grooves, there is a special tool with two saw-tooth blades, with which you can cut grooves of any width. The blades are designed in such a way that their teeth do not catch on each other, even if they are placed closely.
You can watch a video on YouTube that describes this operation in detail:
LED strips must be positioned using spacers so that the light from them falls in the desired direction. In our case, we wanted the light to come inside, reflecting and scattering from the silver curtains and giving the space some mystery.
Spacers were made from scrap wood and placed several in each panel until the desired length was achieved. This was more practical than making them from industrial wood of the required length.
We chose a tilt angle of about 22 degrees.
You can make the spacers from any other material, such as plywood or fiberboard, we just had some extra wood and a cutting machine.


To get a shiny and professional looking result, and to make sure all the spacers fit into the grooves well, we did a LOT of sanding.
To do this, we used a block of wood of the appropriate dimensions covered with sandpaper and sanded both the panels and the gaskets.


After grinding, it is necessary to mount the individual pieces and cut off the protruding parts of the gaskets using a hacksaw. When installing the gaskets, we used a special mastic and secured them with paper clips while it dried.
After the mastic has dried, we begin painting the finished panels. This can be done using a paint sprayer, and for small sizes, use any high-quality paint. Try to paint at least two coats in a color that matches your decor.

LED Strip Light “Digital LED Stripe Set” 3 m long, made of white plastic, supports 14W; 90LED; 230/12V; 18VA.
Digital LED strip provides 164 color and light variations. Digital control produces color mixes with dynamic rhythms. The ability to mute and switch is provided by the remote control. Starting from the end of the block, you can turn off the LEDs every 3 segments (3LED). This allows you to use pads of the required length in the required areas.
Model Feature:
- Self-adhesive tape back for easy installation;
- possibility of any (multiples of three) length reduction (3 LEDs each);
- the presence of an RGB effect for the possibility of any color and light solution;
- Includes remote control for control, dimming, programming;
- protective transparent coating against dust and moisture;
- Exceptional flexibility for installation on flat and curved surfaces;
- energy-saving LED technology (savings up to 80% compared to conventional incandescent lamps);
- includes 230/12V AC adapter.
Modern lighting with LED strips
Thin and flexible LED strips help create ideal lighting of any type (general, zonal, decorative or accent) in your apartment. The back of the tape has an adhesive surface, making it convenient and easy to place on flat or curved surfaces. Such lighting has no restrictions on installation or the ability to implement the most unusual design ideas. Be inspired by innovative developments from Paulmann!
Data sheet
|
Voltage |
|
|
Power consumption |
|
|
Transformer power |
|
|
Material |
|
|
Life time |
30,000 hours |
|
Eurofork |
present |
|
Availability of connectors |
present |
|
Remote control |
present |
|
Light flow |
|
|
Technology |
LED |
|
universal |
|
|
Dimmable |
absent |
|
Protection class |
|
|
Production |
Germany |
Programmable LED strip “Digital” with remote control: RGB; 3m; white (Paulmann 70481), buy at a good price in the online store. Fast delivery and quality guarantee.