DIY birdhouse made of wood: drawings, dimensions, materials, decor and installation. DIY birdhouse: diagrams and step-by-step photo instructions Stage #1 – preparation of wooden elements
The long-awaited spring has arrived. There are only a few days left before the arrival of our feathered friends. But birds in the yard of a house or on a plot of land are always a joy. But are we ready to meet them? Are you sure that the birds will want to settle near our house? If not, then get to work immediately!
Today we will look at how to make a birdhouse correctly, what materials are best to use for its manufacture, and also provide some diagrams and drawings.
First of all, you need to decide on the material of the birdhouse. It is desirable that the birdhouse be made entirely of natural materials. Some even make birdhouses out of stone; they look very beautiful and very unusual. It all depends on imagination and possibilities! But most often, ordinary dry boards are used for these purposes (with the exception of coniferous wood).
What types of wood are preferable for making a birdhouse? Take birch or oak. The recommended thickness of the board should be at least 20mm so that the birdhouse retains heat well. There is no need to sand the boards; they must have a rough surface, at least on the inside. If the board is smooth, you can scratch it thoroughly with a knife - this will make it easier for birds, especially chicks, to get out of the birdhouse. It is highly undesirable to use compressed or laminated wood (fibreboard, chipboard, plywood, etc.) for construction - it is very short-lived, not to mention toxic.
You should not decorate the birdhouse with any rustling objects or sparkles, otherwise instead of a cozy birdhouse you will end up with a very natural scarecrow.
Keep in mind that you do not need to make the birdhouse very spacious. If you nevertheless make it larger than in the drawings below, then as many as 4-5 chicks will survive in such apartments, as a result, their parents will not be able to feed them properly. Accordingly, frail offspring will grow up that will not withstand the difficult flight to warmer climes. In a cramped house, only 2-3 chicks will grow up, but they will be healthy and strong.
To make a birdhouse we will need the following tools:
- ruler with pencil;
- nails or screws;
- hammer (screwdriver);
- wood hacksaw,
- drill.
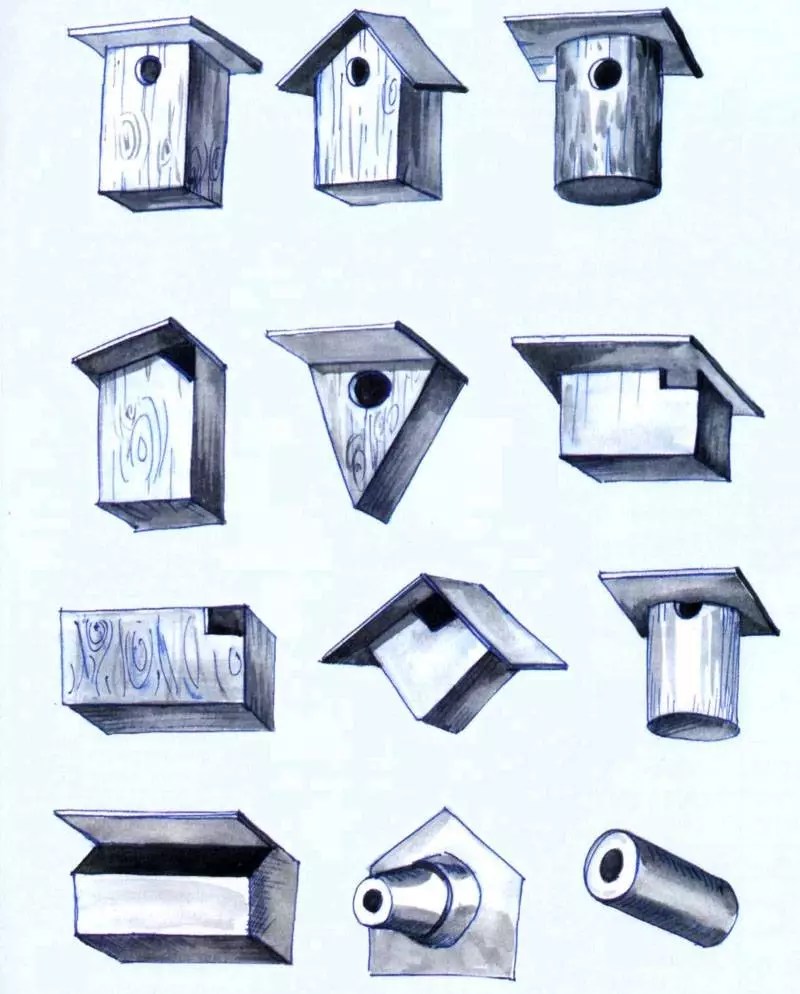
Below is a drawing of a birdhouse of a classic design (Figure 1).

Figure 1 — Classic birdhouse
It is clear that this is the simplest, but far from the only type of birdhouse.
Here is another drawing of the “House” birdhouse, which has a slightly different design (Figure 2).

Figure 2 — Birdhouse “House”
This model has a non-removable roof. Naturally, this design is inconvenient if you plan to inspect and clean the birdhouse every year before the birds arrive. To make the lid removable, a sleeve is nailed to its lower part, having the same dimensions as the bottom (Figure 1), due to which the lid will hold well. Care must be taken that it cannot be blown away by the wind or knocked down by some crow. The easiest way is to screw the lid to the house with wire. It is most rational to make a flat roof with a slight slope back, and not a gable roof, as in the drawing above - it will begin to leak faster than usual.
Fastening the bottom and walls is best done with screws, but it is also possible to use nails. A strip is placed on the back wall and attached to a pole or tree.
As you can see, the design of birdhouses is extremely simple. The drawings show birdhouses made from 20mm thick boards. You can use others, but only then will you have to adjust the dimensions of the roof and bottom of the birdhouse. You can deviate from the drawings and show your own initiative, you just need to take into account some important notes:
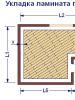
- the total height should be 30–35 cm;
- The size of the bottom of the birdhouse is usually made about 15x15cm;
- the distance from the tap hole to the bottom should be at least 15–20 cm;
- the inlet hole (tap) should have a diameter of about 50mm.
The birdhouse sizes listed above are ideal for starlings and sparrows. The optimal diameter of the entrance varies for different birds. So, for great tits, redstarts, nuthatches and whirligigs, the dimensions of the bottom of the birdhouse should be made smaller - 100x100 mm, the height - up to 280 mm, and the diameter of the entrance about 30 - 45 mm; for small tits and pied flycatchers, the bottom should be about 80x80 mm, the height should be about 250 mm, and the diameter of the entrance should be 30 mm.
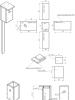
Using the example of a classic birdhouse (Figure 1), we will clearly consider the process of its assembly. We cut the boards in accordance with the drawing and get to work.

We attach the front wall of the birdhouse to the side walls using nails or screws

Attaching the back wall and bottom

All that remains is to make a removable cover...

We install any perch in front of the entrance to your taste

We nail the sleeve to the lid of the birdhouse. In this case, the roof of the birdhouse is made removable so that it can be cleaned. However, it needs to be wrapped with wire or screwed in place for reliability.

Birdhouse assembly
You should try to knock down the bird house as tightly as possible. It is advisable to coat all cracks with clay or caulk with tow. Nails and sharp, split edges should not protrude inside the birdhouse to prevent injury to birds. It is not advisable to paint the birdhouse; it is enough to treat it with drying oil. If you still decide to paint it, it is better to use oil paints in translucent tones.
As you can see, making a birdhouse with your own hands is not at all difficult. In addition, the activity is quite exciting and very useful. 🙂
And finally, I suggest watching a video lesson in English (unfortunately, it was not found in Russian, but in principle everything is clear here), clearly showing one of the methods for making a birdhouse with an unusual - gable - roof. It looks quite original.
Difficult? Here is one of the simplest ways.

When preparing firewood, choose the log that is most suitable in size and shape and make an original birdhouse out of it!
Perhaps anyone can make such a house for birds. Cheap and cheerful, as they say.
We will be happy to look at photos of your homemade products, post them in the comments - we will evaluate, discuss, and advise!
Birds are nurses not only of the forest, but also of the garden. Every summer resident who has fruit trees and shrubs growing on his property knows this. All year round, birds not only delight the ear with their singing, but also help gardeners in their difficult work of protecting trees from pests, destroying small insects and feasting on their larvae. To attract birds, feeders are hung on trees and volunteer helpers are fed during the cold winter season, when it is not so easy to find “prey,” and they also arrange a home for them. Any bird will like a good-quality wooden house; it can not only live in it and hide from bad weather, but also breed in it.
Nuances that are important to know before starting work

As is already clear, the best birdhouse is made from natural materials, in the sense of wood. Some craftsmen make houses from cardboard boxes or plastic bottles, however, this is not at all the same. In the first case, the dwelling will be temporary and will last one season, if it does not get wet first in the rain. Plastic containers are more suitable for manufacturing, and besides, there is no question of their naturalness. The smell of chipboard or plywood will also scare away birds; the latter is also too thin and the house will be cold.
For a bird house, you should use hardwood boards, but in no case coniferous ones - they contain resin that will stick to the plumage, which is fraught with health problems for the birds. The thickness of the boards must be at least 20 mm so that they retain the heat necessary for the chicks.
There is no need to plan the boards to achieve their ideal smoothness. A rough surface, especially inside the birdhouse and under the entrance, will help birds get inside and move around easily.
Making a birdhouse step by step

First of all, you should draw up drawings of your future home. This will make the process of making blanks easier and will make them even, so that in the future there will be no gaps between the walls.
Birdhouses can be of different sizes and shapes - it all depends on what kind of birds will live in it. There is no need to make “apartments” that are too spacious, because the bird family is small and the young can freeze or grow weak. The standard dimensions of the house are approximately as follows:
- bottom width – 15 cm;
- birdhouse height – up to 30 cm;
- roof – approximately 20x24 cm;
- The diameter of the protrusion (taphole) is no more than 5 cm.
It is better that the back wall is a couple of centimeters lower than the front panel - such a slope is necessary for water to drain. Accordingly, then on the side walls the upper cut will be oblique. The roof should protrude slightly, so its dimensions are slightly larger than the bottom.
 Now you can get started:
- Transfer the drawing with a pencil to the boards.
- Cut out all the details.
- Plan the outer surface of the workpieces.
- In the front panel, cut out the “entrance” in the form of a circle.
- Assemble the birdhouse in the following order: front, side walls, bottom, back wall, roof, entrance. All parts must fit snugly together. It is better to fasten them with screws or nails.
All that remains is to attach a mount to the birdhouse in the form of a strip on the back wall and install it on a tree, wrapping it well with wire. There is no need to paint - the smell of the paint will scare away the birds.
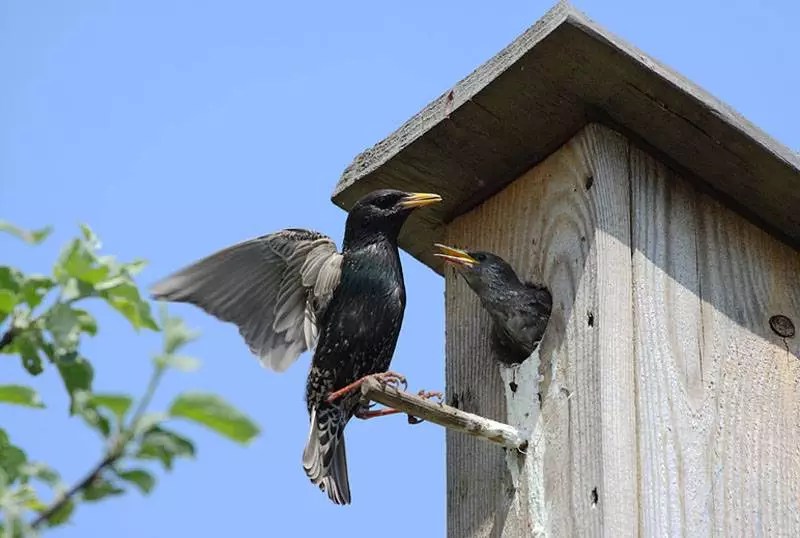
You can take care of birds by throwing them bread crumbs or seeds. Pigeons and sparrows flock with pleasure to such a treat. What else can we do for the birds? In the city and at your dacha? Of course, build them a house to live in - a birdhouse. Why do people build birdhouses? In fact, titmice also build. They are similar to birdhouses, only smaller in size and have a slightly different architecture. But why do we still call birdhouses birdhouses and not use other names? The fact is that not all birds will agree to live in a “house” built by strange creatures on two legs. Clearly, this does not apply to freeloading sparrows. And the starlings are settling in.
Starlings live as a friendly family without noisy sparrow squabbles. They are able to perfectly imitate the singing of other birds, including the famous nightingale trills. And no one better than starlings cleans our squares, parks, forests and garden plots from insects. Do you know how many cockchafers one starling can eat during the nesting period? 8 thousand beetles with larvae! And caterpillars, slugs, snails are simply absorbed by it without counting. Therefore, when building and hanging birdhouses, a person cares not only about birds. A man cares about his future harvest. And you should be happy if a couple of starlings choose your house. This is great luck!
But it’s not enough to build a birdhouse. It must be built correctly and hung correctly.
A few simple rules you need to know
Here are a few rules to follow before you start building a starling house:
- The birdhouse must be checked, otherwise the birds will not be able to live there in the summer. For ventilation, a couple of small gaps between the roof and the walls of the house will be enough. For the same reason, making a birdhouse out of metal is a bad idea.
- It is necessary to organize “drainage” in it. Any water that enters the house must leave immediately. To do this, drill very thin holes in the floor, and to protect the entrance hole, install a small canopy over it.
- The best time to hang a new birdhouse is in early April. And in the old one, through the removable roof, carry out “general cleaning” at the same time. Birds will not return to a birdhouse if it has not been cleaned for almost a year.
- In rural areas, the optimal height for a birdhouse is about 4 meters. In the city it should be weighed higher. Make sure there are no branches nearby. This way, cats and other starling lovers will have less chance.
- The birdhouse should be covered with foliage from direct sunlight.
- Your creation must be nailed strictly vertically, no Prague “dancing houses”. The entrance should look in the direction from which the wind least often blows.
- Very important! It should be remembered that nailing the birdhouse is not enough. It must be cleaned every spring before new guests arrive.
Classic wooden birdhouse
The best material for making such a house is wood. However, not every tree will do. Boards made of birch, oak and alder work well. Coniferous trees are not suitable because of the resin they produce. Chipboard and fiberboard should not be used for the construction of birdhouses - the chemical components used in their manufacture are harmful to birds. Plywood is not the best option either.
There is a birdhouse standard. The board should be used with a thickness of at least 20 mm, so the house will better retain heat. Do not use a sanded board - this will make it difficult for the chicks to leave the birdhouse. If the board is sanded, you need to scratch the inner side with a knife or nail. Typically, birdhouses are made from 120 to 150 mm wide, 300-350 mm high, and side wall length 150-160 mm. It is important to observe two more dimensions: the diameter of the taphole (inlet) should be 40-50 mm, the distance from the taphole to the bottom of the house should be at least 150 mm.
A larger birdhouse will accommodate more pets, but natural selection will work against your plan in this regard. The parents will not be able to feed all the hatched chicks, and even those that survive will not survive the flight to wintering in warmer climes - they will grow up weak. Trust this question to Nature and try to adhere to standard sizes when building a birdhouse. In this case, out of all the offspring, only a couple of chicks will survive, but they will be strong and strong.
The indicated dimensions are well suited for starlings' homes. The sparrows will happily settle in. And for great tits, the diameter of the entrance will have to be reduced to 35-40 mm; for small tits, an entrance hole with a diameter of 30 mm will be enough.
Of course, you can make changes to the design of the birdhouse and show your imagination, but then you should adjust the given dimensions. Compliance with the basic dimensions is very desirable; the very life of the bird family may depend on them.
Below are several drawings of the simplest birdhouses:


Prepare in advance a ruler with a pencil, a wood saw, a screwdriver, a hammer, self-tapping screws and a drill. We cut the boards to fit the dimensions in the selected drawing and begin assembling the birdhouse (in this photo the birdhouse has a rectangular entrance).

To fasten the elements of our design, we pre-drill holes for self-tapping screws with a thin drill.


We fasten the walls together with self-tapping screws. You can also use nails in your work, but you must watch carefully so that any of them do not accidentally come out. We remember what kind of miniature guests should live in our house.


The perch below the tap hole can be made from a planed stick and then tightly inserted into the prepared hole. The perch may have the shape of a triangular shelf. A perch is especially needed when the house is attached to a pole. After all, the head of the family needs to sit somewhere with food for the younger generation in his beak. You also need it to sing songs at the entrance to your house. The perch is made with a diameter of 10 mm and a length of 40 mm.

We make the entrance round or rectangular. We remember that its diameter should be 50 mm. We drill out the tap hole using a drill or cut it out with a jigsaw.

Unlike the internal walls, we thoroughly sand the edges of the taphole. There are known cases when starlings expressed dissatisfaction with the poor quality work of the owners of the site and demanded that the deficiencies be eliminated. First of all, this concerned the size of the taphole and its raw edges. I'm not kidding.


The entrance should be located so that the cats cannot reach the chicks from the roof of the birdhouse (see dimensions).


Important! The fixed roof is inconvenient for annual cleaning of the birdhouse. And this must be done every spring before the birds arrive, otherwise you will end up with a “disposable” birdhouse. Converting the roof into a removable one is quite simple. A bushing corresponding in size to the bottom of the house is attached to it from below. The sleeve should fit snugly against the walls and fit into the hole they form with some effort, then the lid will hold well. For reliability, you can screw the lid to the house with wire. In this case, the wind will not blow it away, and the cat will not be able to remove it. And cats and crows will show increased attention to your birdhouse. It is easier to make a pitched roof. It definitely won’t leak (unlike a gable one). Make the roof slope slightly back.

The last stage of our work is attaching the finished house to the tree. It is convenient to attach a long plank to the back wall of the birdhouse in advance with self-tapping screws and then nail or screw this plank to the tree with self-tapping screws. For reliability, we also fasten the house with wire. The height is about 4 meters, in the shade, without direct sunlight, there should be no branches nearby.
The finished birdhouse can be pre-decorated on the outside. Contrary to popular belief, a painted house will not scare away birds, but it will decorate your area. However, be prepared that starlings will not immediately move into their new home; some time will certainly pass. And this may take more than one month.


Birdhouses made of unusual materials
A birdhouse can be made not only from boards, but also from completely unexpected materials.
Birdhouse made of cardboard
In our minds, cardboard is poorly associated with a building material for constructing a home. However, as experience shows, cardboard can quite cope with the task of urgent construction of a birdhouse with a service life of at least one season. Just use not the ordinary cardboard we are used to (it will quickly get wet under the influence of precipitation), but thick corrugated cardboard.

In addition to corrugated cardboard, we will need self-adhesive paper, rope, pencil and starch. And, of course, a tool: scissors, a ruler, a square, a knife and a compass.
We will need to cut out all the elements for assembling the house (roof, walls, bottom) from corrugated cardboard, only in double quantities. Starch is needed to make paste. The paste has a natural smell and, unlike synthetic glue, it will not scare away birds and instill in them the idea that they have chosen an environmentally unfavorable home to live in.

Each pair of parts is glued together with paste, due to this they acquire increased strength. The only problem will be the lack of ventilation in the house. We cut a hole for the tap hole in the front wall. We can make a perch in such a design, but it will not hold very firmly. We need four holes in the back wall through which we will pass the rope. Rope or twine can be replaced with wire. We need them to tie our house to the tree.
We glue the walls end to end, maintaining a right angle.

We should end up with a box like this:

While the paste is still wet, wrap the box with thread. This way it won't lose its shape. After the paste has dried, we will no longer need the threads.
We glue the roof of the house in two parts. The design will be somewhat reminiscent of the roof of a wooden house with a sleeve that we nailed to make the roof removable. When making a house from corrugated cardboard, the smaller part of the roof should be inside the structure, and the larger part, with allowances on all sides, forms a kind of overhang that will protect the house.
We cover the house with laminated paper. It will add density to the entire structure and at the same time serve as a decorative element.

Well, it turned out to be a good house?

House out of a box
An unexpected (albeit temporary) solution would be an empty juice or milk container. Using ready-made containers will allow us to solve the problem that has unexpectedly fallen on our heads even faster. Or rather, an incoming problem.
Quickly empty the container of its contents, wash and dry. While the container is drying after washing, prepare the wire, scissors and awl. A regular taphole is cut into the front wall. We poke holes in the top of the box for the wire - our makeshift house will hang on it. The bottom must be reinforced with cardboard or corrugated cardboard, which is attached to the bottom of the container.
All that remains is to decorate our house with laminated paper or craft paper with a protective layer. We hang the house in a suitable place, wait for the singing guests and tell the neighbors that this is the most fashionable house design that you personally found in the Belgian society of birdhouse building enthusiasts.
Home with panoramic bottle windows
We are used to empty plastic bottles being used as bird feeders. A hole is cut in the bottom of the bottle, into which food is poured, and the bottle is hung. Using the same principle, you can make a bird house out of a plastic bottle. In this case, the taphole hole is cut where it should be - in the upper part of such an unusual building material. We make a couple of holes in the lid for the wire, with the help of which the house will be suspended from the tree. To prevent the life of a starling family from looking like the “Behind the Glass” show, the bottle can be covered with beautiful paper or a decorative design can be applied. Although the starlings themselves, judging by observations, treat the “transparent” walls of their home quite calmly.

As you can see, building housing for starlings is a simple matter. At the same time it is very exciting. And also useful for raising your own offspring. Join us! Just not like in the stupid advertisement about sausage. After all, it’s really a good thing to make birdhouses with your own hands.


Building birdhouses is a long-standing and very useful tradition. Step-by-step instructions on how to make a birdhouse with your own hands will help you make it quickly and easily. You can also start building houses with children; this is a great way to keep your child busy and teach him to do manual labor.
How to make a birdhouse with your own hands from wood
This is what classic wooden birdhouses look like
A wooden birdhouse is the most durable and reliable house, but the work to create it is also the most labor-intensive. But the result can exceed your wildest expectations.
To build a wooden birdhouse, you will need:
- pine planks 1.5–2 cm thick and 12, 16 and 20 cm wide;
- round rail for the perch;
- electric jigsaw or hacksaw;
- drill;
- Phillips screwdriver or screwdriver;
- sandpaper or sanding machine;
- ruler;
- marker;
- self-tapping screws;
- carnations;
- hammer;
- paints, varnish and brushes (for decoration).
It is better to take hardwood boards
Manufacturing instructions
How to do:
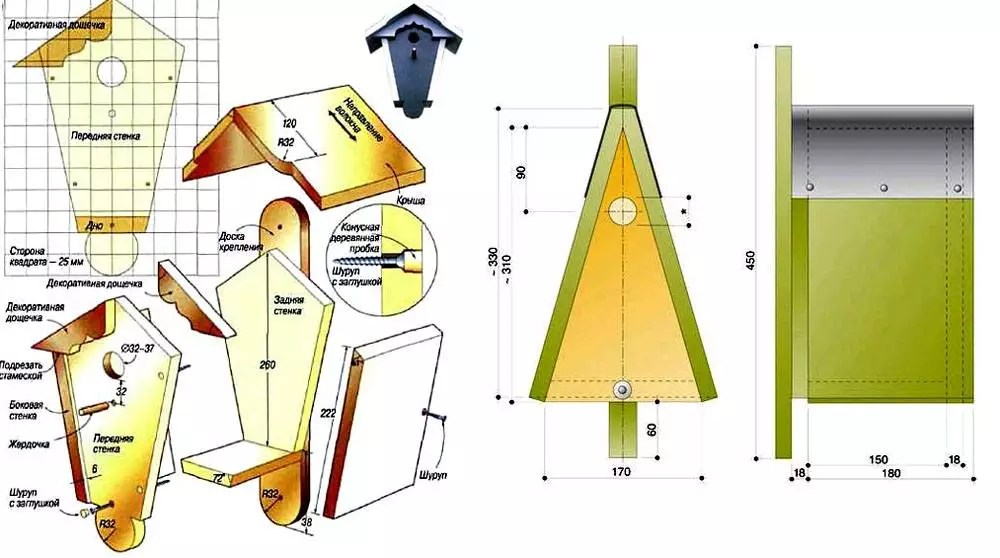
- Create a drawing of the future house and mark the wood according to it. First make markings for the front and back walls.
If you decide to trim a tree before marking, do it with glasses so that sawdust does not get into your eyes, and with gloves so that you do not have to remove splinters
- Then - the side walls.
These are the optimal birdhouse sizes
- Mark the roof. This birdhouse has a gable roof; you need to make two parts. All parts are cut out using a jigsaw or hacksaw.
The future roof of the birdhouse can be gable or single-pitch
- Mark the mounting holes. The boards are quite thick; the center of the holes should be 7–10 mm from the edge. In this case, the screws will accurately hit the middle of the end of the adjacent part.
Sawing and marking of parts should be done sequentially
- On the front wall, mark a place for the entrance (entrance to the birdhouse).
The diameter of the taphole should not be less than 4.5 cm, and the height from the bottom edge should not be less than 20 cm
- A little lower, mark a hole for the pole-perch on which the bird sits before entering the house. Using a drill with a drill bit of the same diameter as the self-tapping screws, drill the intended holes.
- You can start assembling. First, the pole is attached using a thin self-tapping screw.
Instead of a perch, you can make a shelf
- Assemble the walls of the birdhouse, fastening them in any order with self-tapping screws.
The boards must fit tightly together
- Install the bottom.
The assembled structure must be checked for strength
- Assemble the roof and attach the pipe using a self-tapping screw screwed in from the inside.
Screws or self-tapping screws are used
- Reinstall the roof.
A pipe on the roof of the house will look elegant
- To attach the birdhouse to the tree, attach two loops to the back wall. Decorative details are attached using nails and narrow slats. For reliability, you can glue them with moisture-resistant glue.
It is best to attach a birdhouse to a tree with wire
- Paint the product as your imagination dictates.
It is best to use odorless paints
By the way, bird houses first appeared in Russia during the time of Peter the Great, and the idea of artificial nests was discovered in Western Europe.
Making a birdhouse out of a box
A cardboard box may become wet when exposed to rain, so you will have to additionally cover the surface with laminated paper or varnish.
Such houses are easier to make than wooden ones
Required tools and materials
It is better to take very thick corrugated cardboard
To create a birdhouse from a cardboard box you will need:
- corrugated cardboard;
- glue;
- carpenter's tape;
- self-adhesive laminated paper;
- stationery knife;
- scissors;
- ruler;
- marker;
- compass or circle with a diameter of 4.5–5 cm.
Manufacturing instructions
It is easier to make a birdhouse out of cardboard than a wooden one, but the cardboard house will also serve less.
How to do:
- In accordance with the selected dimensions, all parts are cut out of corrugated cardboard in duplicate.
Such blanks are made faster than wooden ones, but require no less attention
- Using glue, identical parts are connected. This is done to increase the strength of the structure. An entrance is cut out in the front wall with a utility knife, and holes are made in the back wall for string, with which the birdhouse will be hung from a tree.
Finished parts are glued together in pairs
- The body parts are glued together. To increase strength from the inside, the joints can be glued with carpentry tape.
The walls are glued together end-to-end
- The roof is assembled from two parts. The smaller one is located inside the case. It should protrude 1.5–2 cm beyond the body. For strength, cover the edges of the roof with colored plastic tape.
Be sure to cover the roof; in this case, the birdhouse will honestly serve until the end of the season
- To make the house last longer, it needs to be covered with self-adhesive paper or varnished.
You can entrust the finishing to your child
You can also make a bird feeder at the same time. The photo below shows an example of the simplest feeder. While you will make a birdhouse from more complex materials, a child can make such a feeder.
Tell your child what feeders are for and how important they are for birds in winter.
The entrance to the birdhouse should be directed to the south, east or southeast so that the wind does not blow into the house.
This option is the easiest and most affordable
If you don’t want to tinker with wood or cardboard, then in a few minutes you can build a bird house from a plastic bottle. Of course, it will not be as cozy as the options described above, but the birds will be quite comfortable in it. Three- or five-liter containers are best suited for making a birdhouse. But if there are none, then you can get by with a standard one and a half liter bottle.
Required tools and materials
A plastic bottle is one of the lightest and most affordable materials.
It's better to remove the label
You will need:
- two one and a half liter and one liter bottles;
- about two meters of wire with a diameter of 2 mm;
- scissors or stationery knife;
- dye.
Manufacturing instructions
How to do:
Make sure that the top does not block the entrance
Don't forget to use odorless paints
This birdhouse is a great idea for a craft for kindergarten or school.
The total height of the birdhouse should be from 30 to 35 cm. The size of the bottom should be made from 10*10 to 15*15 cm. The distance from the bottom to the tap hole should be 15–20 cm. The diameter of the entrance hole (taphole) is 30–40 mm. It is worth noting that different sizes of the entrance will be optimal for different birds, so for a starling it is 32–35 mm, for a nuthatch it is 28–30 mm, for a tit or sparrow it is 25–29 mm.
Despite the general opinion that wild birds can eat anything, birds should be fed with caution, since they absolutely cannot eat some foods.
Ideal for feeding birds:
- sunflower seeds;
- millet, millet, oats and wheat;
- unsalted lard and meat;
- dried rowan and hawthorn;
- maple or ash seeds;
- nuts, cones and acorns;
- pumpkin and watermelon seeds.
You can give calcium supplements, for example, crushed egg shells.
It is strictly forbidden to feed birds rye and wheat bread, as the yeast in them can ferment. Birds should not eat seeds or skins of citrus fruits. And also you should not feed the feathered inhabitants with salty, fried, spicy and sour foods.
Making a bird house is not difficult, especially since modern industry provides a wide selection of materials. Making a birdhouse with your own hands is a fun activity. If you and your children liked to do construction, then you can provide housing for many inhabitants of the park or forest.
Instead of questionable chemical compounds, you can use safe “environmentally friendly” products. To effectively combat caterpillars, beetles and other pests, it is enough to attract starlings. These and some other bird species are capable of destroying not only insects, but also larvae. The only thing you need is a high-quality, hand-made birdhouse. You will find design drawings and dimensions, manufacturing technologies and useful tips in this article.
Read in the article
What to make a birdhouse from: the best materials
To clarify the dimensions of the birdhouse, a drawing for starlings must be created taking into account the characteristics of their habitat in natural conditions. It is recommended to take into account the following facts:
- Usually these birds make nests or use a hollow hollowed out by a woodpecker in a tree. They do not need excessive space, so it is enough to create a small interior space for the home.
- To raise chicks, you will need the absence of drafts, good heat and.
- We should not forget about natural enemies. Sufficient protection against .
- It is necessary to ensure ease of entry into the birdhouse and free flight.
- Unpleasant odors and fumes harmful to biological organisms should be avoided.
- The design should not contain sharp protrusions or defects that could injure the bird.
This photo shows that the birds like the unsightly-looking structure. It is made from natural materials, without varnishes or paints. In terms of its parameters, the housing turned out to be close to natural conditions, which is why the corresponding structures are called “loops”. Manufacturing is not accompanied by unnecessary difficulties. In a suitable log, remove the core and cut out a hole for the tap hole. Boards are nailed from below and above.

Birdhouse made of wood: in harmony with nature
This material is used most often, since its parameters are well suited for bird housing. However, please be aware of the following limitations.

- To obtain acceptable results, it is necessary to use sufficiently thick sheets (from 20 mm or more). It is permissible to create type-setting walls.
- Moisture-resistant varieties are suitable for outdoor use. These materials are more expensive than standard ones. But products made from them will retain their shape for a long service life.
- You should make sure that there are no adhesives or other chemical compounds that are harmful to birds or create unpleasant odors.
Birdhouse out of the box: a ready-made solution

This kit contains wooden blanks made using factory techniques. They are distinguished by high quality processing and precise dimensions. Paints and a special decorative overlay are useful for creating an aesthetic appearance. The assembly instructions will help you perform the necessary steps correctly.
Important! As a rule, such kits do not include tools. They will have to be purchased separately.

This cardboard birdhouse can be assembled in just a few minutes. Special cutouts are designed to create connections. The advantages include low cost, speed of installation operations, and the possibility of disassembly. To determine the shortcomings of such a model, it is enough to carefully study the picture:
- Lack of an additional layer that protects against moisture.
- The bird hole is too big.
- Low strength of connecting nodes.
- Overly modest appearance.

Birdhouse dimensions: what you need to consider
Above we discussed in detail questions about how to properly make a structure using different materials. After a comprehensive analysis, it is not difficult to draw a conclusion about the advantages of natural wood:
- it is an environmentally friendly, inexpensive material;
- it has high strength and good insulating characteristics;
- it is not too difficult to process it at home with your own hands using simple tools.
The last item on this list deserves special attention. Prudent owners make their homes attractive to certain species of birds. That is why it is necessary to take into account not only the physiological differences between starlings and tits, their special habits and preferences.
It should be noted right away that it will not be possible to build such a miniature object according to GOST. There are no standard reference parameters developed for the birdhouse.
Important! What dimensions of products should be are discussed below. Requirements for other parameters are also given there, taking into account the behavioral characteristics of different birds. Individual changes can be made to any drawing. But it is better if they relate only to the aesthetic parameters of the products.
Dimensions of a birdhouse for starlings
Typical design parameters are given in the following table:


When the feathered neighbors have mastered the new home, this one is removed. After this, the birds will begin to destroy harmful insects.
Titmouse: drawing and dimensions
The dimensions of the birdhouse for tits are slightly different from the previous version:

House for a wagtail: drawing and dimensions
To make the birds comfortable, the following parameters must be taken into account:
You can create drawings yourself based on the data provided in the table. But we must remember that the wagtail’s legs are better adapted for running than for clinging to vertical surfaces. It is difficult for this bird to penetrate the entrance of a standard birdhouse. For this purpose, the structure is supplemented with a “threshold”, a special platform with a width of 80 to 120 mm.


How to make a birdhouse step by step
After familiarizing yourself with the theory, you can move on to practice. This table shows an algorithm that will help you correctly create birdhouses for birds with your own hands. Drawings, consumables, and tools must be prepared in advance.
| Photo | Procedure and Important Notes |
 | To make a relatively simple house for birds at home with your own hands, the following drawing of a birdhouse with dimensions is suitable. |
 | In accordance with the design documentation data, the dimensions are transferred to . |
 | Wooden blanks are cut using or with an electric drive. |
 | To make it easier for birds to move, the internal surfaces are made rough. If necessary, special notches are applied in the taphole area. |
 | The hole is made using an electric drill. Use a cutter attachment of the required size. |
 | To simplify the assembly process, thin holes are drilled at the marked points or small recesses are made. Screws are screwed into them. With the help of such fasteners, reliable connections are obtained. |
 | Assembly is performed sequentially. The workpieces are installed so that during the process of fastening them they do not create additional loads on the structure. For the product in the example, three screws on one connection line are sufficient. This is not indicated in the photo, but some craftsmen install special inserts in the inner corners. With their help, the shape of the internal space is rounded, making it similar to an ordinary hollow. |
 | A wooden rectangle with dimensions slightly smaller than the free part of the inner contour of the walls is fixed in the central part of the lid. It is fixed with five screws. |
 | Check the ease of installation and removal of the cover. If necessary, use a chisel to give the optimal shape to the parts. |
 | If you create several birdhouses, the garden will be better protected from harmful insects. To extend its service life, the product is impregnated on the outside with specialized compounds. |
Using this video, you can find out how to make a functional and beautiful birdhouse yourself:
Important! When creating any type of house, it is necessary to seal the cracks. You can use hemp for this. Working operations are performed using specialized tools and blades.
How to build a birdhouse with your own hands: step-by-step instructions
If you buy a ready-made kit, you can make your own birdhouse for birds quickly and accurately. Such kits contain precisely fitted blanks and consumables. Manufacturers' detailed instructions explain how to properly make a birdhouse. But much more interesting are the original designs.


How to decorate a birdhouse with your own hands
Questions often arise: is it possible to paint such structures? The application of impregnations and decorative coatings protects the wood from moisture and harmful bark beetles. This treatment allows the same design to be used for many years without repair. But be sure to make sure that the paints do not contain bird-repellent odors. On the other hand, they should not be overly bright so as not to attract predators.
With the correct application of original ideas, it will be possible to turn a functional object into an expressive design element. It’s easier to figure out how to decorate a bird’s house using photos of specific examples.
1 of 6
Unusual birdhouses (pictured) can be created using relatively complex technologies (1) and available materials (2). An unusual option is a good illustration of the broad capabilities of a creative person. Metal linings, like the stones in the previous version, perform certain protective functions. In order not to think about how to paint the walls, you can use ready-made images or photo printing for decoration
Article