How to extract copper from a cable. How to strip insulation from cables and wires. Cable cleaning machine. How to remove insulation with a knife
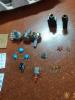
How to strip insulation from cables and wires. Cable cleaning machine. Channel "Your Own Master": https://www.youtube.com/channel/UCv8xmsH5fRuVdKFLWH9AVnQ If you have free time and access to cable and wire waste, you can clean it of insulation and hand it over, for example, to a non-ferrous metal collection facility, or you can try to make a variety of crafts from copper wire with your own hands. Look at some pretty nice decorations in the top left of the screen. When I started cleaning copper wire, I used a regular paint knife, which I first used to cut the outer insulation of the cable, then removed it. All that remained was to remove the colored insulation, which I removed in such a simple way. A knife at an acute angle cuts the insulation perfectly and practically does not damage the copper part of the wire. This is important if you decide to make crafts from copper wire. In general, this method of cleaning the insulation suited me, since the wire was single-core. However, after a while I began to think about mechanizing the removal of insulation from wires to speed up this process. From a flexible, multi-core cable, the top insulation of the cable can be removed normally, but from copper cores twisted together, removing the colored insulation with a knife is problematic. The knife cuts one or more veins and gets completely stuck, stubbornly refusing to move further. I didn’t even take such a wire, since it is almost impossible to clean it in this way. When I was faced with a large amount of thin stranded wire that was a shame to just throw away, I decided it was time to make a device for cleaning it from insulation. This device consists of two halves, between which a groove is cut. One side of the device is designed for trimming the outer insulation of the cable. On the opposite side there is also a groove, which is slightly smaller and, in turn, is designed for removing insulation directly from the copper core. Inside is the blade of a paint knife, which protrudes from the groove just enough to cut the insulation without touching the copper part of the wire. The following device is designed for cleaning the insulation of a very thin stranded wire. In a solid piece of wood, I made a longitudinal cut with a hacksaw for metal and drilled 2 holes for the bolts that clamp the knife blade between the wood. Now I will demonstrate how this works with flexible stranded wire. The blade makes a cut in the insulation and does not catch on the wire, which is impossible to do with a paint knife. All that remains is to separate the insulation from the copper with a slight movement of your hands. Let's take a closer look at these devices. The halves of this device are fastened with self-tapping screws with a press washer and hold the blade together. The wire, passing through the groove, touches the tip of the blade and cuts the insulation. This device can use blades that have become dull and are no longer suitable for other work. By breaking off part of the blade, its tip becomes sharp enough for our purposes. As a last resort, the tip of the blade can be slightly corrected with a diamond file. We assemble the device. We tighten the screws and set the blade to the desired depth of cutting through the insulation. To remove the outer insulation of the cable, we extend the blade a little more, since it is thicker; to remove less insulation from the wire. Then we tighten them until the blade is completely fixed. These devices are safe because the blades are in a groove. They can be carried without additional protection. I made a device for a thinner wire from a single piece of wood, in which I cut a longitudinal groove with a hacksaw. One side of the groove is lower than the other and is made to fit the shape of the blade. The process of installing the blade in this device is similar to the previous one. Remember to adjust the blade so that it only cuts the insulation and does not touch the copper strands of the wire. This is necessary so that the blade does not dull so quickly. And for making crafts from copper wire, this is even important, since there are no knife marks left on the copper wire, and the thin stranded wire remains intact. Device for cleaning...
- a crucial moment, and it makes no difference what material the wires are made of or what they are coated with as an insulating material. Coated wires often have to be connected to each other before installation work, and when performing such work, you need to know how to properly remove the insulation from the wire. It is generally known that plastic insulating material is removed mechanically or by melting. The enamel coating must also be removed mechanically or chemically. When stripping wires, you must follow the rules for performing such work. After all, in the end, the connection of the exposed areas will be made with poor quality, which in the future can lead to system failure.
Removing insulation with a knife
The method of cutting insulating material in a circular direction using a knife blade is not correct. With this action, a notch is applied to the copper material of the core and in this place it can break at the most inopportune moment. This happens especially often when the wire cross-section is too thin. They break almost immediately. How to strip a wire correctly using a knife?
Note! It is necessary to place the knife almost in the same plane with the axis of the cable.
In this case, the insulating material is cut along the conductive material. The remaining pieces of coating are set aside and also removed.
We use side cutters

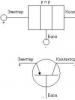
With this method, many often make the same mistake. The tool is taken without taking into account the direction of the cutting edges and begins to work. If the tool side is sharpened in the direction that coincides with the movement of the side cutters, then when removing the shell of the insulating material, a decent amount of force must be applied to close the edges of the tool. In this case, we risk cutting through the entire wire, and not just the insulating surface.
Note! You should position the tool so that the sharpening side faces in the opposite direction from the movement of your tool.
It will be necessary to create a slight reinforcing effect, and the insulation will be removed with a characteristic tube. In this case, the wire is guaranteed not to receive even the most minimal damage.
Reflow method for insulating material

It is great if you need to prepare a thin wire for installation that has a plastic safety material. An electric soldering iron is perfect for these purposes. The tool must be heated and its tip lightly passed over the insulation in the place you need. Under the influence of temperature, it will heat up and in some places even melt. After this, it can be removed by hand without any problems. The copper core of the wire will not receive mechanical damage. When working with a large number of wires sheathed in plastic material, it is recommended to use a special device. Usually it is a wood soldering iron. This method of removing insulation is great when working with old electrical wiring. After all, after prolonged use, the plastic coating of such wires becomes very hard. If necessary, you can use a lighter or regular matches.
Removing the enamel coating

In such a situation, it is recommended to use the mechanical method. You can remove the insulating material using sandpaper, or you can simply scrape it off with a knife. The sandpaper must be wrapped around the wire and twisted until the insulating coating is removed. When using a knife, the wire must be placed on a hard surface and gradually rotated around its axis, scraping the surface with the knife. If the wire diameter is not too large, it is better to use the thermochemical method. You will need a soldering iron known to us and a piece of vinyl chloride tape. Under the influence of heat, the released chlorine is able to clean the wire from the enamel applied to it. This method is excellent for radio amateurs working with high-frequency coil windings. Another little secret is a simple aspirin tablet. You need to put the cable on it, press it with a heated soldering iron and pull it along the tablet. The insulation will be perfectly removed, and the wire will receive additional tinning.
Removing fluoroplastic insulation

This is a type of polymer coating that has good stable characteristics. The insulation coating is ideal, but quite expensive. It is customary to use it only for design calculations. This coating looks like a thin narrow tape tightly wrapped around a copper conductive wire. Only physical impact is suitable for removal. It is best to remove it using a sharp knife by scraping the surface layer to the required working length. Having exposed one edge, the wire is carefully bent to the side and the remaining insulating piece is cut off.
Note! If you come across a cable that has a rubber or fabric insulating surface, you can use any of the mechanical methods to remove it. The main condition is to strip the wires correctly, without notching them.
Application of an automatic stripper

Manually stripping large quantities of wires can be quite time consuming. And if there are also wires with a large number of cores, the matter will take a long time. Here you can use a special type of pliers called a stripper.

They are quite comfortable to work with. With just a little hand pressure, the insulation is removed almost instantly. Typically, for such work in everyday life, a stripper model WS-04 from a German manufacturer is used.

Such a tool has the ability to cut through and remove insulation from wires with a diameter ranging from 0.5 to 2.7 mm. This is without pre-adjustment.

When performing adjustments, you can work with wires of a much smaller cross-section without damaging the integrity of the conductor cores.
There are various wires and cables, some are laid according to a standard scheme, others are laid over the air. It is the former that have a special protective layer that prevents short circuits. Such a surface is subject to dismantling in the process of performing the simplest tasks. For example, this is the connection of two cables so that the contact point becomes as tight as possible and works efficiently.
The question arises: “How to remove insulation from wires?” To make this process easier, there are many different techniques and techniques. Because it is not always necessary to completely disassemble the cable; sometimes you just need to clean the contacts without damaging the main core.
In order not to make mistakes and understand exactly how to remove insulation from a wire, you should arm yourself with instructions and take the correct recommendations as a basis. But without the proper tools, the work will not be completed. In addition, wires and cables may have different bases, and the methods differ accordingly.
Features of stripping insulation and problems in performing the work
Before stripping the insulation from the wires, it is worth considering some of the nuances of the process. After all, the coating can be in one layer or several. The work is done quickly, but this will require the use of a stripper.
If you don’t go into details, many people don’t see any difficulties in the procedure for cleaning a cable or wire from protection. But without sharp, cutting objects, the work will not go smoothly. As a result, there is a possibility of compromising the integrity of the wire itself. The following may happen:
- Formation of holes in unnecessary places.
- There is a possibility of getting hurt.
- Damage to the conductor itself.
All this can be easily eliminated if simple and precise instructions for implementation are taken into service. In addition, special tools are required. There is no need to rush, even if you have experience in completing the task. It is worth at least theoretically understanding how to remove insulation from wires with a tool.
What kind of wires are there?
There are two main cores used in the process - copper and aluminum. If you remove the insulation, you will have to be careful with each type and take your time. When it comes to strength, copper retains its integrity longer than aluminum. Below we will consider the properties and characteristics of each.
Aluminum:
- Density is expressed in t/m3. More than 2.6.
- There is no resistance to frequent bending.
- It will not be possible to create a multi-wire core.
- The specific resistance is negligible.
- Density is expressed in t/m3. More than 8.8.
- Resistance to frequent bending is present.
- It will be possible to create a multi-wire core.
- The resistivity is good.
From these data we can conclude that copper wire is better and its conductivity is higher. But aluminum does not have a high level of reliability, so it is used less often. Great care will have to be taken during the cleaning process. Therefore, before removing the insulation from a copper wire, it is worth making a small notch and preparing the appropriate tool. There are not many options for working with cables and wires; it is important to choose not just a suitable method, but an effective one.

What methods are effective?
Most of the skill in removing the protective layer from a cable or wire comes with time and practice. Especially when you need to do cleaning on the thinnest possible wire.
The main thing is to correctly choose the degree of application of force and pressure on the tool. In addition, the speed of work and the final result depend on the direction of movement. You will have to understand how deep the main vein is. This will determine whether it is damaged or not. Before you remove the insulation from or copper, you will have to figure out what kind of material is inside.
The simplest options for doing the job:
- Using a stationery or regular knife. If you chose the first option, then you should not take one that is too large, they are inconvenient to work with. The pressure should not be maximum, since their blade is quite sharp. A simple knife should have a narrow blade and high-quality sharpening.
- Using side cutters. This is a convenient design, it is similar to scissors, but more durable and sharp. They are sold at any hardware store, although many always have them on hand.
- Burning. This is another good option and less dangerous. To do this, you need to apply high temperature so that the winding melts. If you need to make a small release, then this method is ineffective, since a fairly large area is burned.
- Using a stripper. This is the tool chosen by professionals.
Using a knife
How to quickly remove insulation from wires? This is the most common and effective method, but it is very traumatic. When you need to process a small number of wires at home, this option is quite suitable. The main thing you need to know is at what angle to hold the tool. You can’t do circular movements, because it’s completely ineffective. Because with this option there is a high probability of cutting the main working core. After this, the wires will become unusable.

The angle of inclination is as sharp as possible so that the blade does not penetrate deeply into the body of the wire. Only minor slipping is allowed. You should choose the “pull away” position - such conditions are safe for the worker and for the cable itself.
Electrician's knife
An electrician's knife is the most convenient tool. It has a heel, making it quite easy to hold. At the same time, the core is protected as much as possible, your hands are safe, and the insulation is removed efficiently. This is the answer to the question: “How to quickly remove the insulation from a copper or aluminum wire?”
Side cutter - effective help
This is a metal tool with comfortable handles. But most often the work is done by craftsmen. This process requires knowing how much force to apply, otherwise the main core may be damaged. Electricians know how to carry out the stripping process. The side cutter is used in several cases:
- When the cable is too thick, biting is done in several places along the entire length, and then the insulation is removed by hand. This option is quite suitable for inexperienced people. But the cuts must be made carefully so as not to violate the integrity of the main cable.
- You need to run the strip along its entire length, and then remove the main winding downward.
- Through a distance of 3 centimeters, cuts are made with a side cutter. After which you need to remove the winding in small pieces.
These are the simplest options for people without experience and more. Craftsmen can easily work with this tool. This option will help you easily remove the insulation from the wire for scrapping. To avoid damaging the main core, it is worth holding the sharpened jaws in the opposite direction of pulling and removing the insulation. This allows you to not disrupt anything and get the job done quickly.
Today there are wires on sale on which the manufacturer makes special notches during the creation process so that the insulation can be quickly removed. Therefore, before stripping the insulation from a copper wire, it is worth considering it: you may not even need tools.
Burning
This is the easiest way when you need to remove insulation to transfer wires. This is also the most effective method if the inside is made of polyvinyl chloride. When a small area needs to be treated, use a lighter or soldering iron. Under thermal influence, the winding softens and it simply comes off the wire. If the winding thickness is small, this option is the most effective.
There is one drawback - it has a smell. Therefore, work must be carried out in a room with access to fresh air. Toxic emissions during the firing process negatively affect the body.
What is a stripper?
These are the tools that help you do the procedure quickly and efficiently. But not every cable is suitable for such work. The cross-section must be at least 0.2 mm. You can find various types of devices on sale or from craftsmen:
- Manual stripper without add-ons. Its use is similar to working with a side cutter: notches are made, after which the winding is removed. But this option is not suitable for every section.
- Semi-automatic At the base there is an adjustment lever that regulates the degree of pressure, after which, when the handles are closed, the main process of stripping begins.
- Machine. This is the best option because it is based on several functions - cutting, stripping, crimping conductors.

As a result, this method brings many positive aspects. The main thing is that cuts in the main core are completely eliminated. As a result, this method can be called the best. It is the stripper that allows you to properly remove insulation from wires without damaging the core.
Cable check
When work is underway to get rid of the winding, you need to carry out actions in a clear sequence. Each cable has its own characteristics. Work on a copper cable should be carried out in the following order, since it has two layers of PVC insulation:
- Electrical power is cut off.
- During the installation of the outlet, only a strictly defined area needs to be cleaned. 15 cm is quite enough. A person without experience should not reduce this distance. A side cutter is used for this procedure.
- The top part is cut and carefully removed.
- The required length is set on the stripper, after which the phase and neutral conductors are placed in the tool. A complete cleanup is being done.
This is the entire scope of the work, after which you need to fix the socket. This procedure is not difficult to carry out, although mistakes are often made. The wire breaks, and further stripping has to be done.
How not to perform pressure testing?
Experts believe that removing insulation from cables and wires is not so easy. As a result, many mistakes are made that lead to the main core being undercut. The main reason is the use of the wrong tool. Therefore, there is a special list of those violations that are worth knowing not only for beginners, but also for masters:
- When the top layer is removed and it needs to be cut, the craftsman often chooses the wrong angle, which leads to notches on the main core. Even a slight, imperceptible notch in the insulation of a current-carrying cable leads to a short circuit, and sometimes to complete failure of the entire device.
- Incorrect use of side cutters. They have a sharp side and a blunt side, often choosing the wrong side. As a result, a sharp sliding along the wire occurs, which leads to excessive tension and compression, and this already violates the integrity of the main core.
- A knife with a heel is convenient, but it must be clearly directed, namely, choose the angle of inclination. A mistake made leads to the main cable being cut. And violation of secondary insulation causes more serious problems.

Everything happens due to an illiterate choice of tool. But there are also other problems: a frivolous attitude towards the procedure of clearing the main cable or wire from the winding. Before removing the insulation from a thin wire, you should know what actions you will have to perform, and do everything carefully and in a clear sequence. There are situations when the distance for work is minimal and it is unacceptable to take risks.
We repair headphones
A common problem when using headphones is a violation of the integrity of the wire. To restore it, you need to choose a simple stationery knife for the job. The procedure occurs in several stages:
- It is necessary to find the breakdown.
- Remove the top winding by making a neat longitudinal cut.
- Connect the components and insulate them.

How to remove wire insulation from headphones?
You can use a sheet of sandpaper. Its grain size does not matter (the main thing is to perform work on the front side of the element). Place the edge of the wire on sandpaper and press on top with a soldering iron. It will melt our winding. Then its remains can be removed by hand. As a result, we get a wire without insulation. After this, you can make the connection using the same soldering iron. This is not a long procedure, but everyone can achieve a positive result. There is no need to experiment; each tool does its job. When working with wires and cables, use a sharp knife and a stripper; in other situations, it is worth selecting the appropriate devices.

Conclusion
So, we looked at how to properly remove insulation from wires. As you can see, there are different tools and methods. You just have to choose the most suitable one and follow the instructions.
All wires and cables (except those laid over the air) have a protective layer called insulation, which prevents the conductors from shorting to each other or to the surface in contact. Work on installing electrical wiring, connecting equipment or drawing up electrical circuits is accompanied by the removal of this layer in certain areas to ensure reliable contact at the switching points. To make this process as convenient and safe as possible, there are a number of techniques that allow you to quickly and efficiently perform stripping, eliminating damage to the current-carrying core. In the article we will tell you how to remove insulation from cables and wires correctly, and we will consider clear methods.
Subtleties of stripping insulation and difficulties encountered during this process
The insulating coating can be single or multilayer, which can affect the choice of method for its removal and the devices used for this, from a simple stationery knife to a multifunctional stripper.
 The correct choice of tools greatly affects the quality of the work performed.
 The operation of removing the protective layer from a wire or cable may seem simple and straightforward, accessible to anyone. However, you must remember that these activities are accompanied by the use of cutting tools, which can damage the conductor itself, reducing its cross-section or breaking the insulation in an unnecessary place, as well as getting a cut as a result of improper use.
To avoid such situations, safe working methods and special tools have been developed that greatly facilitate the cutting of wire ends, minimizing the risks that arise. The purpose of this publication is to familiarize the user with these developments. Read also the article: → "".
Difference between copper and aluminum wires
Care is required when working with any conductor, but it should be remembered that aluminum conductors are more fragile compared to copper analogues and have a smaller margin of safety under bending loads. This is due to the technical characteristics of the material used in the product:
We can conclude that aluminum products are inferior in strength and have lower conductivity. Therefore, it is important to avoid damaging them during stripping to prevent further degradation of performance.
The most common methods of removing insulation
When stripping current-carrying conductors, the presence of certain skills that are acquired only through practice plays an important role. This is especially true when handling thin conductors, where every wrong movement can lead to refraction.
Practical experience allows you to select the required force for pressing the tool, the angle of its application and the direction of movement in order to affect only the sheath of the wire, and not its core.
Among the popular methods of removing insulation, the following should be noted:
- using a knife;
- use of side cutters:
- exposure to high temperature;
- using a stripper.
Each of the methods listed may be applicable in different circumstances, and deserves a detailed description.
Removing braid with a knife
Using a knife is the most widely used option, common among DIYers who only occasionally need to cut wires. In this case, it is important to choose the correct blade angle. It is unacceptable to make a circular cut in the sheath, placing the cutting edge perpendicular to the conductor. This will inevitably lead to damage to the secondary insulation or a notch on the current-carrying core, which may subsequently cause it to become brittle. Read also the article: → "".

The knife should be brought to the conductor at the most acute angle, practically sliding along the insulation, and act only in the “away” direction, which will make the process safe for both the product and the user.
Practical recommendation: An excellent tool for removing the top layer of insulation is a knife with a heel, which is called an “electrician’s knife.” Its design allows you to quickly remove the cable insulating layer, avoiding damage to the cores.

Using side cutters to strip wire
Such a tool can only be used by experienced electricians, because any excess force will lead to either the wire being bitten off or damaged. There are two options for using side cutters:
- When working with a large cross-section conductor, the insulation is “bitten” from different sides, after which it is simply removed from the core
- The shell is clamped and cut through the cutting edges of the tool, after which it is pulled together with an axial movement to the side.
The second option requires special attention and accuracy.
It is important to know: the sharpening side of the side cutter jaws should be directed in the direction opposite to the direction of tightening the insulation being removed. This will make it possible to achieve success without using excessive compressive force, and will reduce the risk of cutting the wire.
Some brands make products with provided notches for safe removal of insulation from conductors of a certain cross-section, which makes it easier for household use.

Removing insulation using high temperature
This method is suitable for cable and wire products that have an insulating coating of current-carrying conductors made of polyvinyl chloride. High temperatures can be created with a soldering iron or lighter. Under its influence, PVC loses its density and is easily pulled together with your fingers. Unfortunately, this method is only suitable for wires with a small cross-section.
Another disadvantage of this method is the fact that it is applicable only if it is possible to provide access to fresh air for ventilation, because the combustion products released can be unpleasant and even harmful.

Using a special tool - stripper
Tools like strippers make stripping wires a simple and safe process. The tool provides the ability to work with cables and wires of a certain size. For example, WS-04B capable of stripping conductors with a cross-section range from 0.2 to 6.0 mm². Read also the article: → "".
The following types of strippers are distinguished:
- simple manual - its operating principle is similar to the operation of side cutters that have notches for a certain cross-section of conductors;
- semi-automatic - has adjustment of the length of the exposed ends and removes insulation from the cores when the handles are closed;
- automatic - carries out several operations at once: trimming, stripping, twisting and crimping conductors.
The use of a stripper eliminates damage to live conductors and disruption of insulation in unintended places, which makes its use the most universal of the stripping methods under consideration.

Step-by-step instructions for stripping cables
Quite often, when cutting cables before connecting them, several tools are used. For clarity, you can consider the sequence of actions when preparing a VVG or PUNP cable, which has a double PVC coating for installing a plug socket:
- Before starting work, you must make sure that there is no electricity.
- Using side cutters, a wire length convenient for termination is ensured (when installing a socket, it is no more than 120-150 mm)
- Using a knife with a heel, a longitudinal cut is made in the upper shell, after which it is removed
- The phase, neutral and RE conductors are alternately placed in the stripper and stripped of the insulating layer to a predetermined length.
The most common mistakes
The majority of mistakes made when stripping wires and cables are made as a result of using inappropriate tools or violating the rules for using them.
Among such shortcomings the following can be noted:
- When removing the top insulating layer, when cutting it, the knife is used with excessive force at a right angle. The error lies in the fact that in these there is a threat of damage to the insulation of current-carrying conductors, which can lead to a short circuit of the wire to the body of the electrical appliance or to a short circuit of the conductors among themselves.
- The use of side cutters is carried out on the wrong side of the tool (meaning the sharpening side). The error consists in the possible slipping of the wire between the cutting edges and the need to compress them more tightly, which can lead to the core being bitten.
- Using a knife with the heel at the wrong angle. An error can cause disruption of the easy sliding of the heel along the conductors of the wire, its “burrowing” and damage to the secondary insulation in the wrong place.
Proper and careful use of the tool will help to avoid such problems when working with cables.
In conclusion, I would like to note that each tool must correspond to its intended purpose. To remove insulation from wires and cables, such tools are a knife with a heel and a stripper. Other devices must be used with the utmost care and attention. The tips and tricks given in this publication will help you avoid mistakes when stripping wires.
How to strip insulation from a wire? This question has worried every person at least once. But before you begin to study the methods for carrying out this procedure, you need to understand the purpose of this layer for the cable.
Stripping may be necessary in cases where it is necessary to install an outlet or switch. And there can be a huge number of such examples.
Purpose of insulation in wires
This layer helps prevent short circuits that can occur between conductors.
Insulation is divided into:
- single plastic
- multilayer
For the latter option, fabrics, non-flammable dielectrics or resins are used.
Traditional household wire is a cable of small sections. Removing the insulation quickly from a standard cord, as a rule, does not cause any particular problems. The easiest way is to use a tool such as pliers. To do this, they grab one cable core and carefully, so as not to get hurt, draw a knife around it.
As a result of using tools with rotational movements, part of the insulation is eliminated - the cable is exposed. This option is perfect if, when installing switches and sockets, it suddenly turns out that the wires are too short. In this case, removing the insulation using available tools will be as easy as shelling pears.
Some tips to quickly remove insulation from a cable
Quite often situations arise when even a true professional is confused. For example, a visual inspection showed that the charger had damaged wires going to the plug.
The main problem is:
- thin cable section
- its versatility
- pouring wires into a continuous braid
In this case, the insulation is not just a protective layer, but a channel consisting of two or three chambers.
On the one hand, the repair method is obvious. On the other hand, the question of how to quickly remove the insulation from a cable is not clear.
Experienced specialists advise using a razor cassette as a special tool. Only one element will be needed - a thin blade. In this case, you need to secure the cable well in a vice. If they are missing, a clamp from a table lamp will do.
To remove the insulation quickly, you need to divide the cable into cores. This must be done extremely carefully so as not to damage the structure of the cores. There is no need to rush in this matter. Otherwise, you may make a cut that is too deep. At the end of this stage of work, you need to pick up part of the insulating layer with your fingernail and slowly remove it from the core. Careful handling of the wire will prevent it from being torn or damaged. When removing insulation, it is very important not to cut the remaining wires.
The second situation when it is necessary to remove the protective layer from the cable is loaded sections of electrical networks.
The most striking examples are:
- inner filler insulation layer
- rigid and dense outer insulation
- fabric insulation impregnated with a resin composition
- individual insulation of all cores
To remove the protection, you need to remove the outer shell using a tool. For this purpose, a shallow cut is made along the cable. Using pliers will allow you to remove the wires. This must be done one piece at a time, otherwise you will have to remove the inner fabric or fill. The remaining part of the outer insulating layer simply needs to be cut off.
Tools used for wire stripping
To strip the insulation from the cable, some people are content with a regular kitchen knife.
But it is best to use the following tools:
- cutter equipped with sharp new blades
- any type of pliers
- scissors used for cutting thick wires and metal
- a clamp or a small vice
To create a reliable and safe connection of wires, it is better to use special terminal blocks.
If it is necessary to remove the protective layer from a cable consisting of thin wires, these tools can damage them. Therefore, if possible, it is better to do without removing the insulation.
Without removing the protective layer, separate the wires and create contact using a crocodile with teeth. In this case, the reliability of the connection is ensured not so much by removing the insulation as by puncturing it. In most cases this is quite enough.
Working with electric current should not be considered too simple. Even if you know exactly what tools need to be used to remove the protective layer from the wires, you need to remember that damage to the wire will eventually lead to its breakdown and, as a result, failure.
If you have removed a little more insulation than required, cut off the excess using a suitable tool. Leaving exposed wires is too dangerous.
There is no need to purchase special tools to remove the protective layer from wires. As a rule, they are useless. And in most cases people use simple means at hand.
When working with tools, you must be careful and do all operations slowly. It is better to push the insulation slowly when removing it from the cable. This will prevent damage to the core.
During the work process you should be extremely careful. As practice shows, electrical problems often begin exactly where the protective layer was removed, because it is difficult to notice microscopic damage to the conductors the first time. It’s better to spend a little more time right away, but do everything carefully, rather than later correcting your own mistakes at a large financial cost.
The best option is to call an electrician on the website youdo.com. The order is placed easily and quickly, the contractor will promptly arrive at the specified address and remove the insulating layer professionally and inexpensively.